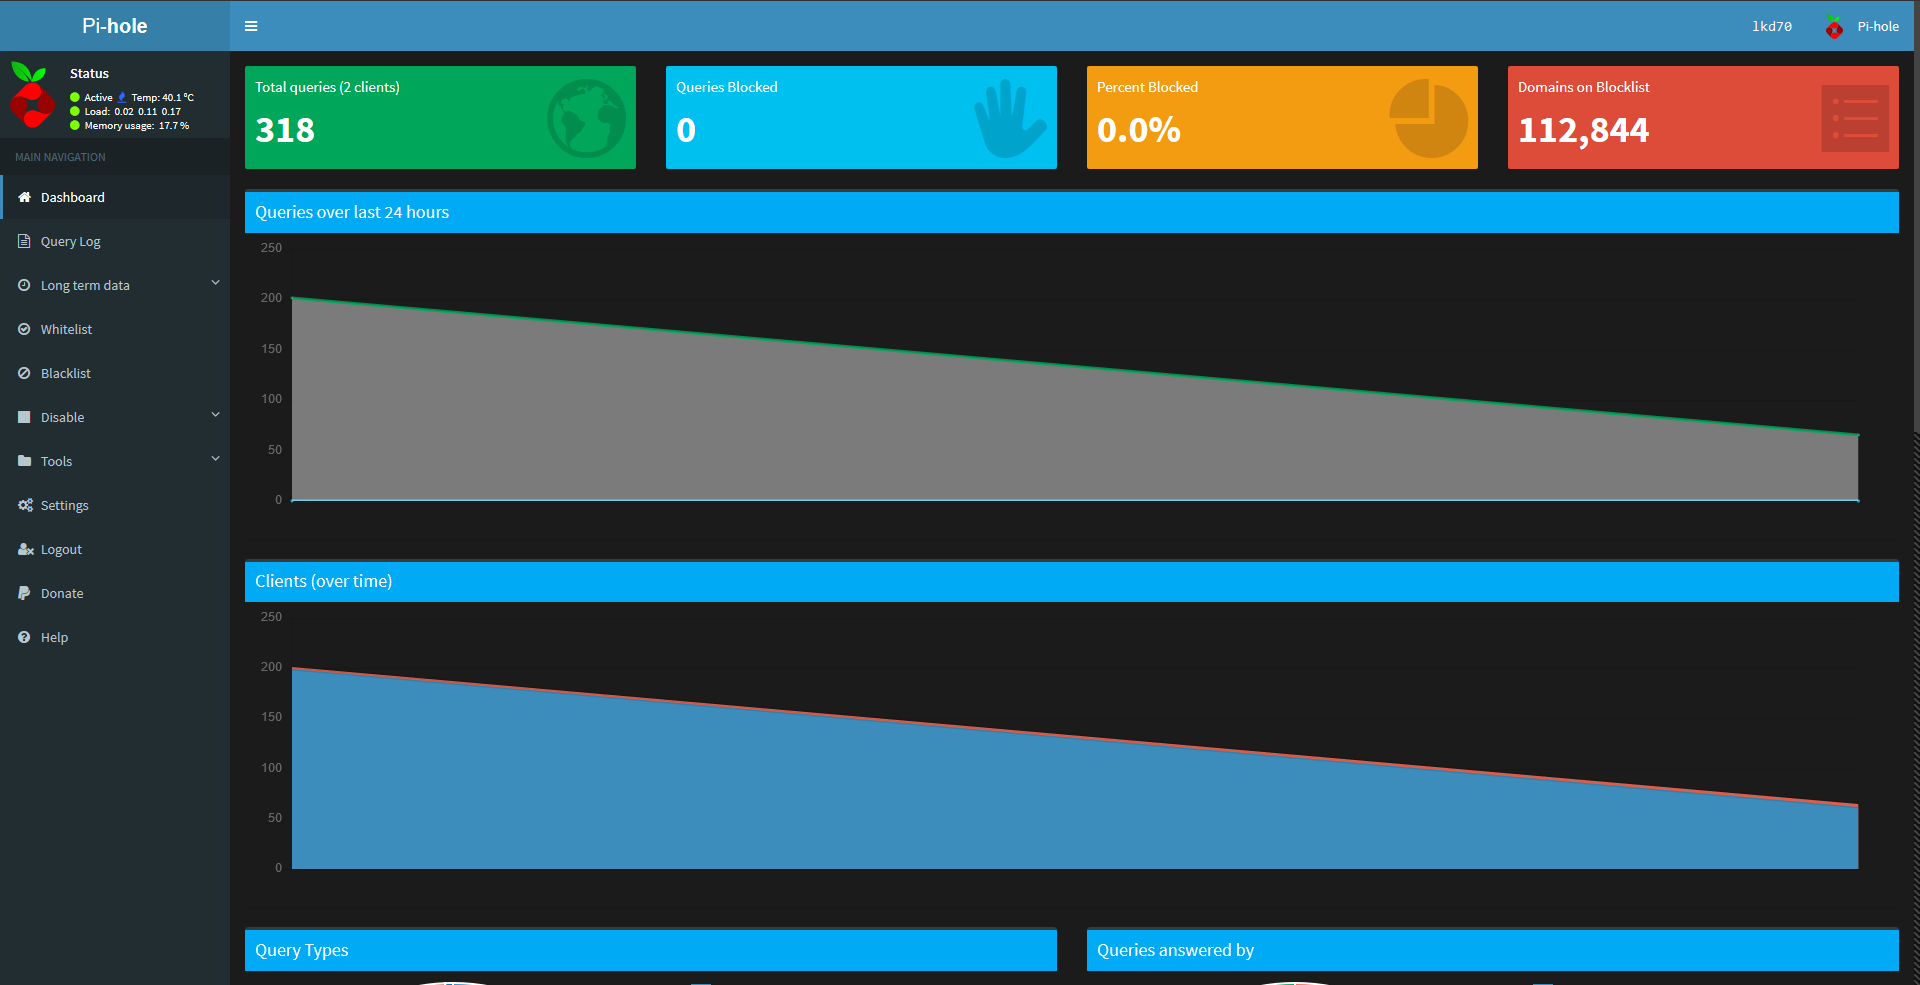
Not a fan of the style? Sorry to hear, please feel free to leave some feedback on the Official Thread. Sadly this theme isn’t for everyone, so here’s a simple method to restore the origional beauty of PiHole:
open a terminal (or SSH if you’re remoting in) ( Ctrl + Alt + T )
Something you’d like to see? Or maybe there’s an incompatibility with a newer version of pi-hole? Please open an issue or make a pull request!
FAQ
Q: Yuck! Why is the background still white??!? How could you do this to me?
First of all, I’d like to say sorry for your eyes, I’m sure they hurt the way mine did upon first seeing that sight.
Let’s look at two possible solutions to this.
1. Create your own pretty background image! (or grabbing one from a background tile/pattern website)
You can easily replace the ugly image in /var/www/html/admin/img/boxed-bg.jpg with a pretty dark one.
2. To hell with the box! View the website without the 4:3 boxed view.
You can change to a wide-view from the admin website by navigating to: Settings -> API / Web Interface -> Web interface settings and un-checking the Use boxed layout option.
Q: I’ve installed the theme and nothing has changed? Is this a scam? I want my money back!
Refunds cost $1 each, please contact me at totallylegitemail@contact.com
(Have you tried refreshing your browsers cache? Chances are it’s still grabbing the old files)
Credits
All credits to the original creators of these files, I am merely an editor.
All credits to the Pi-Hole Team for their great platform.
Do follow the individual licenses of these files as supplied by the authors.
Graphsurge: Graph Analytics on View Collections using Differential Computations
Graphsurge is a new system for performing analytical computations on multiple snapshots or views
of large-scale static property graphs. Graphsurge allows users to create view collections, a set
of related views of a graph created by applying filter predicates on node and edge properties, and
run analytical computations on all the views of a collection efficiently.
Differential Dataflow can incrementally maintain the results for any general computation, including
cyclic or iterative computations (which include many graph algorithms such as
Connected Components. Analytical
computations in Graphsurge are expressed using Differential operators and enables reusing
computation results across the views of a collection instead of running computations from scratch
on each view. This results in huge savings on the total runtime.
We use the Timely execution engine to seamlessly scale both the materialization of view
collections and running analytical computations to a distributed environment, similar to using
other execution frameworks such as Spark or
Flink.
Graphsurge stores view collections using a form of delta encoding,
where the data for a view GVi represent its difference with the previous view GVi-1.
This representation can also be directly used as inputs to Differential Dataflow computations.
In general, the runtime of a black-box differential computation (such as the
user-defined computations in Graphsurge) is correlated with the total number of diffs of a view
collection. Graphsurge enables 2 key optimizations based on this observation:
Collection Ordering: The total number of diffs of a view collection depends on the order the
views (similar views placed next to each other will generate less diffs) and we want to reorder
a given set of views to get the lowest number of diffs. This Collection Ordering Problem is related
to the Consecutive Block Minimization Problem, which is NP-Hard! Graphsurge solves this problem
using a constant-factor approximation algorithm (resulting in up to 10x less diffs
in our experiments).
Adaptive Collection Splitting: Maintaining computation results unsurprisingly implies an
overhead for Differential Dataflow, as it needs to check the entire history of a
key to determine the effect of a new update. This overhead is especially large for cases where the
number of diffs of a view are high, or for computations (like PageRank) which results
in a large number of output changes even for small number of input updates. In such cases, it is
faster to run the computation on a view from scratch instead of trying to reuse results from
previous views.
Graphsurge keeps track of the correlation between the number of the diffs and the
actual computation time when running differentially and also when rerunning from scratch. It uses
a linear regression model to adaptively decide at runtime to split the view collection at the
point where rerunning from scratch is predicted to be faster than to continue running
differentially.
More details on our techniques and experimental results can be found in our paper.
Using Graphsurge
Graphsurge is written in Rust. To run the Graphsurge cli, download and build
the binary:
graphsurge> LOAD GRAPH WITH
    VERTICES FROM 'data/small_properties/vertices.txt' and
    EDGES FROM 'data/small_properties/edges.txt'
    COMMENT '#';
Create a view collection:
graphsurge> CREATE VIEW COLLECTION Years WHERE
[year <= 2000 and u.country ='canada' and v.country ='canada'],
[year <= 2005 and u.country ='canada' and v.country ='canada'],
[year <= 2010 and u.country ='canada' and v.country ='canada'];
Run computations:
$ mkdir bfs_results
graphsurge> RUN COMPUTATION wcc ON COLLECTION Years SAVE RESULTS TO 'bfs_results';
Running in a distributed environment:
To run Graphsurge on multiple machines, say on 2 hosts server1 and server2, start
Graphsurge and set the process ids:
# On server1
graphsurge> SET THREADS 32 AND PROCESS_ID 0;
# On server2
graphsurge> SET THREADS 32 AND PROCESS_ID 1;
Then run the same queries on both of them. Make sure that server1 and server2
can access each other at the specified port.
graphsurge> LOAD GRAPH WITH
VERTICES FROM 'data/small_properties/vertices.txt' and
EDGES FROM 'data/small_properties/edges.txt'
COMMENT '#';
graphsurge> CREATE VIEW COLLECTION Years WHERE
[year <= 2000 and u.country ='canada' and v.country ='canada'],
[year <= 2005 and u.country ='canada' and v.country ='canada'],
[year <= 2010 and u.country ='canada' and v.country ='canada']
HOSTS 'server1:9000''server2:9000';
graphsurge> RUN ARRANGED_DIFFERENTIAL COMPUTATION wcc on COLLECTION Years
HOSTS 'server1:9000''server2:9000';
The same process can be repeated for additional hosts machines.
Writing new computations:
Graphsurge already has implementations
for a set of common graph algorithms. New computations can be written using the Analytics
Computation API. You can see examples of how to use the API for
bfs and scc.
Check the experiments folder for examples on how to use Graphsurge.
Late 2014, I initiated an MQTT client library for Scala side project.
My purpose was to learn me some Akka while trying to deliver something potentially useful. I quickly
found the excellent scodec library to encode/decode MQTT protocol frames, making
this part of the work considerably easier, with a concise and very readable outcome.
More recently, while getting more and more interest in pure functional programming in Scala, in had the chance to see
this amazing talk on Skunk from @tpolecat. It’s about
building, from the ground up, a data access library for Postgres based on FS2 and… scodec.
Oops!… I did it again.
I rushed to Skunk, which as been inspirational, and took the opportunity of the
lock-down days, around april 2020, to learn a lot about cats, cats effect
and of course FS2. I even found the integration between FS2 and scodec, scodec-stream,
to be utterly useful.
With all these tools at hand, and the book Practical-FP in Scala: A hands-on approach
on my desk, it has been quite (sic) easy to connect everything together and build this purely functional Scala MQTT
client library.
Current status
This library is build in the tagless final style in order to make it, as much as possible, IO monad agnostic for the
client code using it. It’s internals are nevertheless mainly build around FS2, cats effect typeclasses and concurrency
primitives.
It implements almost all the MQTT3.1.1 protocol, managing (re)connections and in flight messages, and allows interacting
with a Mosquitto broker. It does not support MQTT5 and, to tell the truth, this is not even envisioned!
Still, there’s work ahead:
finer grained configuration (e. g. number of in flight messages)
In case you want to easily give a try to this library, without the burden of adding resolvers, there is a release synced
to Maven Central. In this case just add,
It should work seamlessly with various compatible IO monads: Cats Effect IO
of course and ZIO as it supports cats effect typeclasses. Monix used to be supported as well, but
since version 1.0.0 and the migration to cats effect3.x, this is no more the case.
More and more large multimodal models (LMMs) are being released from time to time, but the finetuning of these models is not always straightforward. This codebase aims to provide a unified, minimal structure for LMM finetuning. Key design ideas include:
the components of the finetuning process (e.g., model loading, data collating) are abstracted, allowing one to easily integrate the latest LMMs into this codebase and finetune them with minimal effort;
for all LMMs the 🤗huggingface’s official implementation is used, so that after finetuning one can do inference and everything else in the exact same way as earlier with the HF model;
the codebase is kept as simple/lightweight as possible, so that it is easy to understand and modify.
The codebase is quite flexible. It supports the finetuning of various types of LMMs, including:
See supported_models.md for the full list of supported models. For training strategy, 1) full-finetuning, 2) lora, and 3) q-lora are supported for the LLM component, while 1) full-finetuning and 2) lora are supported for the vision encoder/backbone.
What’s different from other training frameworks, e.g., LLaMA-Factory, xtuner, swift?
These are great projects/frameworks with large scale and high-degree optimization. However, due to their scale and complexity, they could be less transparent and less easy to get started (e.g., I personally feel quite lost when trying to use those frameworks, with a bunch of questions like “how should I format my data”). This codebase (lmms-finetune) is instead designed to be lightweight and simple, meaning that it’s much more likely for you to quickly get started and be able to know almost every detail of the training process if you want. In other words, this is a minimal workable codebase that supports LMM finetuning, while facilitating quick experiments, flexible modifications, and easy integrations of new models.
News
2025/01/27: Qwen2.5 family is supported in the transformers-4.49.0.dev0 branch. At the moment you would need to install the latest transformers from github.
2024/12/16: Thanks to the contribution from lavinal712 (Yuqian), training with Llama-3.2-Vision is now supported. Also there is a useful script merge_lora_weights.py added.
2024/10/16: We added LLaVA-Onevision. See a caveat when using LLaVA-Onevision here. Also we updated the collators to stay in line with the new processing of LLaVA models in transformers.
2024/08/28: Finetuning with gradio webui interface is supported. Try python webui.py.
2024/07/30: Finetuning of vision encoder and projector is now supported.
2024/07/25: Several things are improved. We have 1) released a colab notebook demonstrating a full, successful training run with LLaVA-NeXT-Video-7B (happy to hear from people that they succeeded in their cases too); 2) supported having text-only samples in the training set (see this for one note).
2024/07/20: Initial release of the codebase. More models and optimizations are coming soon. Stay tuned!
Installation
# clone this repo
git clone https://github.com/zjysteven/lmms-finetune.git
# set up a conda environment
conda create -n lmms-finetune python=3.10 -y
conda activate lmms-finetune
## this will install the latest version of torch## feel free to change it to a specific version
python -m pip install -r requirements.txt
## optionally install flash attention
python -m pip install --no-cache-dir --no-build-isolation flash-attn
Usage
A workable example training run (of LLaVA-NeXT-Video-7B) is showcased in this colab notebook, which is a good starting point to get a sense of how to use this codebase. The following sections provide a more detailed guide on how to finetune a model.
0. See if the model you want to finetune is supported
Browse supported_models.md. Or run python supported_models.py, which will for example show things like
✋ Don’t see the one you want? Check out this guide for step-by-step instructions on how to add a new model.
1. Prepare your finetuning data
Similar to LLaVA, we expect the data to be in a json file containing a list of dictionaries, where each dictionary is a sample.
[
    {
        "system_prompt": "You are a helpful assistant.",
        "video": "path/to/video1.mp4",
        "conversations": [
            {
                "from": "human",
                "value": "<video>What is this video about?"
            },
            {
                "from": "gpt",
                "value": "This video shows a baby crying."
            },
        ]
    }
]
The image and video token is assumed to be <image> and <video>. We adopt this format for its readability. Our dataset implementation is general enough to support variations within this format, e.g., multiple image/video inputs in a sample, text-only sample etc. For more details, see the dataset documentation and find how flexible this json file can be. There are also mutiple example json files under example_data for reference.
Besides this json file, the actual videos and images are by default assumed to be stored in their corresponding folders, and then the paths in the json file should be relative to the video/image root folder. Or the paths can simply be absolute paths.
⚠️If you have text-only entries in your training dataset: the training is likely to fail at some point if 1) your per_device_batch_size is 1, or 2) the number of text-only instances dominate the number of multi-modal instances. This is due to a limitation/bug of deepspeed. If neither of the above two conditions is met, no worries, we got you covered.
2. Perform finetuning
Modify the sample training bash script, example_video.sh or example_image.sh (there are no differences other than different model ID and dataset filepath), to specify arguments including the target model, data path, etc. There are comments that explain each argument’s meaning. Then simply kick off the training by running the bash script bash example_scripts/example_video.sh or bash example_scripts/example_image.sh. Note that to exactly run the provided example_video.sh, you will need to download the video clips from ShareGPT4Video; see here for instructions.
📈If you prefer graphical interface, simply run python webui.py to lauch the gradio interface for finetuning.
3. Inference with finetuned model
The key here is to correctly load the finetuned model, after that everything is the same as how you would do inference with the corresponding model from huggingface. Refer to the inference documentation for more details, including how to use merge_lora_weights.py to easily obtain a standalone model. Again you can refer to this colab for a complete example.
Acknowledgements
We want to thank the huggingface team for actively integrating newest models in the transformers library. Also, the example finetuning scripts (e.g., this, this, and this) made by HF staff, Niels Rogge and Raushan Turganbay, are very helpful and lay the foundation for this codebase. We also especially thank Raushan Turganbay for her generous discussions and feedbacks on this project.
The codebase borrows from, is inspired by, or builds upon the following code, repos, and/or libraries: LLaVA, Qwen, transformers, etc.
Citation
If you use lmms-finetune in your research/project, we’d be very happy if you could 1) give us a star, 2) share this repo with others, or 3) cite this codebase:
@software{Zhang_lmms-finetune,
author = {Zhang, Jingyang and Lin, Yueqian},
license = {Apache-2.0},
title = {{lmms-finetune}},
url = {https://github.com/zjysteven/lmms-finetune}
}
Created in February 1992, Log Alpha is one of those logic or IQ test programs. It displays a series of letters, and it’s up to you to find the missing one.
The program does not generate the series itself. It comes with a game editor.
I’m providing you with the source codes for the two programs in this project, in anticipation of a new online or Delphi version.
This game was developed in Turbo Pascal to run under MS-Dos in text mode.
It’s possible that this program is compilable with Free Pascal but I haven’t tried. Units not supplied can be found in the DeveloppeurPascal/librairies-TurboPascal repository. If any are missing, please let me know so that I can add them.
You’ll find the binaries (8 bits) and dependencies in the “release” folder. This is the September 19, 1993 version. You can only run it on an MS-Dos emulator, Windows 3.x or 95. There’s no point in trying it on Windows beyond these versions.
Follow my development streams of software, video games, mobile applications and websites on my Twitch channel or as replays on Serial Streameur mostly in French.
License to use this code repository and its contents
You are generally free to use the contents of this code repository anywhere, provided that:
you mention it in your projects
distribute the modifications made to the files supplied in this project under the AGPL license (leaving the original copyright notices (author, link to this repository, license) which must be supplemented by your own)
to distribute the source code of your creations under the AGPL license.
If this license doesn’t suit your needs, you can purchase the right to use this project under the Apache License 2.0 or a dedicated commercial license (contact the author to explain your needs).
These source codes are provided as is, without warranty of any kind.
Certain elements included in this repository may be subject to third-party usage rights (images, sounds, etc.). They are not reusable in your projects unless otherwise stated.
Support the project and its author
If you think this project is useful and want to support it, please make a donation to its author. It will help to maintain the code and binaries.
A collection of Javascript based tools for Wwise, using WAAPI from your browser.
Download, unzip anywhere and open index.html to use. Alternatively available on https://waapitools.org for direct use.
1. Event Soundbank finder
This tool is used to find out in which soundbank(s) a wwise event is included, upon selection of the event in the Wwise Authoring Tool, regardless of whether the event is directly included in a bank or through the inclusion of one of its parent folders or WWU. This is designed to work around the issue of Wwise’s Reference View ignoring indirect references (a soundbank appears in an event’s references only if the event is directly included in the bank).
Usage: select an event in Wwise.
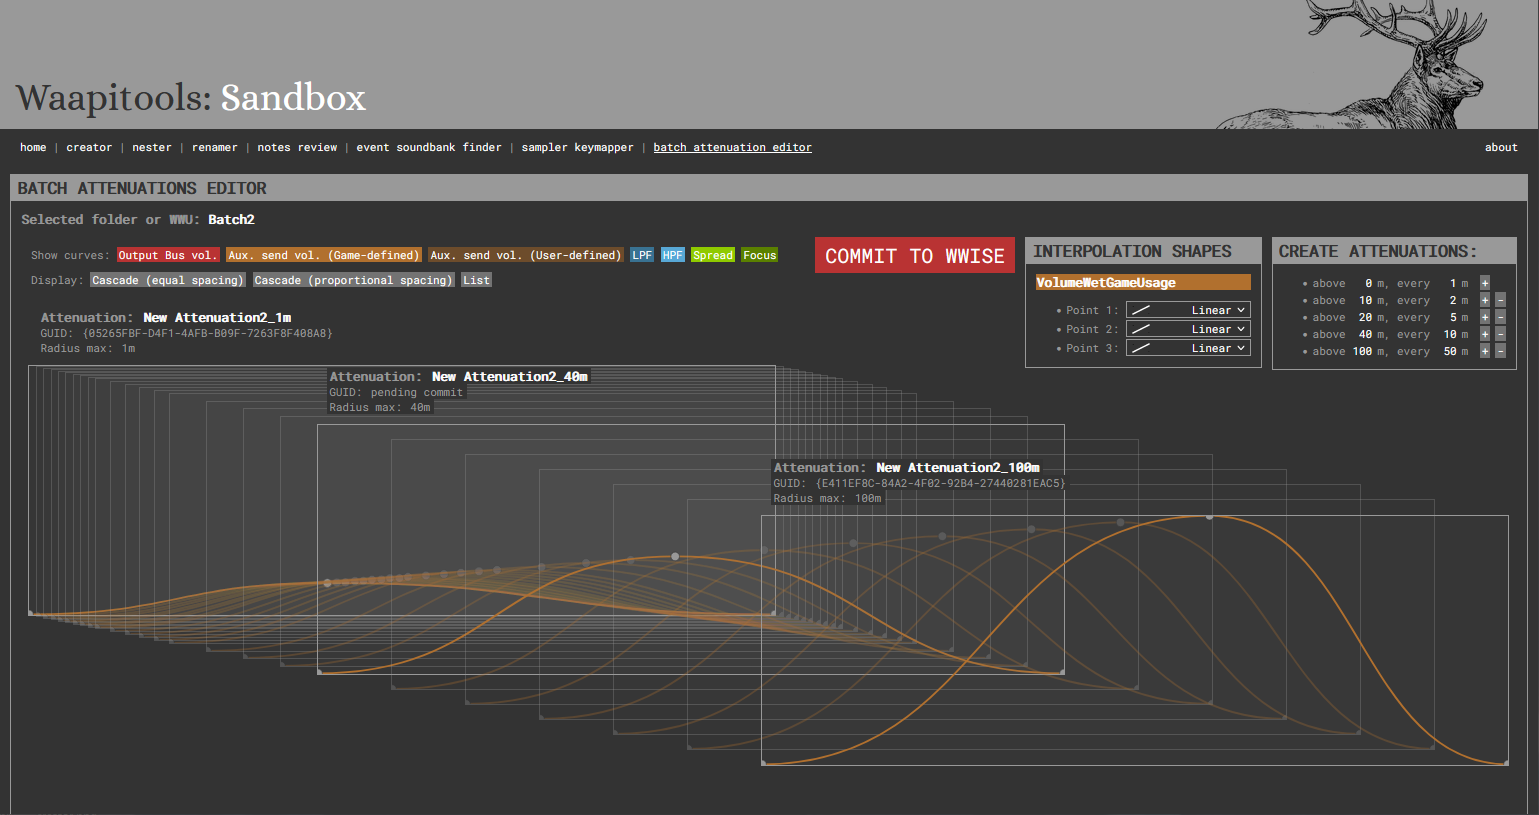
2. Batch Attenuations Editor
The Batch Attenuations Editor is designed to help with the creation and update of large attenuation sets, by interpolating attenuation curves between a short (eg 1m) and a long (eg 100m) attenuation.
Usage:
Create an attenuations folder or work unit
Inside, create 2 attenuations with names ending with their max radius (e.g. 1m, 100m)
Edit the attenuations curves, making sure each curve has a matching number of points between the short/long attenuation
Select the parent folder
In Waapitools, choose how many intermediate attenuations you want to create by setting distance intervals
For each curve (volume, aux sends…) and each point, choose how the point’s coordinates will be interpolated from the shortest to the longest attenuation (linear, quadratic, etc.)
Commit the new interpolated attenuations to Wwise
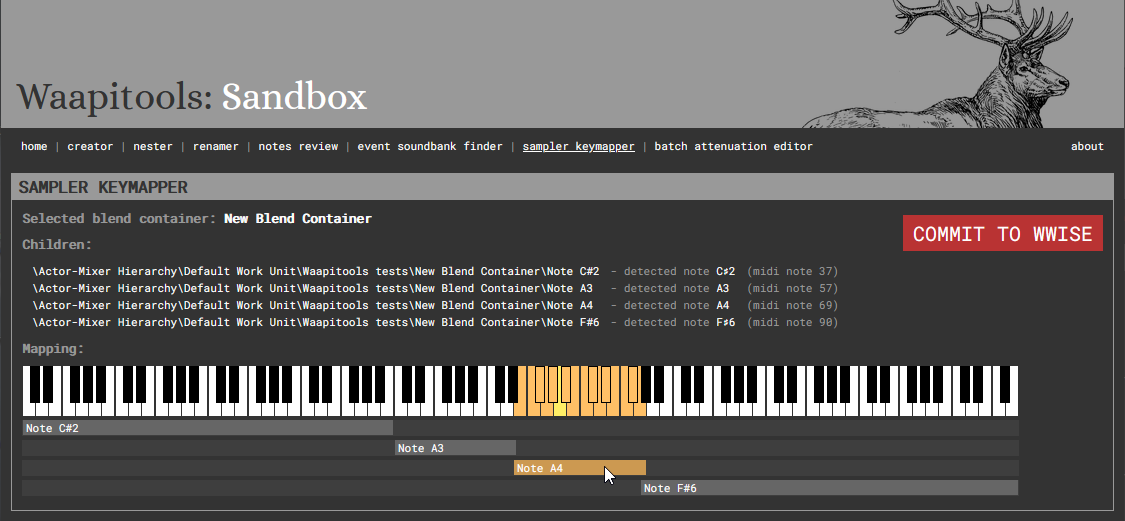
3. Sampler Keymapper
The Sampler Keymapper automatically sets MIDI root key and key range parameters on children of a blend container if their names contain a note name (eg MyPianoSample_C#3 is mapped to MIDI root key 49 and its range is set based on neighbouring samples root notes).
Usage:
Create a blend container
Inside, create the sound objects representing your sampler notes
Each sound object name must end with a note name (e.g. C#3, G7, Eb2…)
Select the blend container
From Waapitools, commit the note’s MIDI roots and key ranges to Wwise
4. Notes Review
Notes Review provides a comprehensive display of all notes in the Wwise project. It’s brutally stupid and will freeze on huge projects.
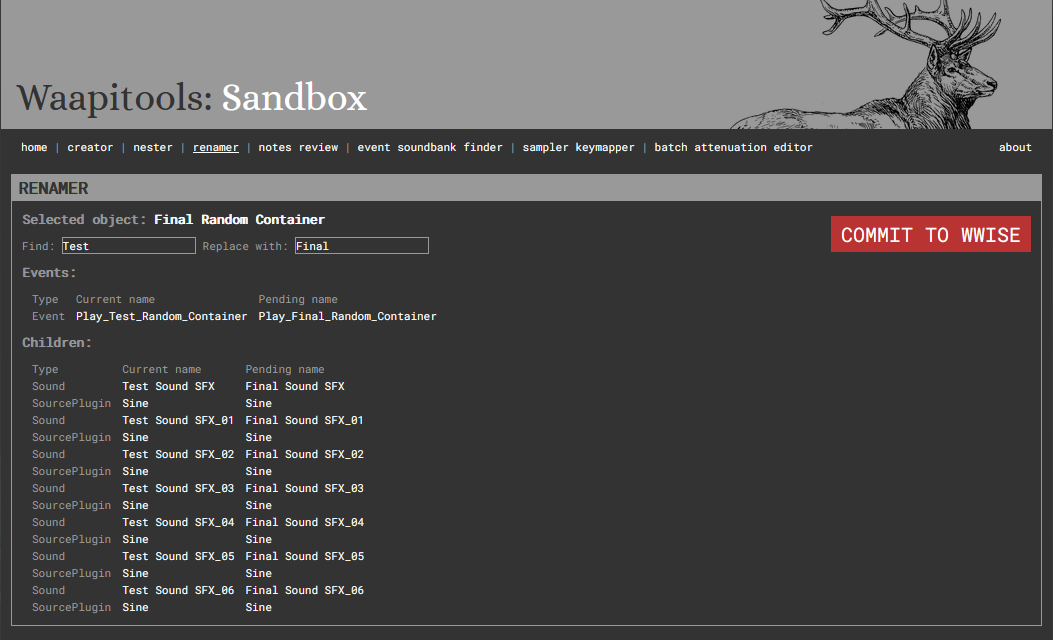
5. Renamer
The Renamer allows for easy search/replace in names of objects in the Actor-Mixer Hierarchy. In addition to the selected Actor-Mixer hierarchy object, it will apply the same renaming to:
all its children
all the events referencing it
Usage:
Select an object in the actor-mixer hierarchy
Edit the search and replace strings
Check the changes and commit them to Wwise
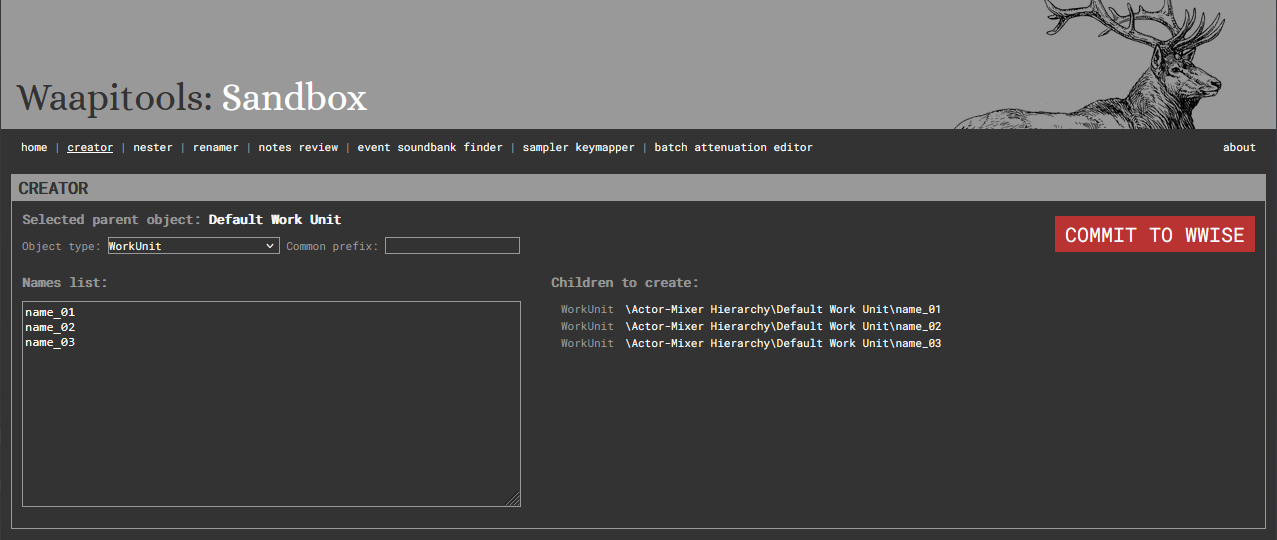
6. Creator
The Creator helps with the batch creation of children to the currently selected object, from an object type, a list of names and a common prefix.
Usage:
Select an parent object in your Wwise project
Choose an object type to create
Fill in the list of the names you want to give your new objects
Optionnally, choose a common prefix for all your new objects
Check the pending objects list
Commit the new objects to Wwise
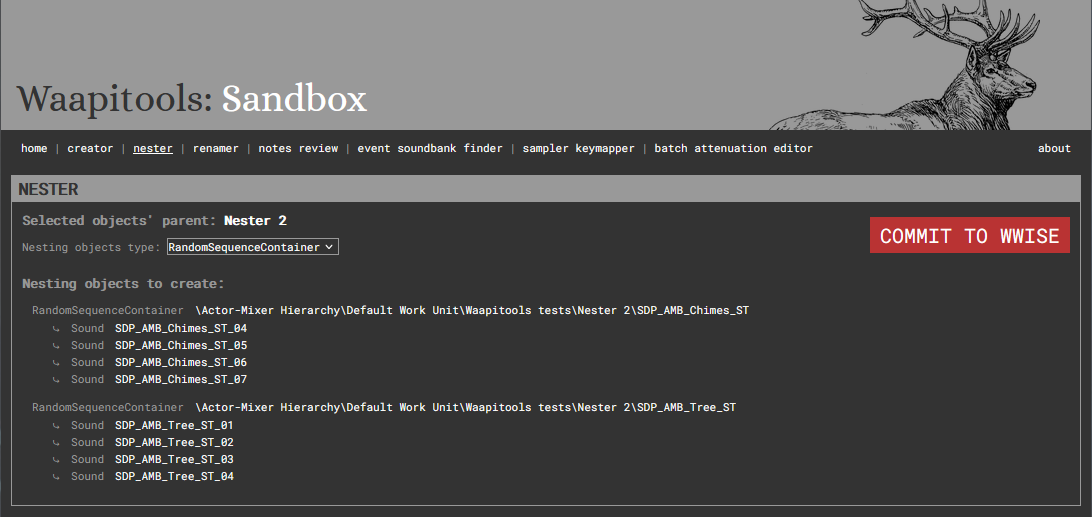
7. Nester
The Nester can ‘nest’ selected objects in new parents of your chosen type. The new parents will be nalmed after their children.
A typical use case would be to create random containers from a list of freshly imported sounds, each set of similarly named sounds getting their own parent.
Usage:
Select multiple objects in your Wwise project
Check the tool groups them as desired, based on their names
Choose the type of object you want to create as their new parents
statusCode(): int
isError(): bool // True if status code >= 300
headers(): Headers
raw() // Raw content of the response
json() // Array or false if not a json response
By default, FileRequestModifier and PlainTextRequestModifier are active.
If necessary, you can add an instance of ProxyRequestModifier
ProxyRequestModifier allows you to define curl options to use a proxy
FileRequestModifier is used to manage file paths starting with @
and passed as a parameter by transforming them into CurlFile
and then modifying the HTTP Content-Type header.
PlainTextRequestModifier changes the HTTP Content-Type header
to text/plain when a string is passed as a parameter.
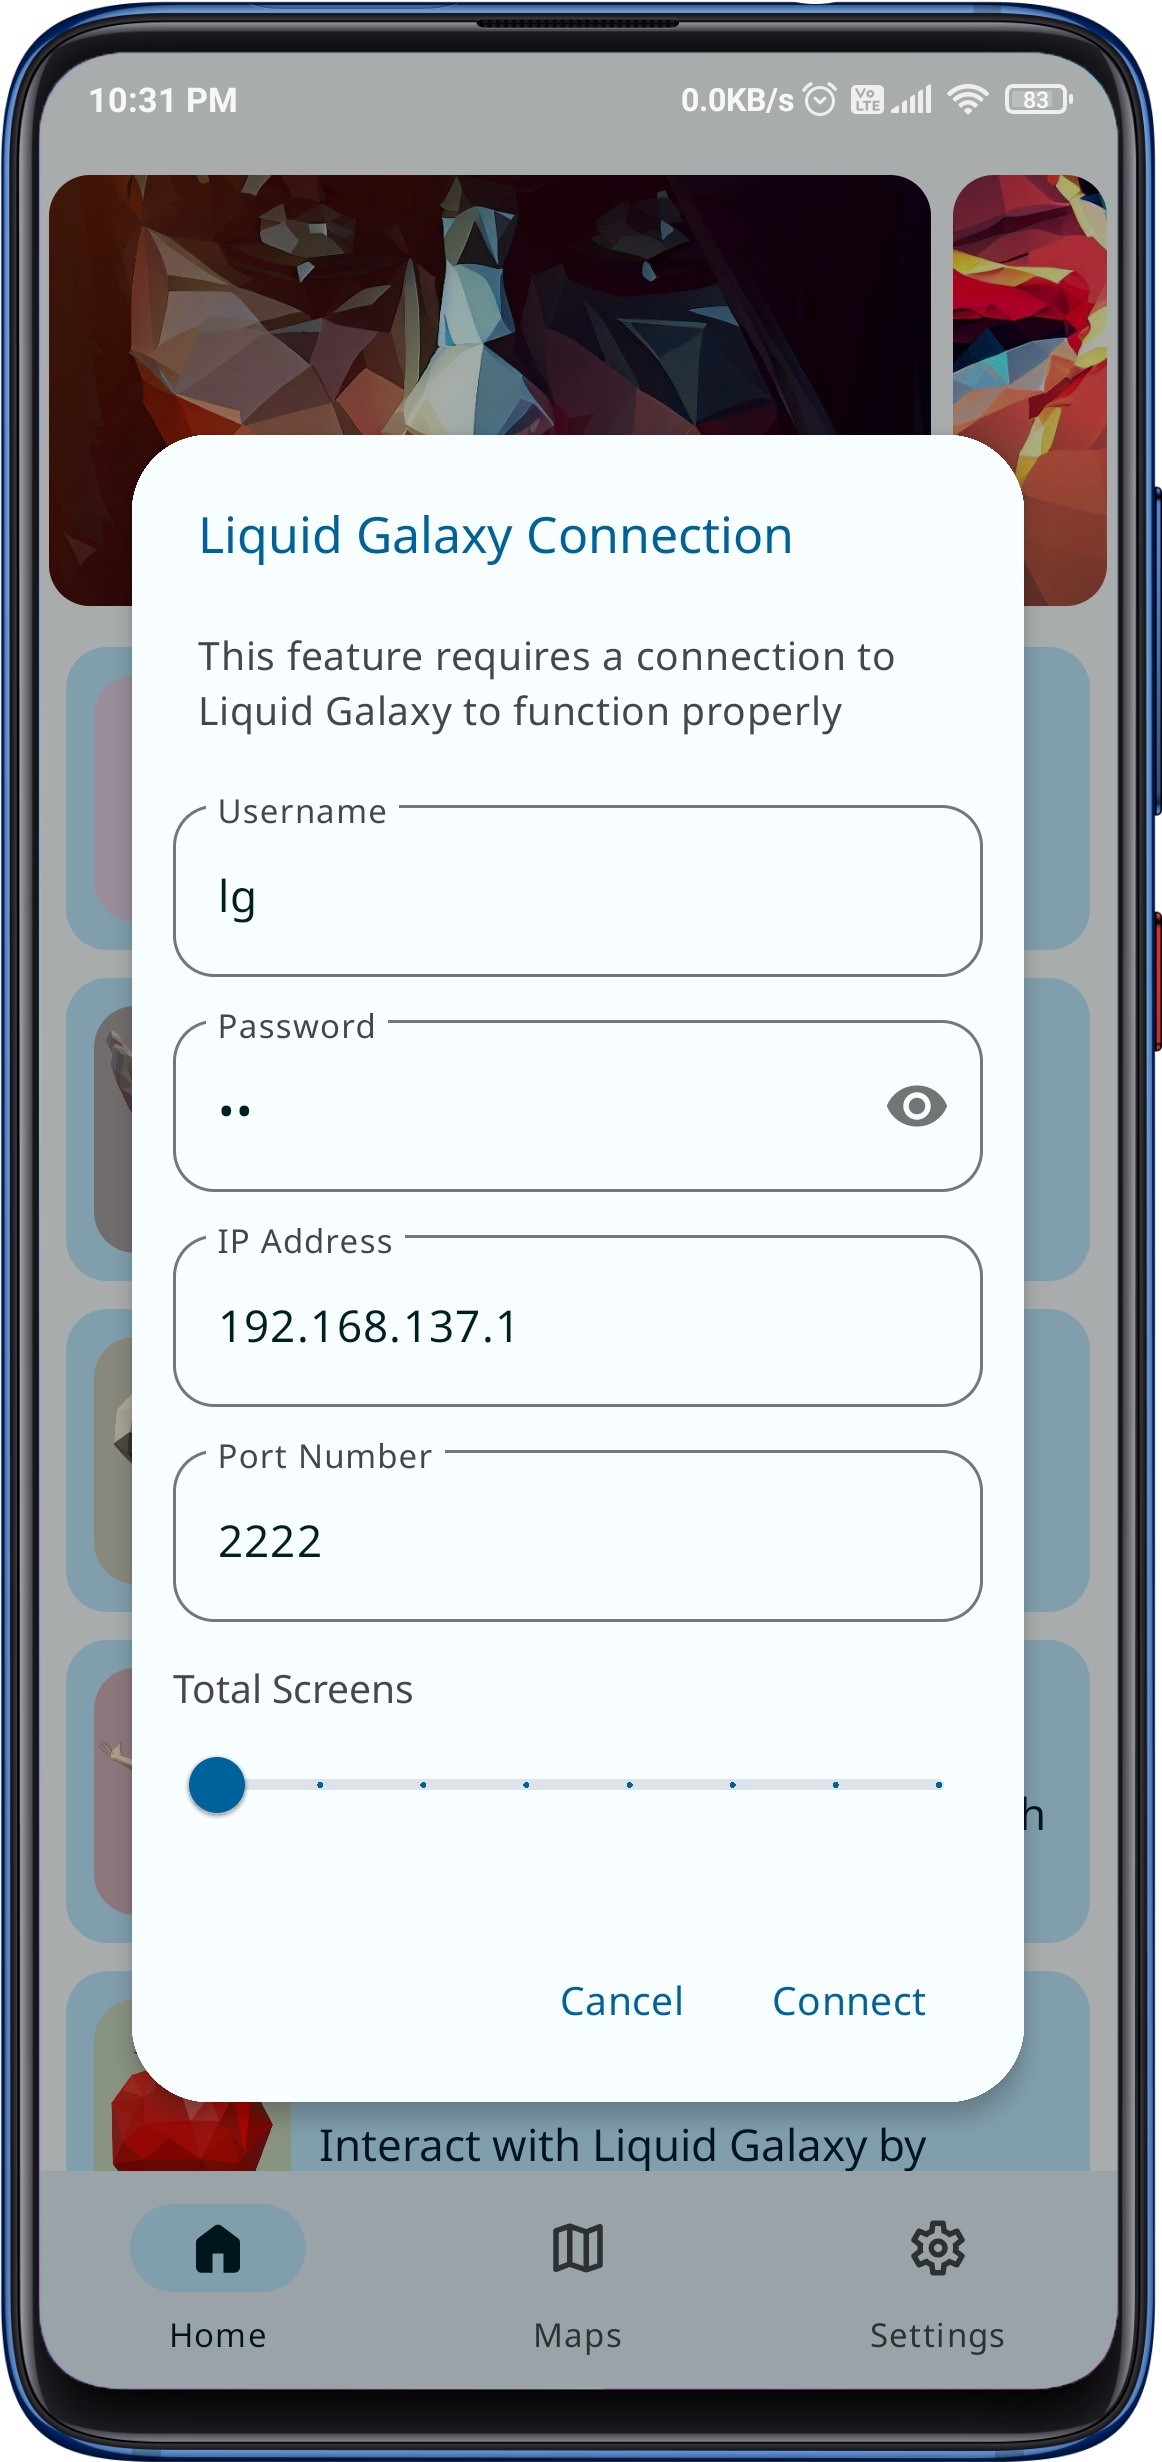
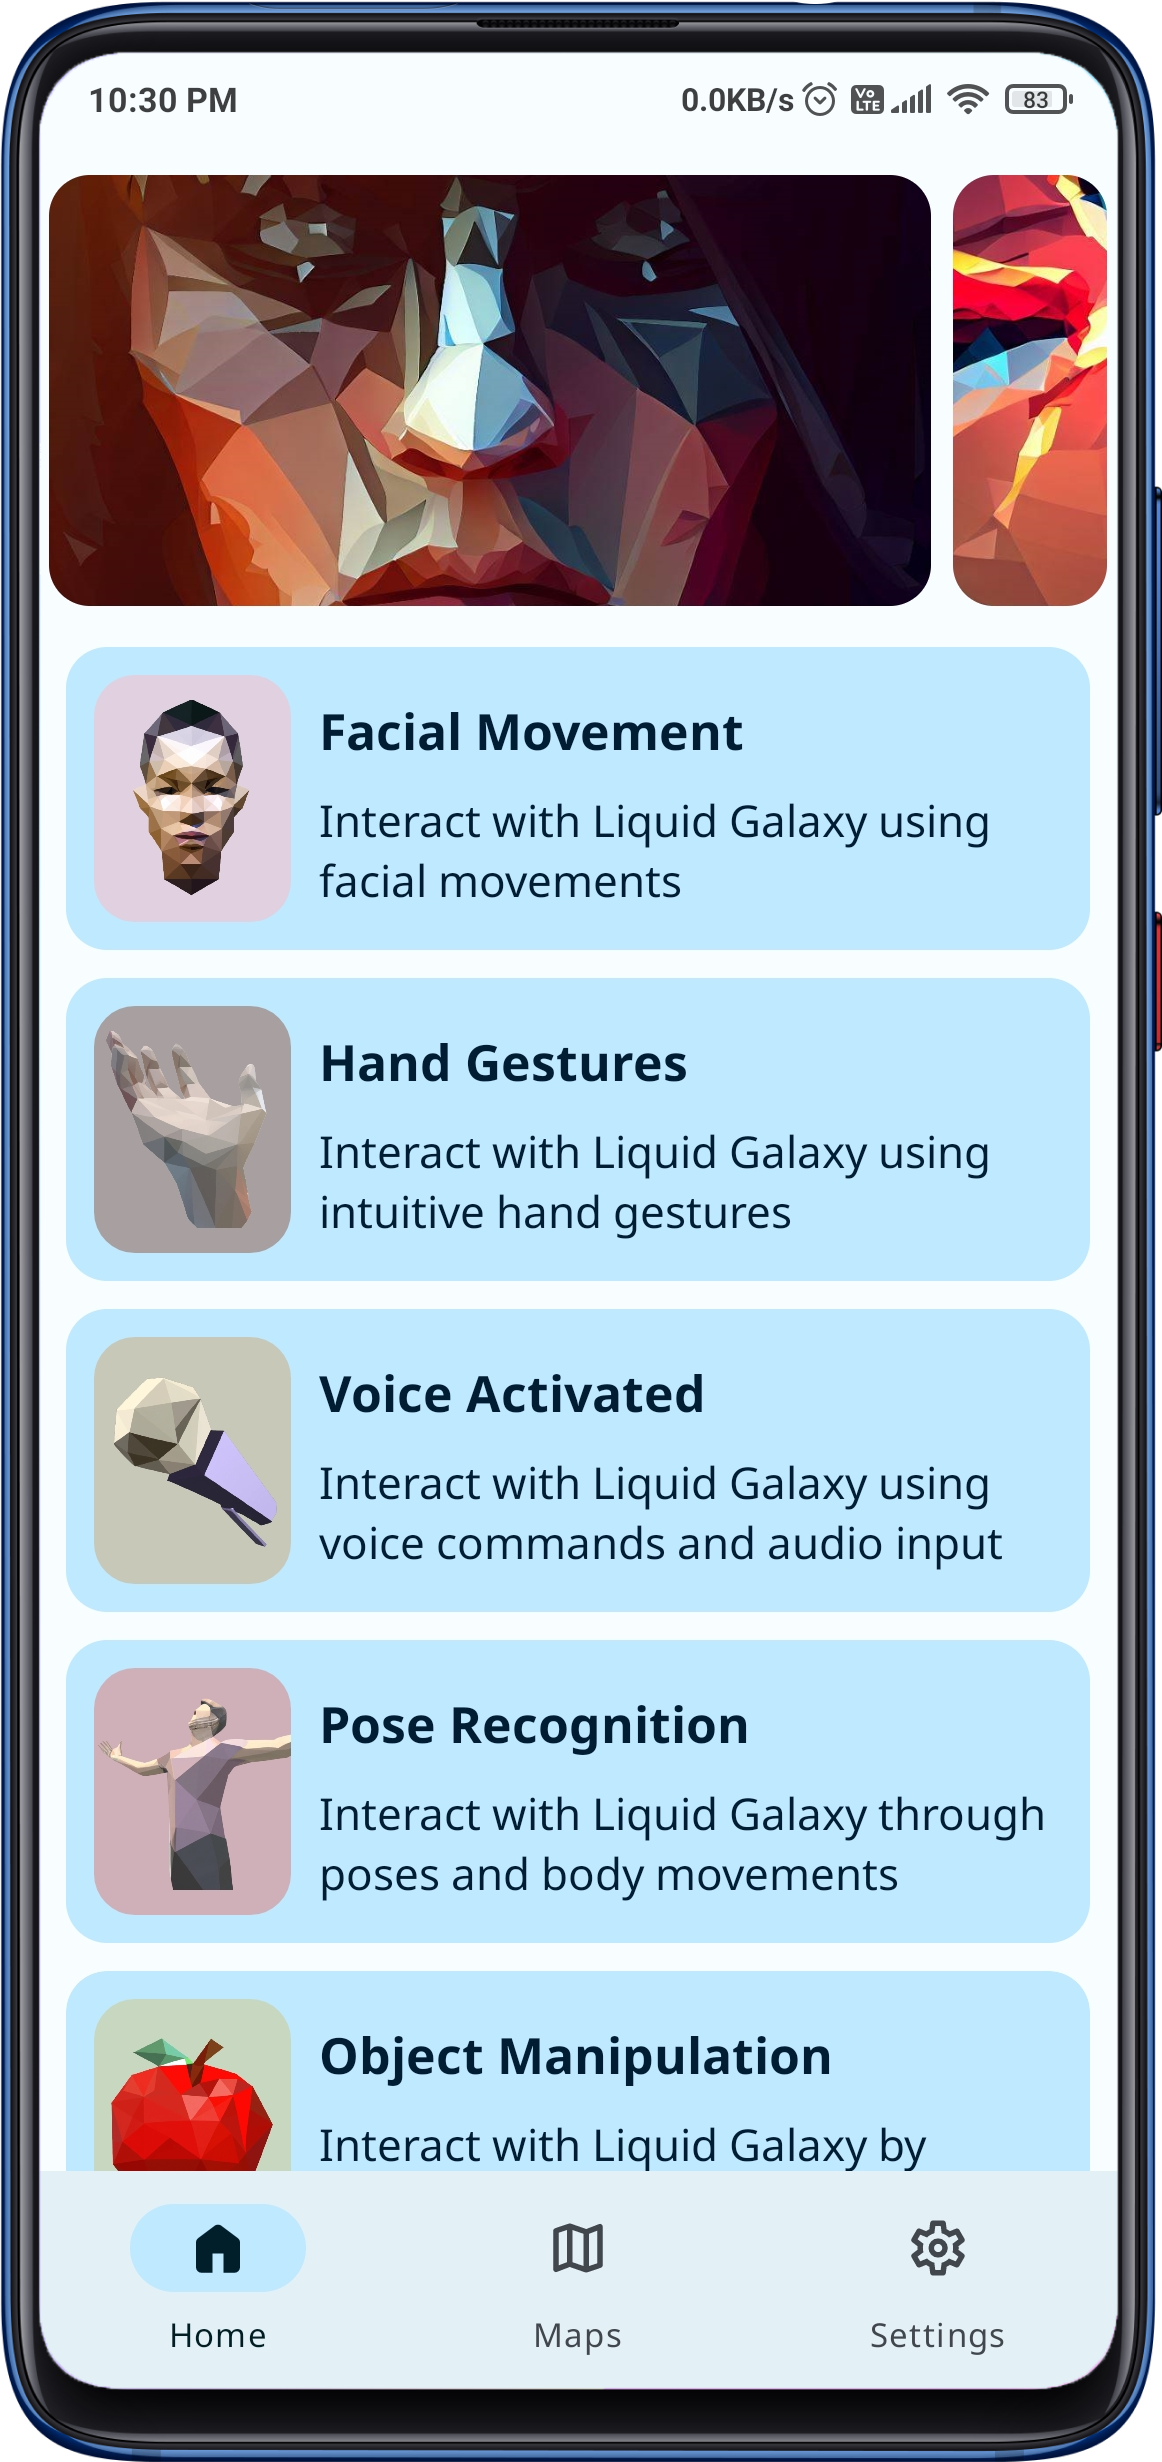
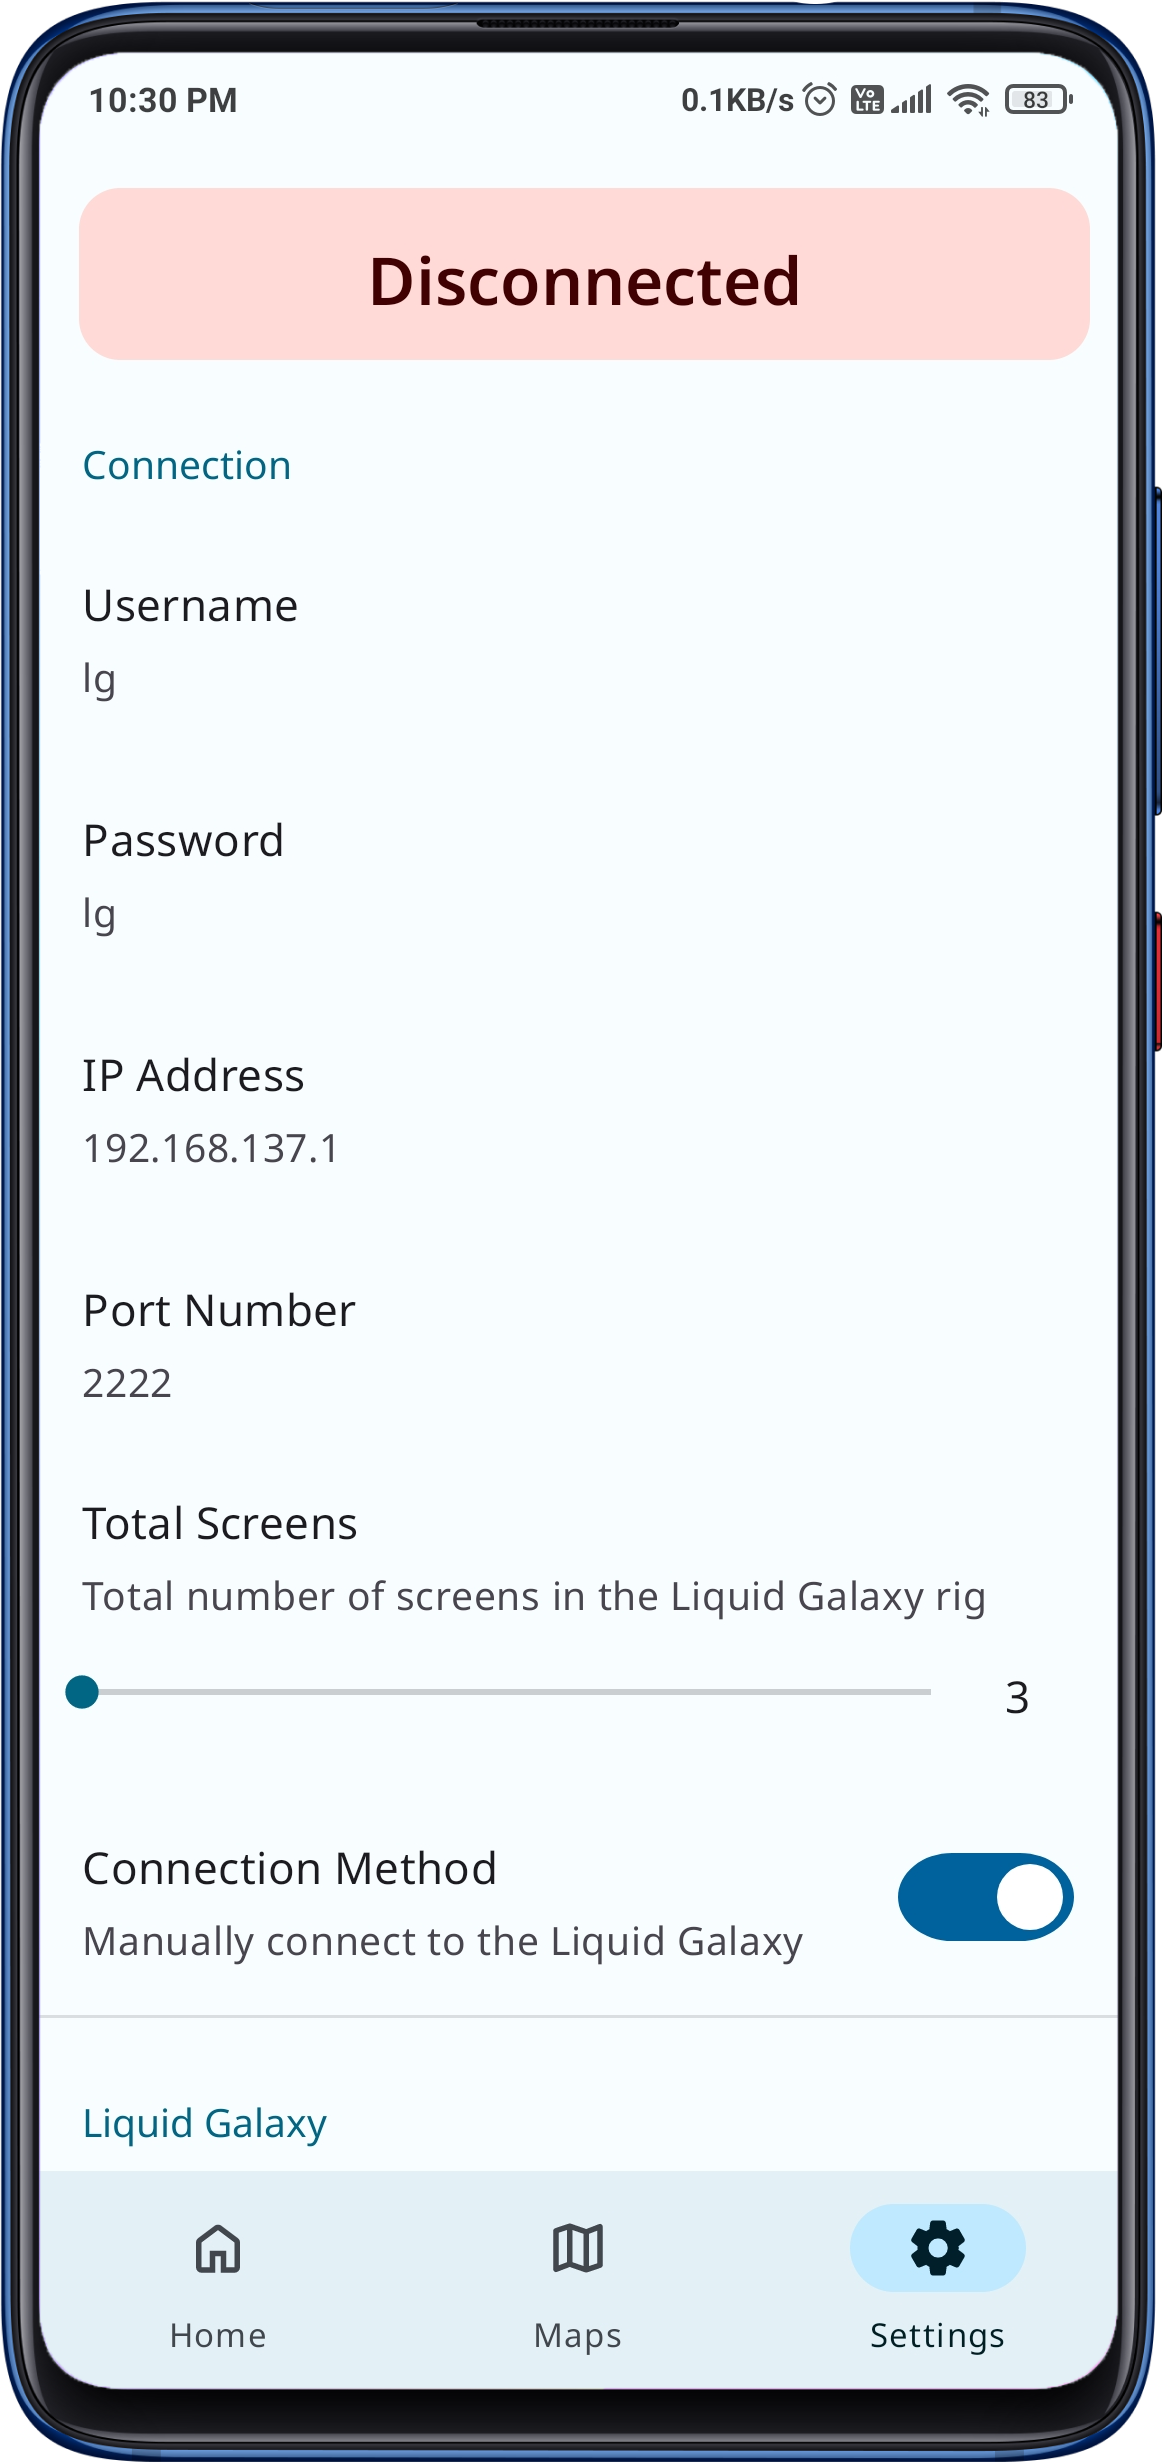
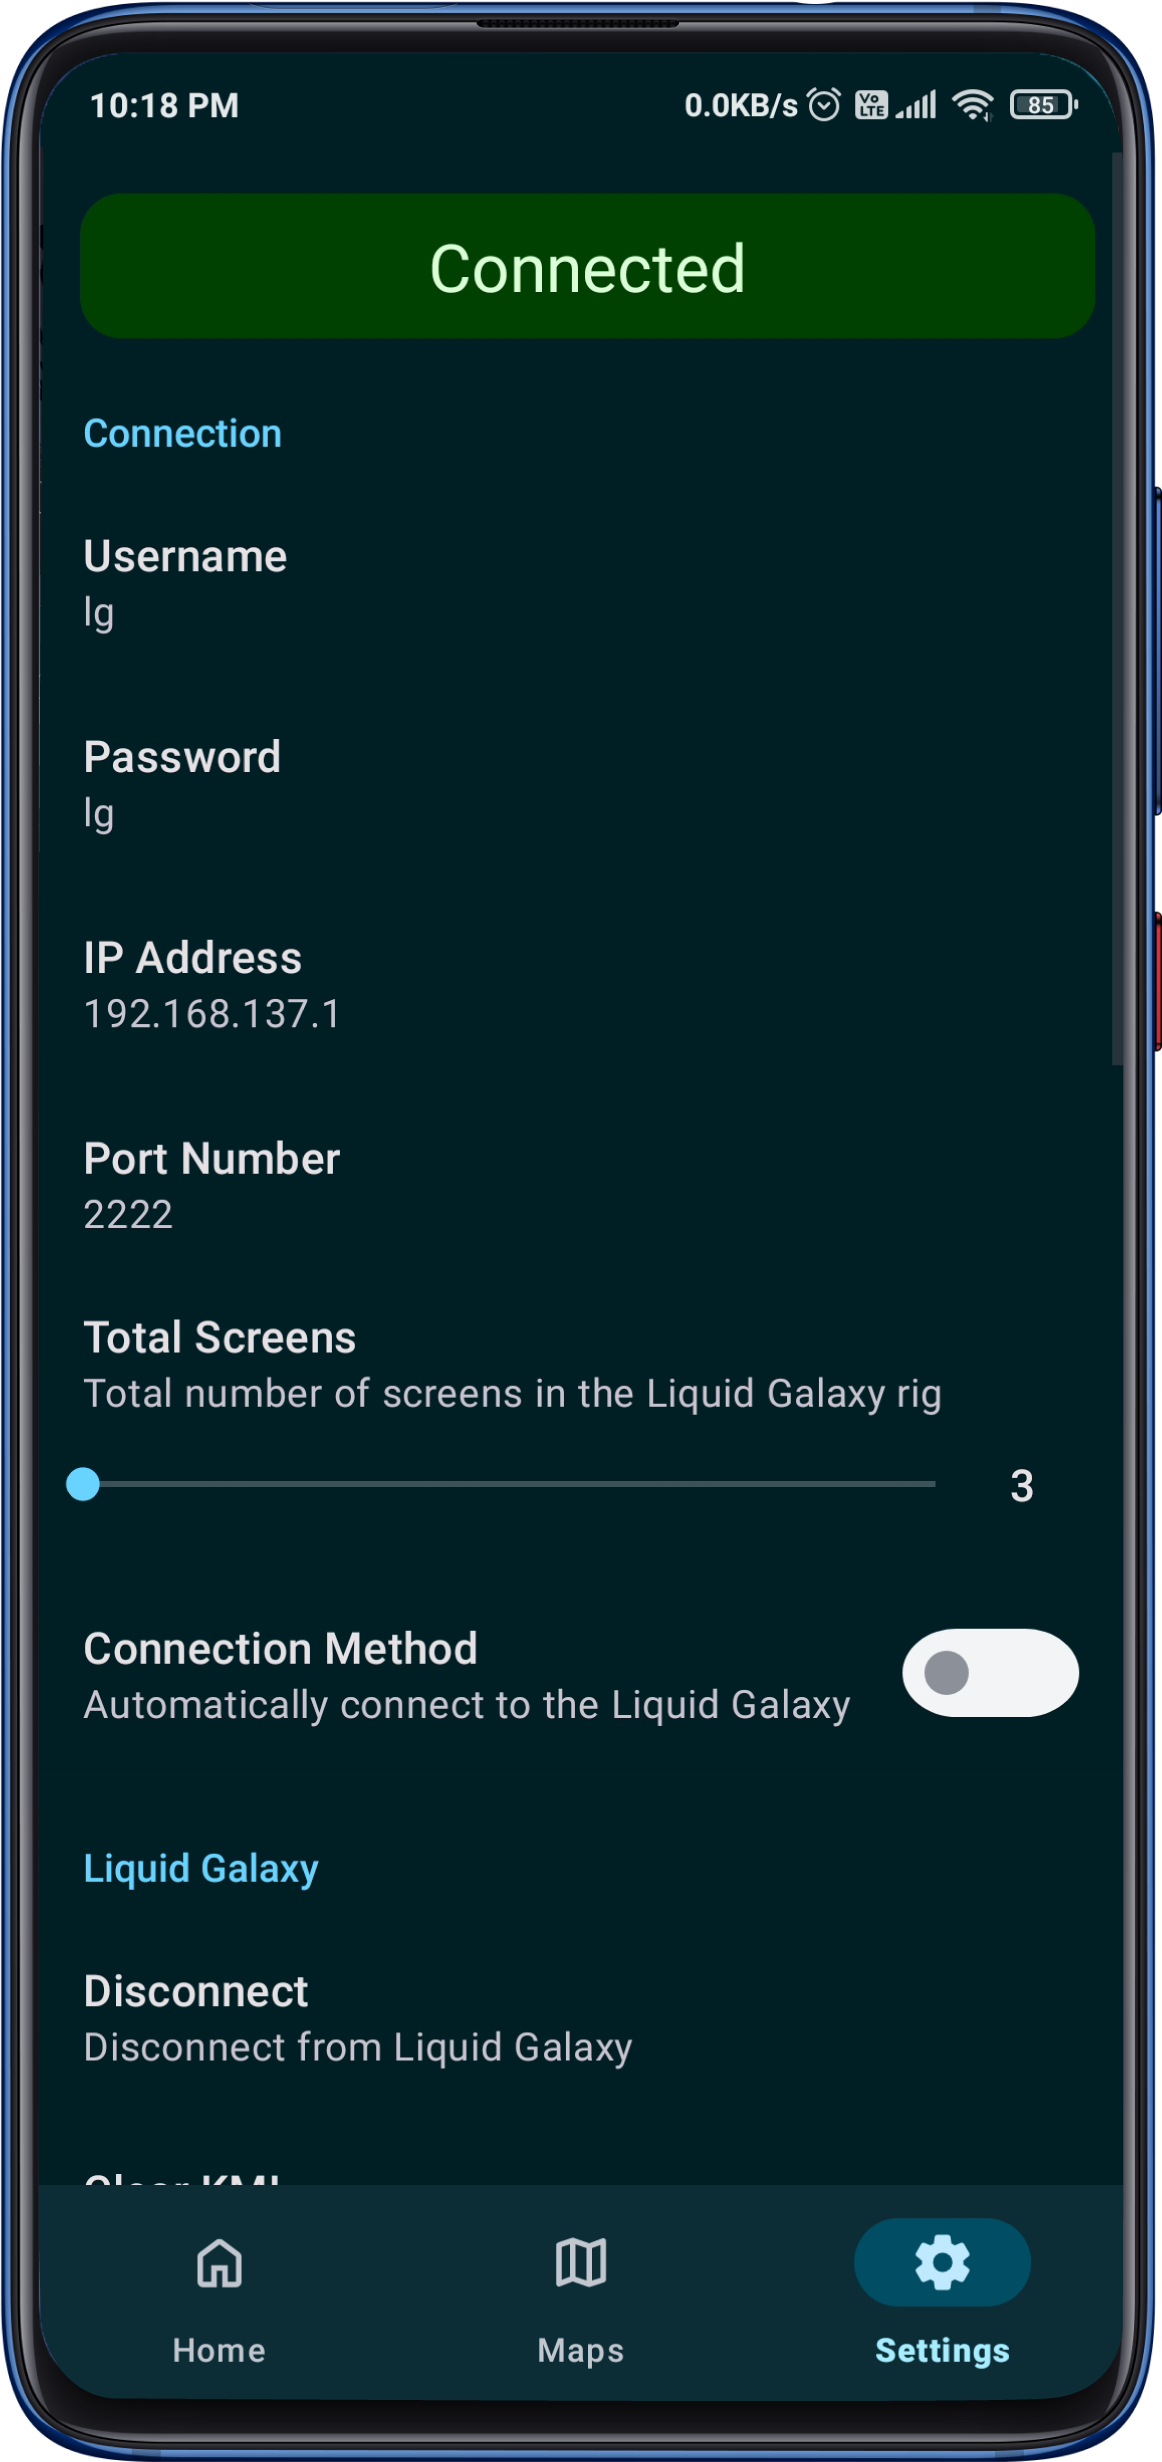
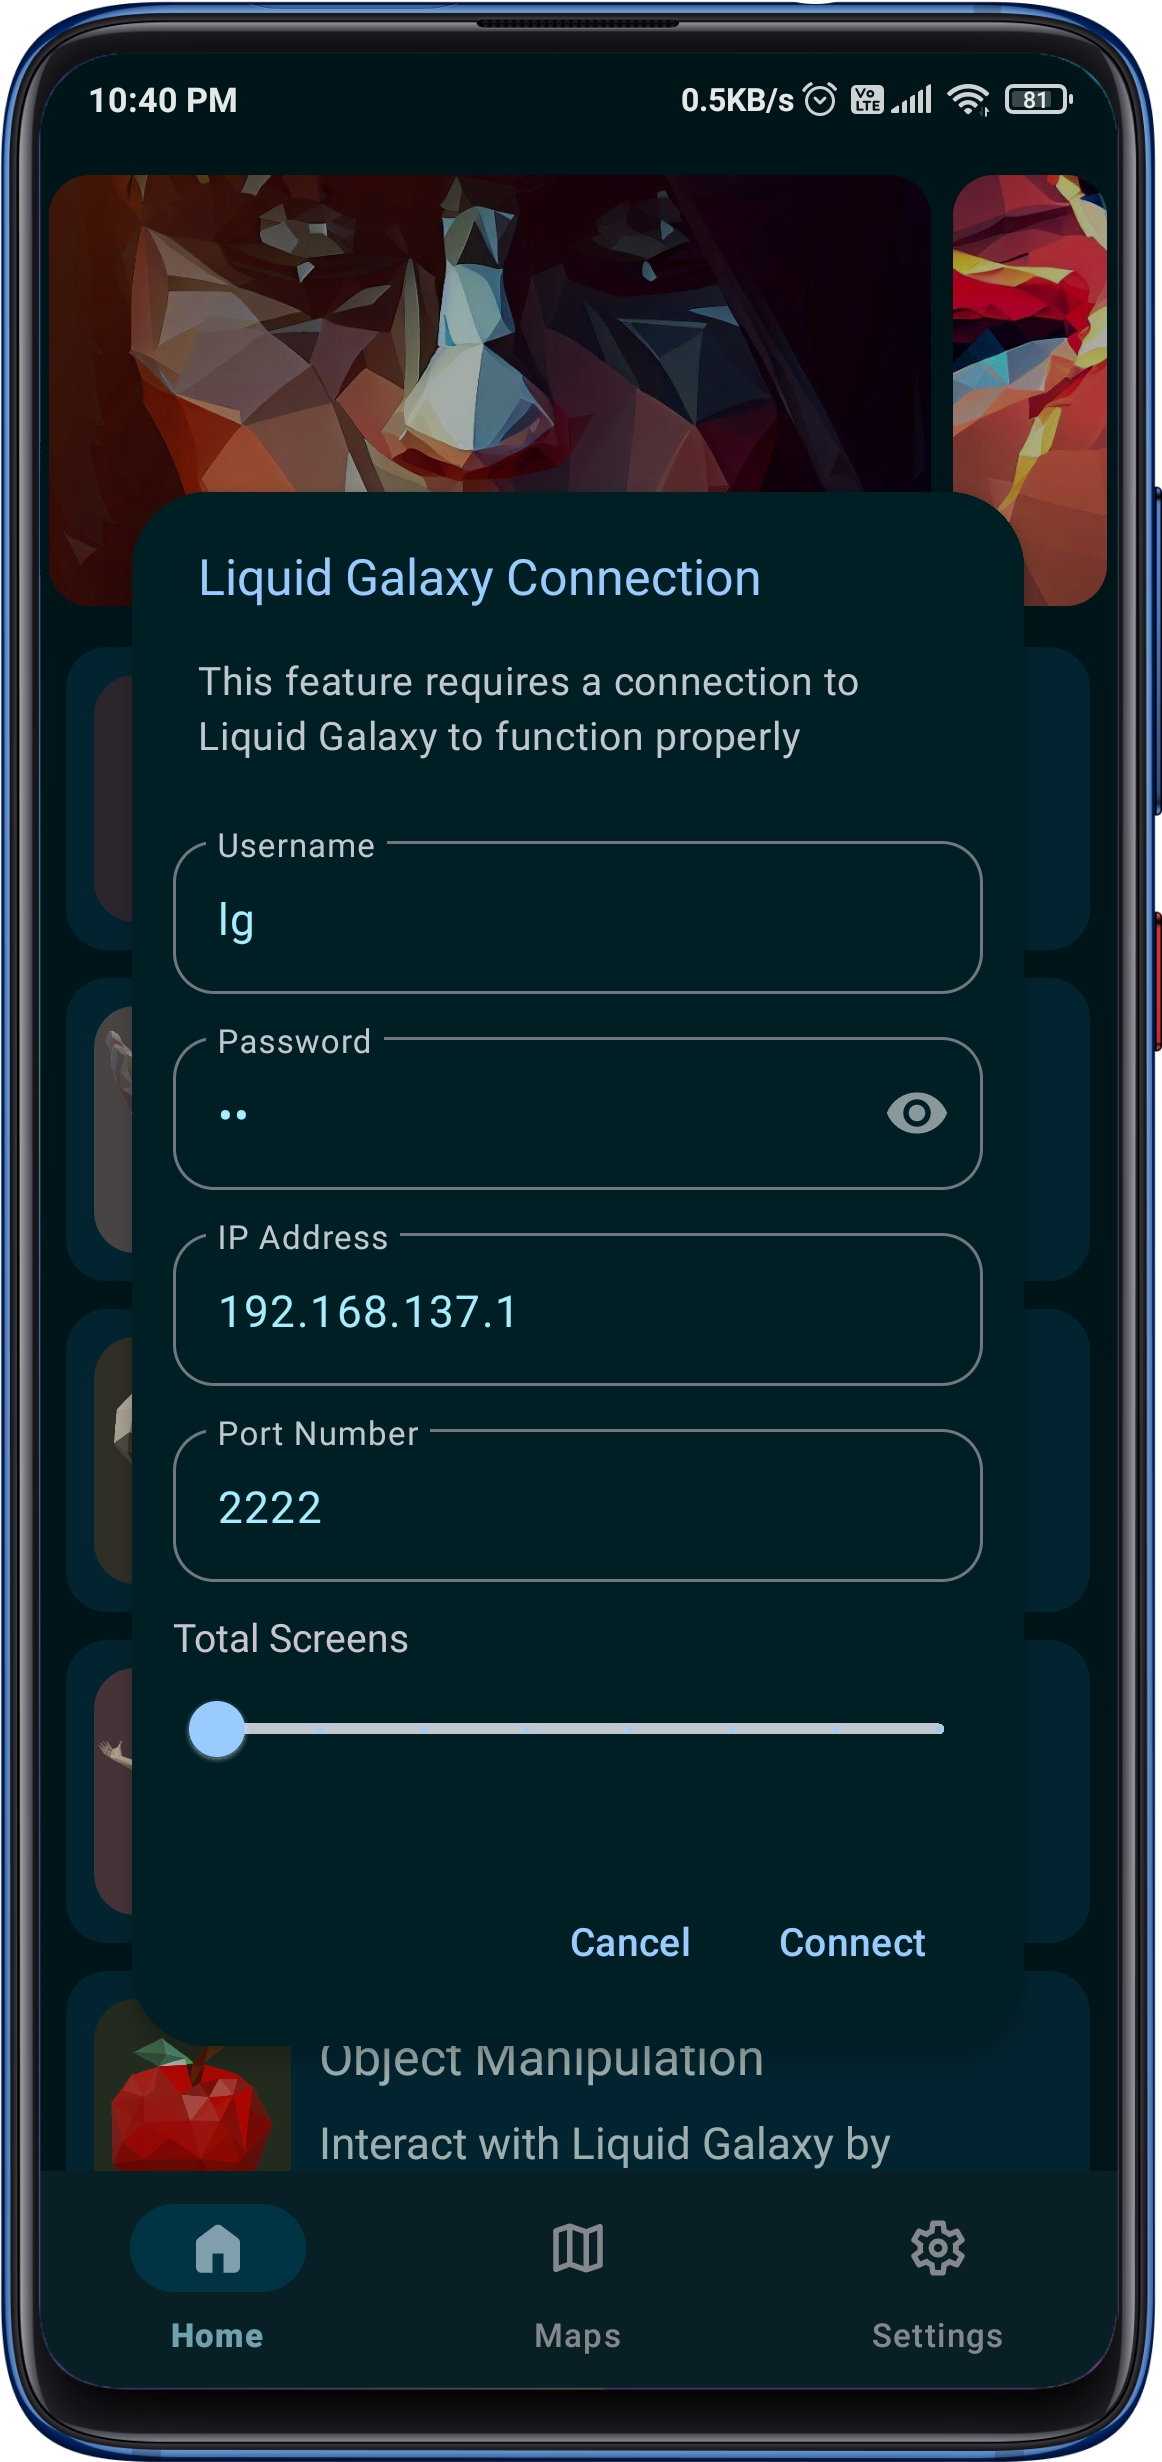
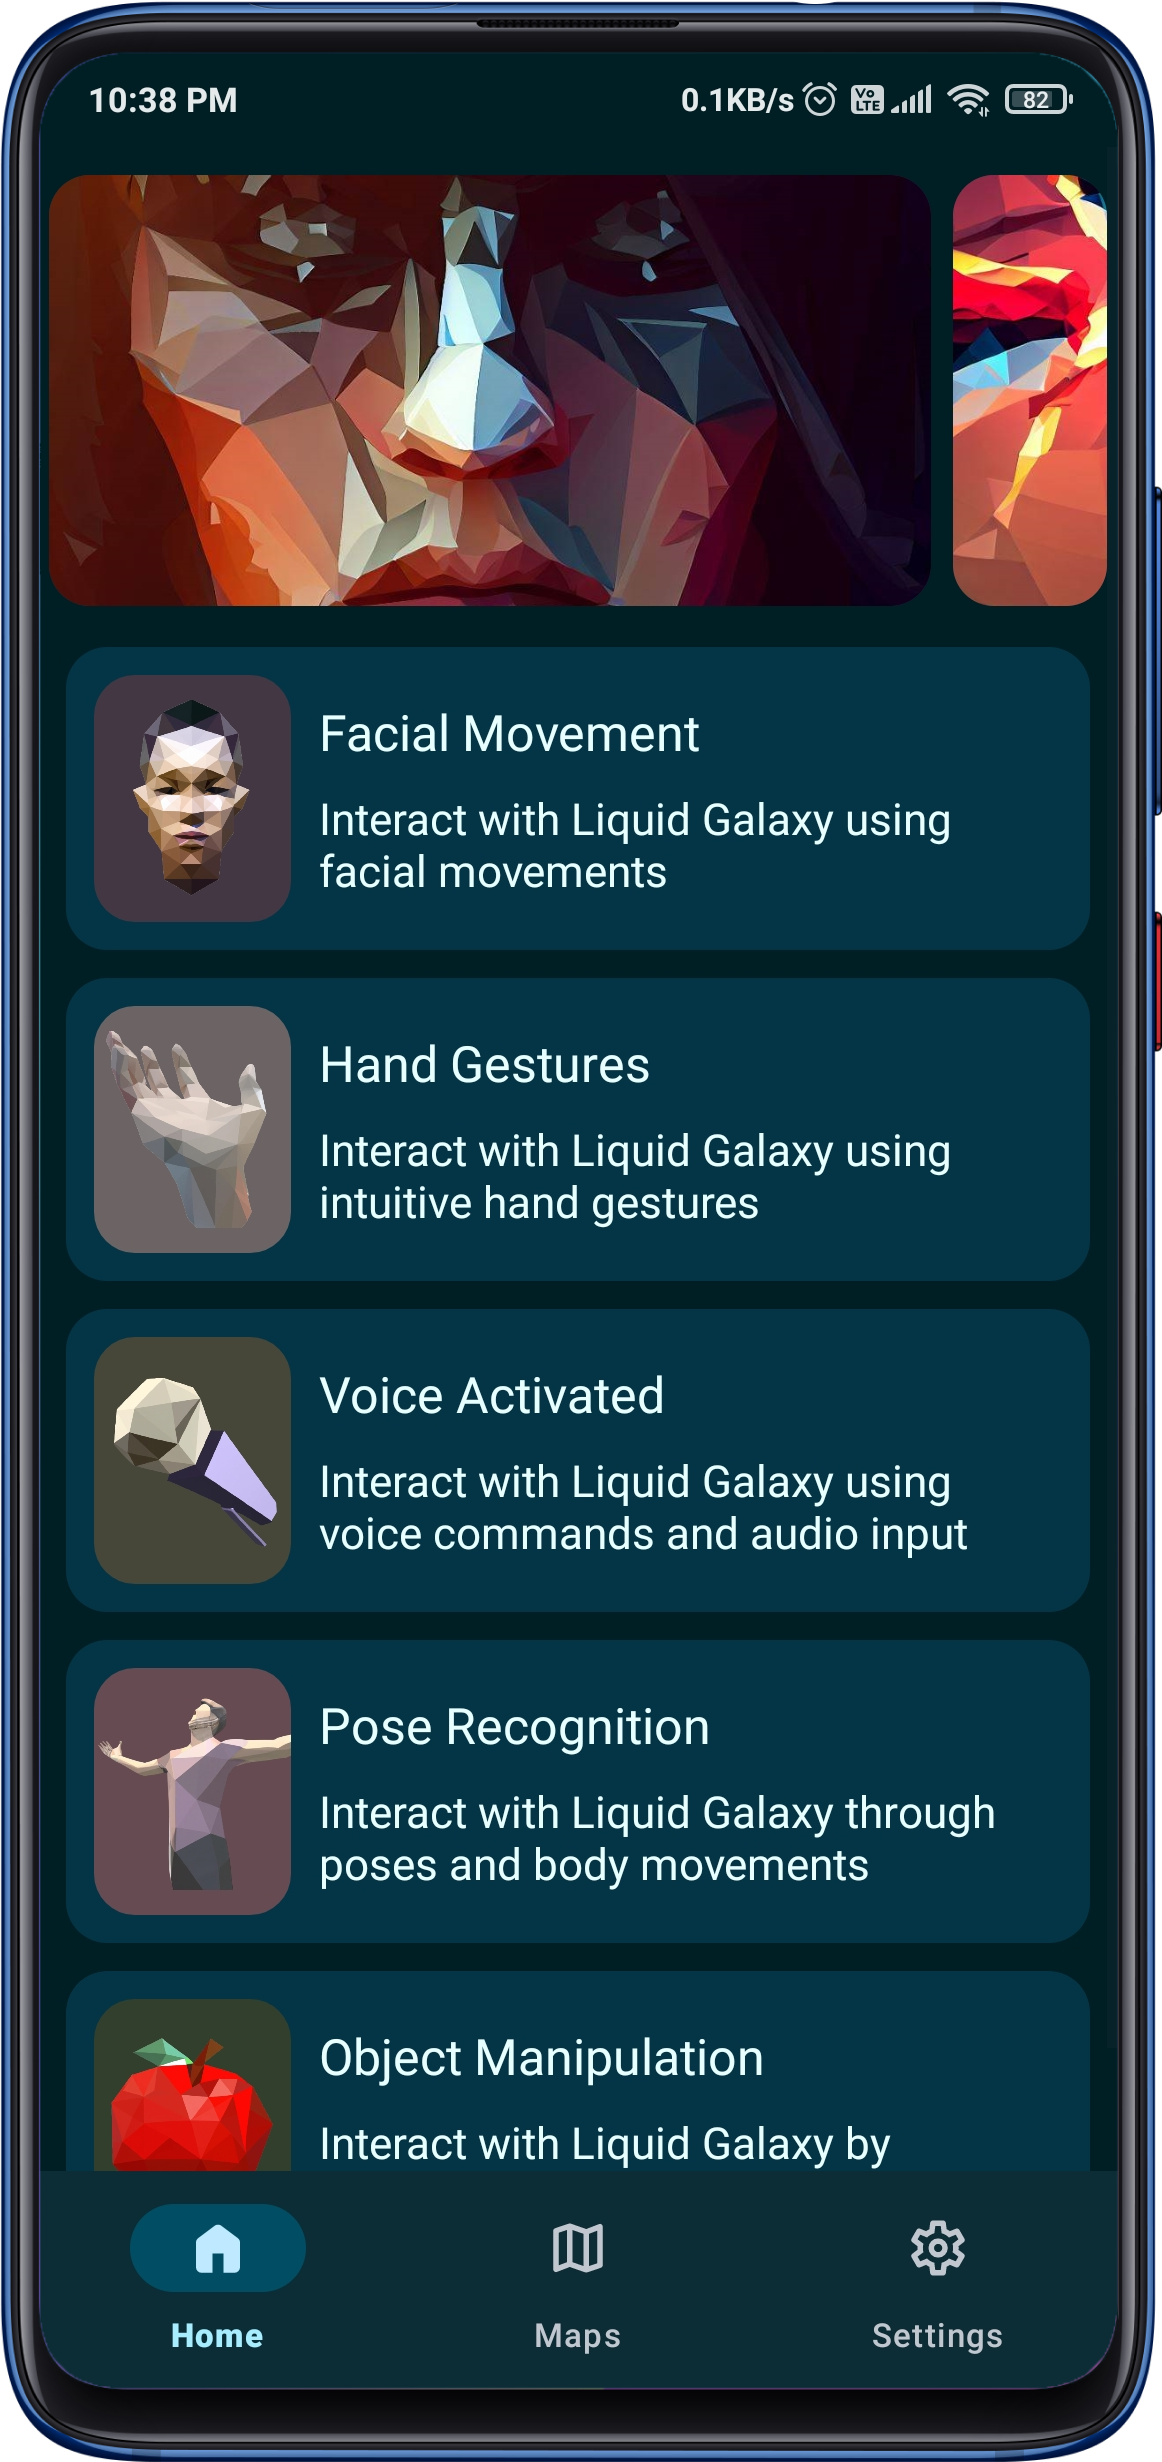
The incredible app designed to elevate your Liquid Galaxy experience like never before! With a seamless connection to your Liquid Galaxy rig, you can now control it remotely using facial expressions, voice commands, hand gestures, poses, and even object manipulation all at your fingertips!
The app utilizes the power of the Mediapipe API for recognizing and processing facial gestures, hand gestures, and body poses, making it easy for users to control their Liquid Galaxy experience through their Android device.
With Python 3 and LaTeX installed you can easily compile your project using the maketex script which simplifies the compilation progress, handles multiple source files and removes unnecessary files.
For most use-cases you only have to run ./maketex which compiles the main.tex file using pdflatex while looking for bibliography and glossary entries.
Latex
If (for some reason) you do not want to depend on the maketex script you can also use pdflatex, makeglossaries and bibtex from the shell.
pdflatex -shell-escape main	# Initial compilation
makeglossaries main 		# Compile glossaries
pdflatex -shell-escape main	# Progressive compilation for glossaries
bibtex main 			# Compile bibliography
pdflatex -shell-escape main	# Progressive compilation for bibtex
pdflatex -shell-escape main	# Progressive compilation for bibtex
TexStudio
In TexStudio a custom command can be added under Options → Configure TexStudio → Build → User Commands. The following line completely compiles a LaTeX file with glossaries, bibliography and minted.
Of course you can also add the maketex script as a user command but you might want to set -lm so TexStudio can find your log files and minted cache after cleanup.
Overleaf is a popular online latex editor and is also fully supported by this template. Just download the archived repository or latest release and upload as a new project.
Options
Options are added to the \documentclass command usually found in main.tex.
\documentclass[<option1>,<option2>,...]{protocol}
Option
Result
en
Set main document language to english
landscape
Change the page format to landscape orientation
minted
Add and configure minted package
natbib
Change bibtex backend to natbib
nobib
No bibliography
nofonts
No additional fonts
noglo
No acronyms and glossary
nologos
No logos on titlepage
notable
No table on titlepage
notitle
No titlepage
notoc
No table of contents
parskip
Skip a line instead of indenting after blank line
sans
Load sans-serif fonts
Variables
Variables are set as commands with their parameter being the variable value.
QuickCart is a full-fledged e-commerce web application built using Django and Tailwind CSS. It provides a user-friendly shopping experience with features like product management, cart functionality, order tracking, authentication, and more. The application is structured with rendered templates instead of an API-based implementation, ensuring a seamless user experience.
Features
User Management
User registration and login
Profile management with avatar upload
Password reset and change password functionality
Two-factor authentication (2FA) enablement
Product Management
Browse and search for products
View product details
Add, edit, and delete products (admin only)
Product reviews and ratings
Wishlist functionality
Shopping Cart & Checkout
Add and remove items from cart
Update cart item quantities
View cart details with total price
Checkout process with order summary
Address management for shipping and billing
Order Management
Place orders and track order status
View order history
Cancel orders if eligible
Order confirmation page
Payment processing simulation
Additional Features
Dark mode support
Responsive UI built with Tailwind CSS
Optimized database queries for performance
Admin dashboard for order and product management
Installation
Prerequisites
Ensure you have the following installed:
Python 3.8+
Django 4+
SQLite (default) or any supported database
Tailwind CSS (configured with Django reload)
Setup Instructions
Clone the repository:
git clone https://github.com/JunaidSumsaal/quickcart.git
cd quickcart
Create a virtual environment and activate it:
python -m venv venv
source venv/bin/activate  # On Windows use: venv\Scripts\activate
Install dependencies:
pip install -r requirements.txt
Apply database migrations:
python manage.py migrate
Create a superuser:
python manage.py createsuperuser
Run the development server:
python manage.py runserver
Open the application in your browser:
http://127.0.0.1:8000/
Project Structure
quickcart/
├── accounts/         # User authentication and profile management
├── cart/             # Shopping cart functionality
├── orders/           # Order management and tracking
├── products/         # Product catalog and reviews
├── templates/        # HTML templates organized by app
├── static/           # Static files including Tailwind CSS
├── core/             # Settings and configuration
├── manage.py         # Django management script
└── README.md         # Project documentation
Deployment
This project is configured for deployment on Render. To deploy:
Ensure environment variables are set for database and secret key.
Use a production-ready WSGI server like Gunicorn.
Set up Nginx as a reverse proxy.
Contributing
Contributions are welcome! Follow these steps:
Fork the repository.
Create a new branch: git checkout -b feature-branch
Commit your changes: git commit -m "Add new feature"
Push to the branch: git push origin feature-branch