Category: Blog

  • bilidown

    Bilidown

    GitHub Release

    哔哩哔哩视频解析下载工具,支持 8K 视频、Hi-Res 音频、杜比视界下载、批量解析,可扫码登录,常驻托盘。

    支持解析的链接类型

    使用说明

    1. Releases 下载适合您系统版本的安装包
    2. 非 Windows 系统,请先安装 FFmpeg 工具
    3. 将安装包解压后执行即可

    软件特色

    1. 前端采用 BootstrapVanJS 构建,轻量美观
    2. 后端使用 Go 语言开发,数据库采用 SQlite,简化构建和部署过程
    3. 前端通过 p-queue 控制并发请求,加快批量解析速度

    其他说明

    • 本程序不支持也不建议 HTTP 代理,直接使用国内网络访问能提升批量解析的成功率和稳定性。

    打包可执行文件

    git clone https://github.com/iuroc/bilidown
    cd bilidown/client
    pnpm install
    pnpm build
    cd ../server
    go mod tidy
    CGO_ENABLED=1 go build

    交叉编译

    说明

    • 镜像名称:iuroc/cgo-cross-build
    • 支持的系统架构
      • linux/amd64
      • windows/amd64
      • windows/386
      • windows/arm64
      • darwin/amd64
      • darwin/arm64

    拉取镜像和项目源码

    docker pull iuroc/cgo-cross-build:latest
    git clone https://github.com/iuroc/bilidown

    交叉编译发行版

    • 执行 goreleaser 命令时将自动执行 pnpm buildgo mod tidy
    cd bilidown/server
    # [交叉编译 Releases]
    docker run --rm -v .:/usr/src/data iuroc/cgo-cross-build goreleaser release --snapshot --clean
    
    # [交互式终端]
    cd bilidown
    docker run --rm -it -v .:/usr/src/data iuroc/cgo-cross-build

    编译指定系统架构

    cd bilidown/server
    
    # [DEFAULT: linux-amd64]
    docker run --rm -v .:/usr/src/data iuroc/cgo-cross-build go build -o dist/bilidown-linux-amd64/bilidown
    
    # [darwin-amd64]
    docker run --rm -v .:/usr/src/data -e GOOS=darwin -e GOARCH=amd64 -e CC=o64-clang -e CGO_ENABLED=1 iuroc/cgo-cross-build go build -o dist/bilidown-darwin-amd64/bilidown

    非 Docker 环境编译

    在 Linux amd64 平台上执行 go build 时,您可能需要安装以下依赖包:

    sudo apt install pkg-config gcc libayatana-appindicator3-dev

    开发环境

    # client
    pnpm install
    pnpm dev
    # server
    go build && ./bilidown

    特别感谢

    软件界面

    Star History

    Star History Chart

    Visit original content creator repository
  • CloudFirewall

    CloudFirewall

    What is it?

    CloudFirewall is a simple, SDN based firewall, which can be used in order to forward or block certain types of traffic between two different networks. It supports three different work modes: black-list based blocking, white-list based forwarding, and a pass-through mode which forwards all traffic, but still gathers different statistics on it. It also features a simple web based UI which can be used to manage settings and inspect statistics on the network traffic and the firewall’s functionality.


    How does it work?

    CloudFirewall is implemented as an SDN controller, which is programmed to forward or block certain TCP/UDP flows, where a TCP/UDP flow can be uniquely identified by the five-tuple of < source IP, destination IP, transport protocol type, source port, destination port >. This SDN controller controls, using the OpenFlow protocol, an underlying SDN switch which interconnects two different networks. CloudFirewall interconnecting two different networks

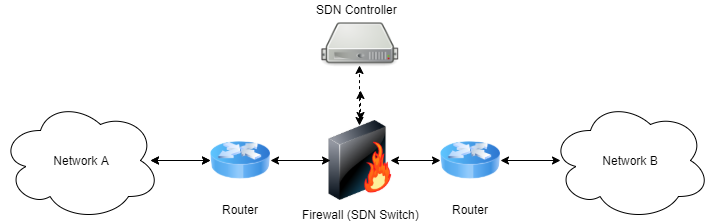
    Whenever a packet starting a new flow is received at this switch, it forwards it to the controller, which in turn decides whether this flow should be forwarded to the other network or otherwise blocked altogether. This decision based upon the firewall’s current work mode (white-list / black-list / pass-through) and its current defined rules set. When such decision is made by the controller, it installs an appropriate forwarding rule in the switch so that future packets belonging to the same flow will be handled in the same manner.


    The internals

    The implementation consists of two different parts:

    The SDN firewall:

    As explained above, the firewall is implemented as an SDN controller. It is written in Python and is built above the POX framework. It exposes an XML-RPC based API which allows manipulating the firewall’s behavior (i.e: changing the firewall’s work mode, adding and removing forwarding rules). See this API file for a complete functions list. You can find the firewall’s source code under the sdn-fw folder.

    The web UI:

    The firewall’s UI is implemented as a web application. It’s back-end is written in Python above the Flask micro-framework. It exposes a RESTful API which allows manipulating the firewall’s settings, i.e: changing it’s current work mode, adding or removing forwarding rules, etc. It also allows querying for certain statistical and event based information regarding the traffic passed through the firewall (i.e: detailed information on flows that were recently blocked by the firewall). You can experiment with the RESTful API by invoking the api_tester.py script.

    The front-end is simplemented as a single page application, and is written in HTML/CSS/JS. For rendering the visual charts, we used the charts.js library. You can find the code unser the cloudfirewall folder.

    CloudFirewall's internal structure


    Installation

    The easiest way to experiment with CloudFirewall is to set it up on a Mininet network. We provided a simple Mininet network topology file that you use to easily create a network that consists of two LANs, interconnected by CloudFirewall.

    In order to setup this network follow the next steps:

    1. Install Mininet v2.1.0 64bit on your target machine using the instructions found here. Alternatively, simply grab the preinstalled Mininet 2.1.0 64 bit VM (make sure you get the right version).

    2. Install POX on your target machine by following the instructions found here. Note: the Mininet VM comes with POX preinstalled, so skip this step if you chose to use this VM.

    3. Make sure POX is on the dart branch by entering the POX folder (/home/mininet/pox in the Mininet preinstalled VM) and running:

       git checkout dart
      
    4. Clone CloudFirewall’s git repository by running:

       git clone https://github.com/matanby/CloudFirewall.git
      
    5. Install Python development tools and PIP by running:

       apt-get install -y python-dev python-pip
      
    6. Install all package dependencies by running:

       sudo pip install -r CloudFirewall/requirements.txt
      
    7. Run the SDN firewall:

       cd CloudFirewall/sdn-fw/
       chmod +x ./run_fw.sh
       ./run_fw.sh
      

    Note: the run_pox.py script is configured to run POX from /home/mininet/pox, if you have POX installed in some other path, edit this file and change it accordingly. 8. Run Mininet with the sample network topology provided:

        cd CloudFirewall/sdn-fw/test/
        chmod +x ./run_mininet.sh
        ./run_mininet.sh
    
    1. Run the UI web application:

       cd CloudFirewall/cloudfirewall/
       python app.py
      
    2. Access the UI by entering: http://[MININET_HOST_IP]:5000


    Screenshots

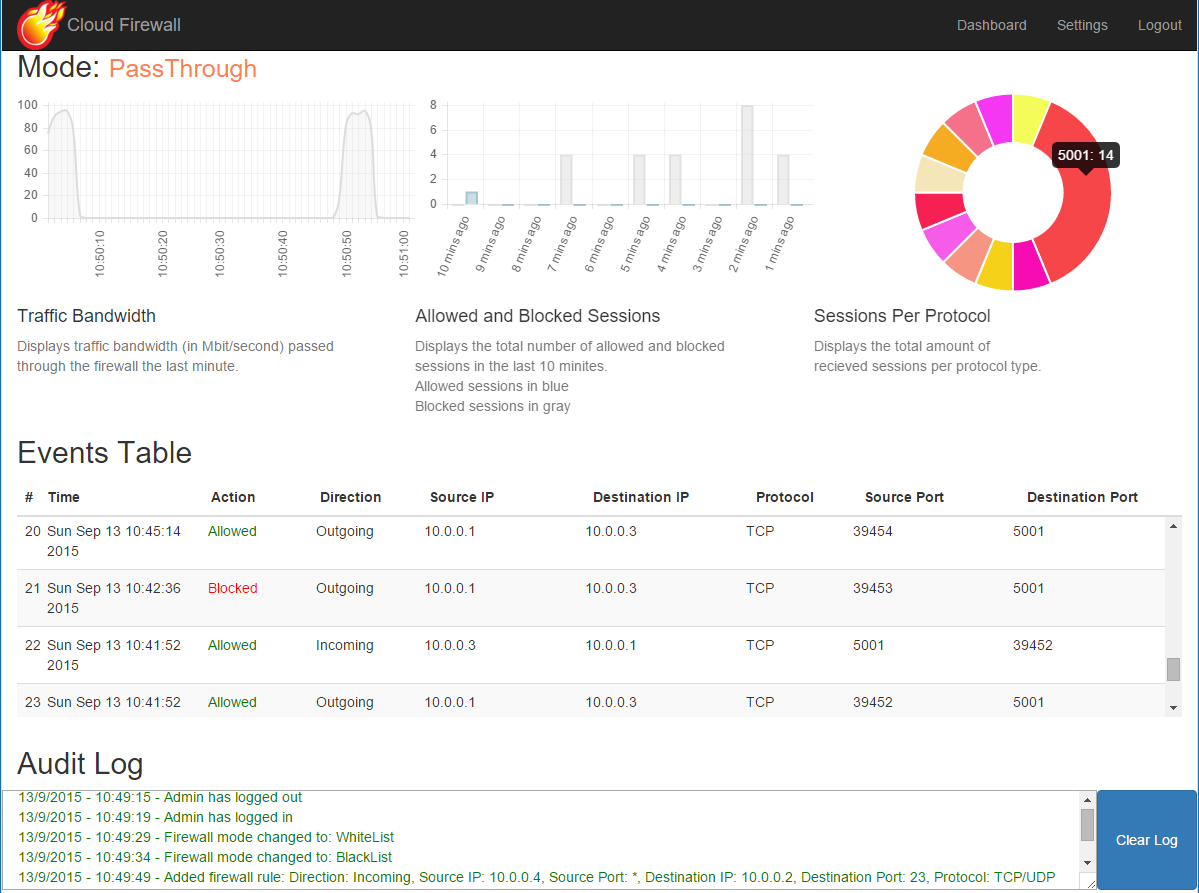
    Here are a couple of screenshots of the web UI:

    The dashboard: CloudFirewall's dashboard

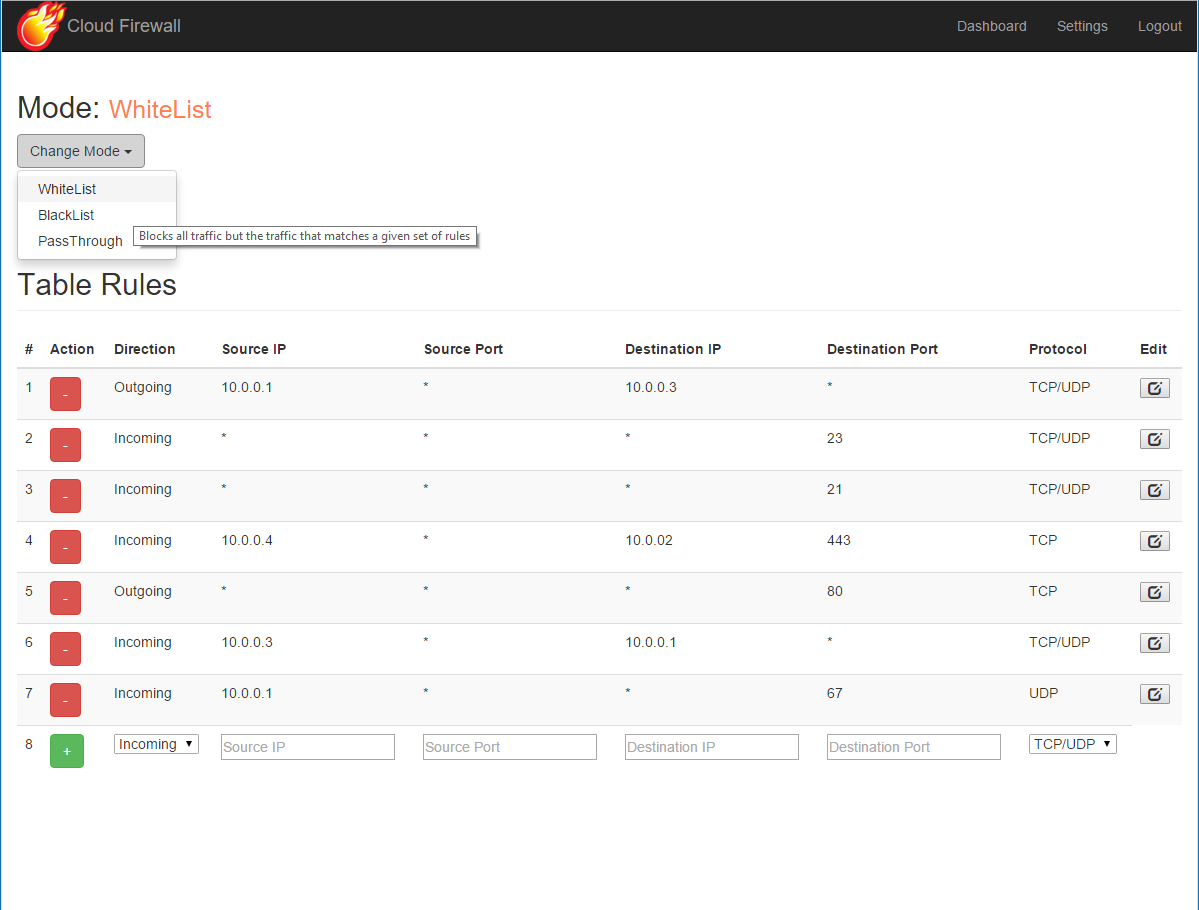
    The settings section: CloudFirewall's settings section


    Credits

    This project was created by Matan Ben-Yosef and Nir Parisian as a part of the course Advanced Operating Systems & Cloud Technologies (67788), instructed by Dr. Yaron Weinsberg and Prof. Danny Dolev, in spring semester of 2015, Hebrew University Of Jerusalem.


    Visit original content creator repository
  • Principle-Concepts-of-Computer-Vision

    Principles of Computer Vision for AI

    Author

    Matthias Bartolo 0436103L

    Preview:

    Description of Task:

    Through the following tasks, a deeper understanding of computer vision was achieved, with a particular focus on tools and frameworks that enabled its implementation:

    In the first part of the task, a variety of Data Augmentation techniques in computer vision were explored, encompassing both theoretical and practical aspects. The objectives involved investigating the concept of data augmentation, conducting a comprehensive review of relevant literature, implementing selected techniques using TensorFlow, PyTorch, and OpenCV, and evaluating the performance of augmented images in comparison to other approaches and the original images. Valuable insights into the potential and effectiveness of data augmentation techniques in computer vision were obtained.

    In the second part of the task, various tutorials were followed to delve into specific tasks that enhance computer vision capabilities. This endeavor involved experimenting with a wide range of techniques, including both Point Processing and Area Processing. Convolution techniques, including sobel kernel, box filter, and gaussian kernel, were studied, as they play a fundamental role in tasks such as edge detection and smoothing. Additionally, Morphology operations like dilation, erosion, opening, closing, and text segmentation were explored, which are crucial for image processing tasks like noise removal, shape detection, and text extraction. Feature Detection techniques, such as Corner Harris, Sci Thomasi, SIFT, SURF, and ORB, were also examined, as they enable the identification and extraction of distinctive features for tasks like object recognition and tracking.

    data augmentation image

    By completing these tasks, the project achieved a comprehensive understanding of computer vision principles and techniques. The exploration of data augmentation techniques, along with the utilization of tools and frameworks, provided valuable insights into the potential and effectiveness of computer vision applications.

    Deliverables:

    The repository includes the Computer Vision Tutorials and Group Project.

    Visit original content creator repository
  • simple-ca

    Simple CA

    This tool is a simple CA intended to be executed via cli and http.

    Mainly intended for development/testing environments.

    Build executable

    go build

    Update config.yml

    data_directory: ./tmp/
    http_server:
        listen_address: 127.0.0.1
        listen_port: 5000
    all_ca_configs:
        ca_1:
            subject:
                common_name: My CA 1
                country:
                    - IT
                organization:
                    - ACME Corp
                organizational_unit:
                    - PKI
                locality: []
                province: []
                street_address: []
                postal_code: []
            validity:
                years: 1
                months: 1
                days: 10
            key_config:
                type: rsa
                config:
                    size: 4096
            crl_ttl: 12h
            permitted_dns_domains_critical: true
            permitted_dns_domains: []
            excluded_dns_domains: []
            permitted_ip_ranges:
                - 192.168.0.0/16
                - 10.0.0.0/8
            excluded_ip_ranges: []
            permitted_email_addresses: []
            excluded_email_addresses: []
            permitted_uri_domains: []
            excluded_uri_domains: []
            http_server_options:
                users:
                    my_user: my_pass
    

    Bootstrap CAs

    ./simple-ca

    Local use

    Generate csr using openssl

    openssl req \
        -nodes \
        -subj "/CN=www.example.com" \
         -addext "subjectAltName = DNS:www.example.com , DNS:www2.example.com" \
        -addext "extendedKeyUsage = serverAuth, clientAuth" \
        -addext "keyUsage=keyEncipherment" \
        -newkey rsa:2048 \
        -keyout ${KEYS_DIR}/www.example.com.key.pem \
        -out ${CSRPOOL}/www.example.com.csr.pem
    
    
    openssl req \
        -in ${CSRPOOL}/www.example.com.csr.pem \
        -noout \
        -text

    Sign all CSRs and generate new CRL

    ./simple-ca

    HTTP server

    Run

    ./simple-ca http

    Requests

    openssl req \
        -nodes \
        -subj "/CN=www.example.com" \
         -addext "subjectAltName = DNS:www.example.com , DNS:www2.example.com" \
        -addext "extendedKeyUsage = serverAuth, clientAuth" \
        -addext "keyUsage=keyEncipherment" \
        -newkey rsa:2048 \
        -keyout ${KEYS_DIR}/www.example.com.key.pem \
        -out ${CSR_DIR}/www.example.com.csr.pem
    
    
    openssl req \
        -in ${CSR_DIR}/www.example.com.csr.pem \
        -noout \
        -text
    
    CA_ID=ca_1
    
    curl \
        -sSLf \
        -T ${CSR_DIR}/www.example.com.csr.pem \
        --user my_user:my_pass \
        -X POST \
        http://localhost:5000/ca/$CA_ID/csr/sign
    
    curl \
        -sSLf \
        --user my_user:my_pass \
        -X POST \
        http://localhost:5000/ca/$CA_ID/crt/revoke/12345

    Visit original content creator repository

  • google-tag-manager-controller

    Google Tag Manager Python API

    🐍 Table of Contents 🐍

    ⚡ About ⚡

    The Google Tag Manager API provides access to Google Tag Manager configuration data for an authorized user. With this API you can manage: accounts, containers, worksapces, tags, triggers and variables

    Benefit

    The Google Tag Manager API handles millions of operations. To protect the system from receiving more operations than it can handle, and to ensure an equitable distribution of system resources, it is necessary to employ a quota system.

    Info

    https://developers.google.com/tag-manager/api/v2/reference
    https://developers.google.com/tag-manager/api/v2/devguide

    Software architecture

    GitHub Logo

    Quota Limits

    • 50,000 requests per project per day, which can be increased.
    • 10 queries per second (QPS) per IP address
    • By default, it is set to 100 requests per 100 seconds per user
    • This can be adjusted to a maximum value of 1,000.

    Setup

    0. activate venv

    python -m venv venv
    source ./venv/bin/activate (Mac) or venv\Scripts\activate (Windows)

    1. install the packages

    pip install -r requirements.txt

    2. create the service account & OAuth client in GCP for the Google Tag Manager API

    https://console.cloud.google.com/

    3. download the client secrets.json (OAuth 2.0 Client ID)

    4. create conf repository and locate client_secrets.json into this repository

    mkdir conf
    mv xxxxx-xxxxx.json client_secrets.json

    5. create .env and put there private key and sensitive information

    touch .env

    6. setup the .env

    • CLIENT_SECRETS=’conf/client_secrets.json’
    • ACCOUNT_ID=’xxxx’
    • CONTAINER_NAME=’xxxx’
    • CONTAINER_ID=’xxxx’
    • WORKSPACE_NAME=’xxxx’
    • WORKSPACE_ID=’xx’

    7. setup GTM account info

    CLIENT_SECRETS = config('CLIENT_SECRETS')
    ACCOUNT_ID = config('ACCOUNT_ID')
    CONTAINER_NAME= config('CONTAINER_NAME')
    CONTAINER_ID = config('CONTAINER_ID')
    WORKSPACE_NAME = config('WORKSPACE_NAME')
    WORKSPACE_ID = config('WORKSPACE_ID')

    8. RUN GTM Scanner to see the GTM information

    you can scan the account, container, workspace, tag, trigger, variable information by using gtm_scanner.py

    python project/run_scanner.py

    8. RUN GTM Creator

    you can create new workspaces, tags, triggers, variables and publish these by using gtm_creator.py

    python project/run_creator.py

    Visit original content creator repository