Worried about your wallet bulge? Remembering which credit card to use for which situation is difficult, but it doesn’t have to be. DisCard missed opportunity costs so you can spend with confidence!
Explore the docs » View Demo
·
Report Bug
·
Request Feature
DisCard is a web app built to help users manage their creditcards and maximize cash back rewards. Using a database of all Canadian creditcards and cash back deals from Rakuten, DisCard can tell you the best credit card to use based on your shopping needs with a sleek and responsive UI.
Simply login to DisCard with Google and add your cards to the app. You can then use the search function to find a store or directly use your location with Google Maps to find nearby stores. DisCard will then use its large database of credit cards and deals to select the best card to use from your set of cards. Just like that, you’ll be set to maximize your cashback rewards!
At the top of every page, you’ll be able to navigate between the main page, the credit card list, and info about the project. There’s also an option for you to login to DisCard with Google so that you can save your cards on the app.
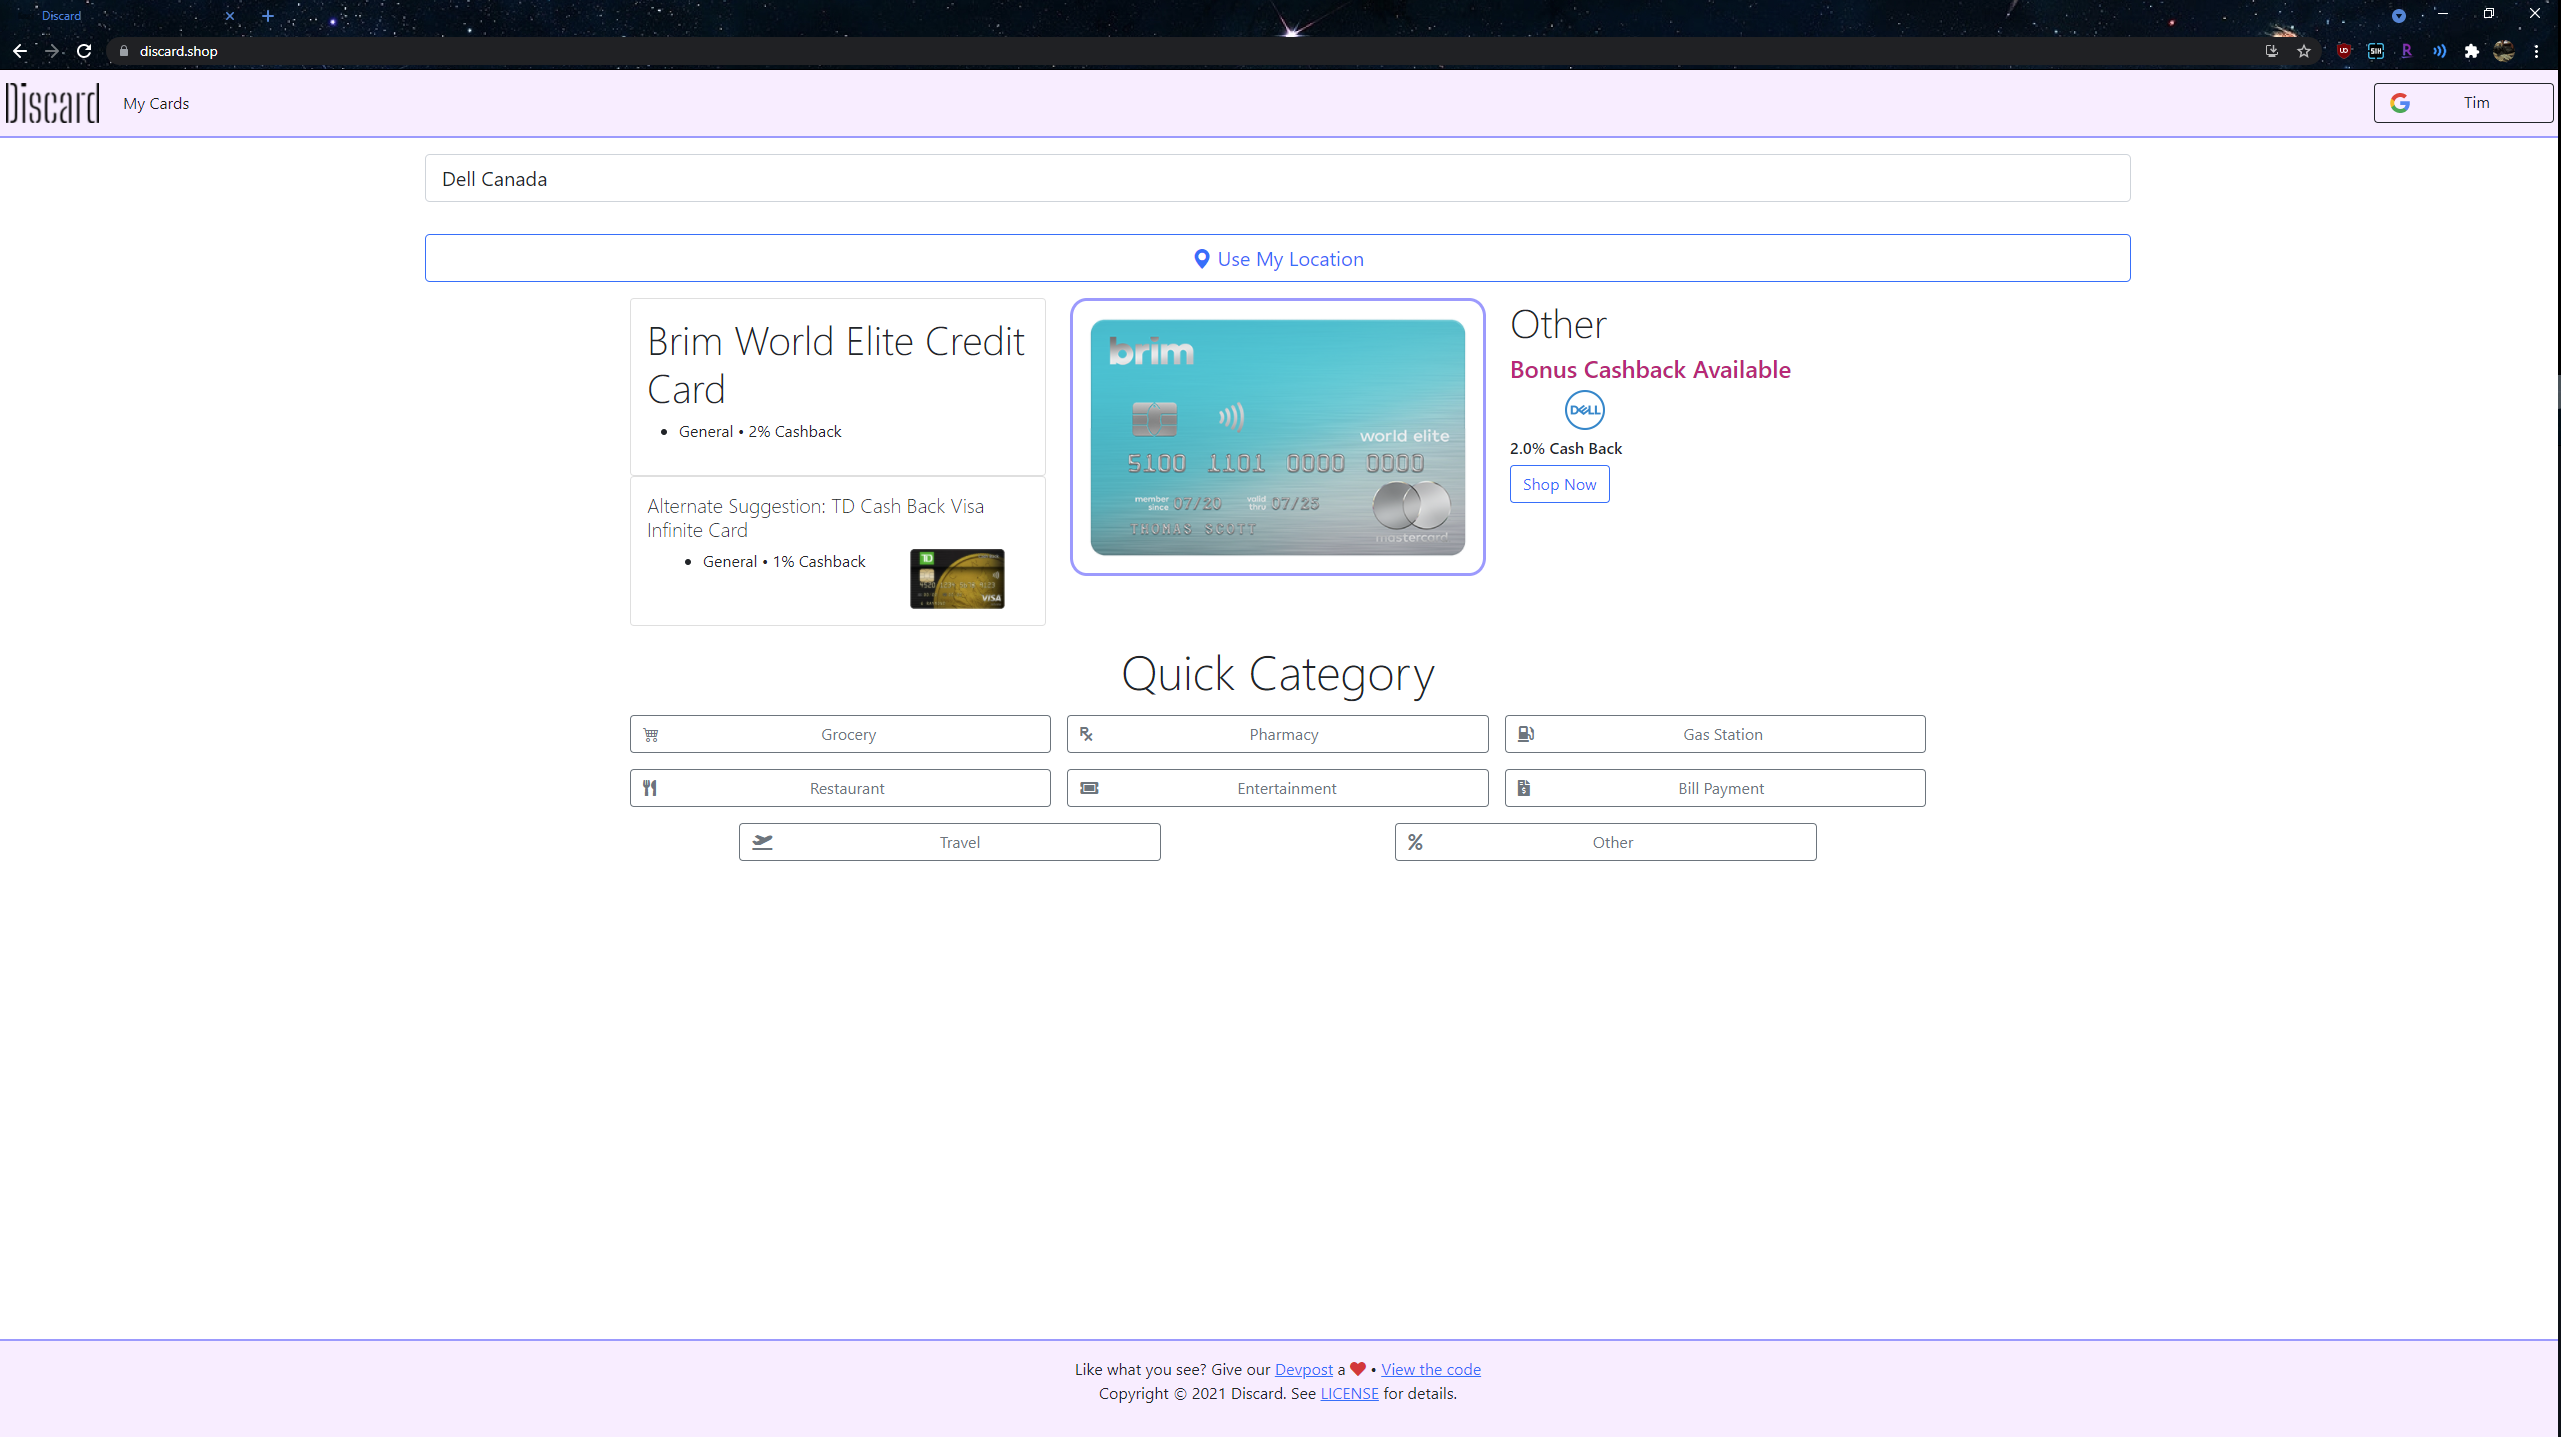
Main Page
On the main page, you will be greeted by a few different options:
Search Bar: Enter the name of the store you’re looking to shop at
Use My Location Button: Get nearby stores directly using your devices location
Quick Category: Choose a category to find the best card suited for a broad category of stores
After using any of these options, you’ll be told which card is the best to use.
Credit Card List
This is the page where you can view and add to your set of credit cards on DisCard. Clicking on a card shows details for the card like its name and cashback details. To add a card, you can click on the search button or the manual add button.
Search:
The search button lets you add a credit card by searching through a database of Canadian credit cards.
To search for a card, enter the card’s name in the search bar and select an option from the list of cards.
TBC [after selecting a card, you’ll see the card’s cashback options?]
Manual Add:
The manual add button lets you manually add a credit card in case the search function can’t provide the right card.
To use this function, upload a photo of the card, enter its name, and enter the cashback provided by the card for each category.
You can also enter cashback for specific stores here.
The card will be added to your account and DisCard will consider it when finding the best card for you to use.
Native Mobile App (PWA already serves mobile app functions, but native apps are generally cleaner)
Contactless payment setup allowing users to automatically pay using their best credit card depending on their location
Suggest better credit cards offers to users
Indicate cards that have excessive annual fees
Track coupon codes
Editing existing card entries
Contributing
Contributions are what make the open source community such an amazing place to be learn, inspire, and create. Any contributions you make are greatly appreciated.
Fork the Project
Create your Feature Branch (git checkout -b feature/AmazingFeature)
Commit your Changes (git commit -m 'Add some AmazingFeature')
Push to the Branch (git push origin feature/AmazingFeature)
Open a Pull Request
License
Distributed under the MIT License. See LICENSE for more information.
Case Harvester is a project designed to scrape the Maryland Judiciary Case Search (MJCS) and build a near-complete database of Maryland court cases that can be queried and analyzed without the limitations of the MJCS interface. It is designed to leverage Amazon Web Services (AWS) for scalability and performance.
Our database of cases (with criminal defendant PII redacted) is available to the public and can be found at mdcaseexplorer.com, which is built using our Case Explorer software. REST and GraphQL APIs are available. If you would like to download tables from our database exported monthly, you can find that at exports.mdcaseexplorer.com.
NOTE: Unless you are modifying Case Harvester for specific purposes, please do not run your own instance so that MJCS is spared unneccesary load. Instead, use the options described above for viewing the data, or if you have an AWS account you are also welcome to clone our database directly.
Architecture
Case Harvester is split into three main components: spider, scraper, and parser. Each component is a part of a pipeline that finds, downloads, and parses case data from the MJCS. The following diagram shows at a high level how each of these components interact:
Spider
The spider component is responsible for discovering new case numbers. It does this by submitting search queries to the MJCS and iterating through the results. Because the MJCS only returns a maximum of 500 results, the search algorithm splits queries that return 500 results into a set of more narrowed queries which are then submitted. Each of these queries is then split again if more than 500 results are returned, and so forth, until the MJCS is exhaustively searched for case numbers.
Scraper
The scraper component downloads and stores the case details for every case number discovered by the spider. The full HTML for each case is added to an S3 bucket. Version information is kept for each case, including a timestamp of when each version was downloaded, so changes to a case can be recorded and referenced.
Parser
The parser component is a Lambda function that parses the fields of information in the HTML case details for each case, and stores that data in the PostgreSQL database. Each new item added to the scraper S3 bucket triggers a new parser Lambda invocation, which allows for significant scaling.
Case details in the MJCS are formatted differently depending on the county and type of case (e.g. district vs circuit court, criminal vs civil, etc.), and whether it is in one of the new MDEC-compatible formats. MJCS assigns a code to each of these different case types:
ODYCRIM: MDEC Criminal Cases
ODYTRAF: MDEC Traffic Cases
ODYCIVIL: MDEC Civil Cases
ODYCVCIT: MDEC Civil Citations
ODYCOSA: MDEC Appellate Court of Maryland (formerly Court of Special Appeals)
ODYCOA: MDEC Supreme Court of Maryland (formerly Court of Appeals)
DSCR: District Court Criminal Cases
DSCIVIL: District Court Civil Cases
DSCP: District Court Civil Citations
DSTRAF: District Court Traffic Cases
K: Circuit Court Criminal Cases
CC: Circuit Court Civil Cases
DV: Domestic Violence Cases
DSK8: Baltimore City Criminal Cases
PG: Prince George’s County Circuit Court Criminal Cases
PGV: Prince George’s County Circuit Court Civil Cases
MCCI: Montgomery County Civil Cases
MCCR: Montgomery County Criminal Cases
Each different parser breaks down the case details to a granular level and stores the data in a number of database tables. This schematic diagram illustrates how this data is represented in the database.
This repository contains a implementation of a camera gateway for BlackFly GigE camera models using Spinnaker SDK. All messages used are defined in is-msgs and is-wire-py package is used to implement the pub/sub middleware for the Inteligent Space architecture.
Configuration
The behavior of the service can be customized by passing a JSON configuration file as the first argument, e.g: is-spinnaker-gateway options.json. The schema for this file can be found in is_spinnaker_gateway/conf/options.proto. An example configuration file can be found in etc/conf/options.json. Check the following table to see the available settings and which ones are modifiable during streaming:
Configuration
Available
Modifiable during streaming
Sampling Rate
✔️
✔️
Delay
❌
❌
Image Resolution
❌
❌
Image Format
✔️
✔️
Image Color Space
✔️
❌
Region of Interest
✔️
❌
Brightness
✔️
✔️
Exposure
❌
❌
Focus
❌
❌
Gain
✔️
✔️
Gamma
❌
❌
Hue
❌
❌
Iris
❌
❌
Saturation
❌
❌
Sharpness
❌
❌
Shutter
✔️
✔️
White Balance RV
✔️
✔️
White Balance BU
✔️
✔️
Zoom
❌
❌
Contrast
❌
❌
NOTE
When setting the white_balance_rv to automatic, white_balance_bu will also be set to automatic. It is not possible to set one to automatic and the other not. So, be careful when configuring it.
First, make sure to download Spinnaker SDK for Ubuntu 22.04. The files are and their locations are:
spinnaker-3.0.0.118-amd64-pkg.tar.gz: Linux > Ubuntu 22.04
spinnaker_python-3.0.0.118-cp310-cp210-linux_x86_64.tar.gz: Linux > Ubuntu 22.04 > python
Then, extract and move all .deb and *.whl into etc/spinnaker/ folder.
Docker image
Once you have the necessary files for the camera driver at etc/spinnaker/, to build the docker image just run:
make image
You can also build the image with your user and the version you want:
make image USER=luizcarloscf VERSION=0.1.3-beta
Troubleshooting
The Teledyne FLIR company provides a good guide to Troubleshooting Image Consistency Errors. Image consistency errors have a variety of causes, and the user may have to address more than one cause to correct the errors. Note that this gateway provides some really important configurations to optimize the streamming:
onboard_color_processing: by default, the cameras capture images with a BayerRG8 filter. Essentially, an 1288×788 with only one channel. To build a RGB Image is necessary to interpolate for each pixel based on its neighbors the other channel values. The Blackfly GigE cameras have the capacity to run a interpolation algorithm and construct a RGB image onboard. But, it implies in more data over the network. If you would like to run all gateways in only one server, you may have to set this to False. However, by setting onboard_color_processing=False it implies in some processing time to construct an RGB inside the gateway.
algorithm: if onboard_color_processing=False, you can choose the color processing algorithm to build the RGB image. The Teledyne FLIR company also provides a guide to Undestading Color Interpolation, where you can choose the best algorithm to fit your needs.
packet_size: UDP packet size. Always try to optimize the packet size according to your network settings. Larger packets implies in less chance of packet drop and less packets per image, but your local network should not fragment these packets to improve streamming.
packet_delay: UDP packet delay. Always try to maximize to packet delay. Higher delays allows socket to process more resend requests. However, when increasing the packet delay, the maximum framerate will be lower. In the guide Troubleshooting Image Consistency Errors, there is a section about Understanding Packet Delay, Device Link Throughput, and camera framerate that explain how packet delay changes the maximum framerate.
packet_resend: flag to enable/disable resend UDP Packets. If not enable, may result in image inconsistencies.
packet_resend_timeout: time in milliseconds to wait after the image trailer is received and before is completed by the driver.
packet_resend_max_requests: maximum number of requests per image. Each resend request consists of a span of consecutive UDP packet IDs.
restart_period: restart capture stream from time to time. The package PySpin has some bugs, after some time the streamming stops due to memory related issues in Boost C++ library used by Spinnaker SDK.
This project aims to predict the selling price of used cars based on various features such as the car’s age, kilometers driven, fuel type, transmission, and number of previous owners. By using Machine Learning models, we can help car buyers and sellers make informed pricing decisions.
🚀 Key Features:
✔️ Data Preprocessing (Handling categorical & numerical data)
✔️ Exploratory Data Analysis (EDA)
✔️ Feature Engineering & Selection
✔️ Model Training & Evaluation
📂 Dataset Overview
The dataset contains 301 entries with the following 9 features:
Feature
Description
Car_Name
Name of the car (string)
Year
Manufacturing year (integer)
Selling_Price
Price at which the car is being sold (Target variable)
Present_Price
Price of the car when it was new
Driven_kms
Kilometers driven
Fuel_Type
Type of fuel (Petrol, Diesel, CNG)
Selling_type
Seller type (Dealer or Individual)
Transmission
Manual or Automatic
Owner
Number of previous owners
📌 Insights from EDA:
✅ Selling price is right-skewed (most cars are lower-priced).
✅ Present Price has the highest correlation with Selling Price.
✅ Fuel Type: Petrol cars dominate, followed by Diesel.
✅ Transmission Type: Manual cars are more common than automatic.
🔧 Data Preprocessing
✔️ One-hot encoding for categorical features.
✔️ Feature scaling for numerical values.
✔️ Dropped irrelevant features like Car_Name.
✔️ Splitting dataset into 80% Training and 20% Testing.
# Splitting data into train and test setsfromsklearn.model_selectionimporttrain_test_splitX_train, X_test, y_train, y_test=train_test_split(X, y, test_size=0.2, random_state=42)
🤖 Model Training
We experimented with different models:
✅ Linear Regression
✅ Random Forest Regressor
✅ Decision Tree
✅ XGBoost
Open Car Price Prediction with Machine Learning.ipynb and run all cells.
📌 Future Improvements
🔹 Improve feature selection & engineering.
🔹 Try Deep Learning models.
🔹 Build a web app using Flask / Streamlit for real-time predictions.
💡 Conclusion
This project successfully predicts used car prices with high accuracy using machine learning techniques. The XGBoost model provided the best results with a 94% R² Score.
A fast & densely stored hashmap and hashset based on robin-hood backward shift deletion for C++17 and later.
The classes ankerl::unordered_dense::map and ankerl::unordered_dense::set are (almost) drop-in replacements of std::unordered_map and std::unordered_set. While they don’t have as strong iterator / reference stability guaranties, they are typically much faster.
Additionally, there are ankerl::unordered_dense::segmented_map and ankerl::unordered_dense::segmented_set with lower peak memory usage. and stable iterator/references on insert.
The chosen design has a few advantages over std::unordered_map:
Perfect iteration speed – Data is stored in a std::vector, all data is contiguous!
Very fast insertion & lookup speed, in the same ballpark as absl::flat_hash_map
Low memory usage
Full support for std::allocators, and polymorphic allocators. There are ankerl::unordered_dense::pmr typedefs available
Customizeable storage type: with a template parameter you can e.g. switch from std::vector to boost::interprocess::vector or any other compatible random-access container.
Better debugging: the underlying data can be easily seen in any debugger that can show an std::vector.
There’s no free lunch, so there are a few disadvantages:
Deletion speed is relatively slow. This needs two lookups: one for the element to delete, and one for the element that is moved onto the newly empty spot.
no const Key in std::pair<Key, Value>
Iterators and references are not stable on insert or erase.
2. Installation
The default installation location is /usr/local.
2.1. Installing using cmake
Clone the repository and run these commands in the cloned folder:
To use the module with e.g. in module_test.cpp, use
import ankerl.unordered_dense;
and compile with e.g.
clang++ -std=c++20 -fprebuilt-module-path=. ankerl.unordered_dense.o module_test.cpp -o main
A simple demo script can be found in test/modules.
3.2. Hash
ankerl::unordered_dense::hash is a fast and high quality hash, based on wyhash. The ankerl::unordered_dense map/set differentiates between hashes of high quality (good avalanching effect) and bad quality. Hashes with good quality contain a special marker:
using is_avalanching = void;
This is the cases for the specializations bool, char, signed char, unsigned char, char8_t, char16_t, char32_t, wchar_t, short, unsigned short, int, unsigned int, long, long long, unsigned long, unsigned long long, T*, std::unique_ptr<T>, std::shared_ptr<T>, enum, std::basic_string<C>, and std::basic_string_view<C>.
Hashes that do not contain such a marker are assumed to be of bad quality and receive an additional mixing step inside the map/set implementation.
auto ids = ankerl::unordered_dense::set<id, custom_hash_simple>();
Since custom_hash_simple doesn’t have a using is_avalanching = void; marker it is considered to be of bad quality and additional mixing of x.value is automatically provided inside the set.
3.2.2. High Quality Hash
Back to the id example, we can easily implement a higher quality hash:
For heterogeneous overloads to take affect, both hasher and key_equal need to have the attribute is_transparent set.
Here is an example implementation that’s usable with any string types that is convertible to std::string_view (e.g. char const* and std::string):
structstring_hash {
using is_transparent = void; // enable heterogeneous overloadsusing is_avalanching = void; // mark class as high quality avalanching hash
[[nodiscard]] autooperator()(std::string_view str) constnoexcept -> uint64_t {
return ankerl::unordered_dense::hash<std::string_view>{}(str);
}
};
To make use of this hash you’ll need to specify it as a type, and also a key_equal with is_transparent like std::equal_to<>:
auto map = ankerl::unordered_dense::map<std::string, size_t, string_hash, std::equal_to<>>();
For more information see the examples in test/unit/transparent.cpp.
3.2.5. Automatic Fallback to std::hash
When an implementation for std::hash of a custom type is available, this is automatically used and assumed to be of bad quality (thus std::hash is used, but an additional mixing step is performed).
3.2.6. Hash the Whole Memory
When the type has a unique object representation (no padding, trivially copyable), one can just hash the object’s memory. Consider a simple class
structpoint {
int x{};
int y{};
autooperator==(point const& other) const -> bool {
return x == other.x && y == other.y;
}
};
A fast and high quality hash can be easily provided like so:
In addition to the standard std::unordered_map API (see https://en.cppreference.com/w/cpp/container/unordered_map) we have additional API that is somewhat similar to the node API, but leverages the fact that we’re using a random access container internally:
3.3.1. auto extract() && -> value_container_type
Extracts the internally used container. *this is emptied.
3.3.2. extract() single Elements
Similar to erase() I have an API call extract(). It behaves exactly the same as erase, except that the return value is the moved element that is removed from the container:
auto extract(const_iterator it) -> value_type
auto extract(Key const& key) -> std::optional<value_type>
template <class K> auto extract(K&& key) -> std::optional<value_type>
Note that the extract(key) API returns an std::optional<value_type> that is empty when the key is not found.
3.3.3. [[nodiscard]] auto values() const noexcept -> value_container_type const&
Exposes the underlying values container.
3.3.4. auto replace(value_container_type&& container)
Discards the internally held container and replaces it with the one passed. Non-unique elements are
removed, and the container will be partly reordered when non-unique elements are found.
3.4. Custom Container Types
unordered_dense accepts a custom allocator, but you can also specify a custom container for that template argument. That way it is possible to replace the internally used std::vector with e.g. std::deque or any other container like boost::interprocess::vector. This supports fancy pointers (e.g. offset_ptr), so the container can be used with e.g. shared memory provided by boost::interprocess.
3.5. Custom Bucket Types
The map/set supports two different bucket types. The default should be good for pretty much everyone.
ankerl::unordered_dense provides a custom container implementation that has lower memory requirements than the default std::vector. Memory is not contiguous, but it can allocate segments without having to reallocate and move all the elements. In summary, this leads to
Much smoother memory usage, memory usage increases continuously.
No high peak memory usage.
Faster insertion because elements never need to be moved to new allocated blocks
Slightly slower indexing compared to std::vector because an additional indirection is needed.
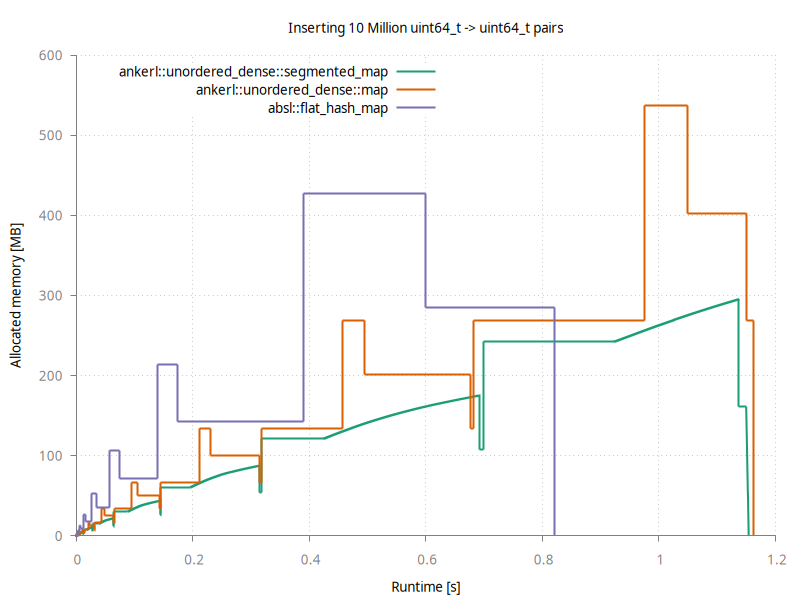
Here is a comparison against absl::flat_hash_map and the ankerl::unordered_dense::map when inserting 10 million entries
Abseil is fastest for this simple inserting test, taking a bit over 0.8 seconds. It’s peak memory usage is about 430 MB. Note how the memory usage goes down after the last peak; when it goes down to ~290MB it has finished rehashing and could free the previously used memory block.
ankerl::unordered_dense::segmented_map doesn’t have these peaks, and instead has a smooth increase of memory usage. Note there are still sudden drops & increases in memory because the indexing data structure needs still needs to increase by a fixed factor. But due to holding the data in a separate container we are able to first free the old data structure, and then allocate a new, bigger indexing structure; thus we do not have peaks.
5. Design
The map/set has two data structures:
std::vector<value_type> which holds all data. map/set iterators are just std::vector<value_type>::iterator!
An indexing structure (bucket array), which is a flat array with 8-byte buckets.
5.1. Inserts
Whenever an element is added it is emplace_back to the vector. The key is hashed, and an entry (bucket) is added at the
corresponding location in the bucket array. The bucket has this structure:
The distance of that value from the original hashed location (3 most significant bytes in dist_and_fingerprint)
A fingerprint; 1 byte of the hash (lowest significant byte in dist_and_fingerprint)
An index where in the vector the actual data is stored.
This structure is especially designed for the collision resolution strategy robin-hood hashing with backward shift
deletion.
5.2. Lookups
The key is hashed and the bucket array is searched if it has an entry at that location with that fingerprint. When found,
the key in the data vector is compared, and when equal the value is returned.
5.3. Removals
Since all data is stored in a vector, removals are a bit more complicated:
First, lookup the element to delete in the index array.
When found, replace that element in the vector with the last element in the vector.
Update two locations in the bucket array: First remove the bucket for the removed element
Then, update the value_idx of the moved element. This requires another lookup.
6. Real World Usage
On 2023-09-10 I did a quick search on github to see if this map is used in any popular open source projects. Here are some of the projects
I found. Please send me a note if you want on that list!
PruaSlicer – G-code generator for 3D printers (RepRap, Makerbot, Ultimaker etc.)
Kismet: Wi-Fi, Bluetooth, RF, and more. Kismet is a sniffer, WIDS, and wardriving tool for Wi-Fi, Bluetooth, Zigbee, RF, and more, which runs on Linux and macOS
Rspamd – Fast, free and open-source spam filtering system.
Slang – Slang is a shading language that makes it easier to build and maintain large shader codebases in a modular and extensible fashion.
CyberFSR2 – Drop-in DLSS replacement with FSR 2.0 for various games such as Cyberpunk 2077.
ossia score – A free, open-source, cross-platform intermedia sequencer for precise and flexible scripting of interactive scenarios.
HiveWE – A Warcraft III World Editor (WE) that focusses on speed and ease of use.
opentxs – The Open-Transactions project is a collaborative effort to develop a robust, commercial-grade, fully-featured, free-software toolkit implementing the OTX protocol as well as a full-strength financial cryptography library, API, GUI, command-line interface, and prototype notary server.
LuisaCompute – High-Performance Rendering Framework on Stream Architectures
Lethe – Lethe (pronounced /ˈliːθiː/) is open-source computational fluid dynamics (CFD) software which uses high-order continuous Galerkin formulations to solve the incompressible Navier–Stokes equations (among others).
PECOS – PECOS is a versatile and modular machine learning (ML) framework for fast learning and inference on problems with large output spaces, such as extreme multi-label ranking (XMR) and large-scale retrieval.
Operon – A modern C++ framework for symbolic regression that uses genetic programming to explore a hypothesis space of possible mathematical expressions in order to find the best-fitting model for a given regression target.
MashMap – A fast approximate aligner for long DNA sequences
minigpt4.cpp – Port of MiniGPT4 in C++ (4bit, 5bit, 6bit, 8bit, 16bit CPU inference with GGML)
A fast & densely stored hashmap and hashset based on robin-hood backward shift deletion for C++17 and later.
The classes ankerl::unordered_dense::map and ankerl::unordered_dense::set are (almost) drop-in replacements of std::unordered_map and std::unordered_set. While they don’t have as strong iterator / reference stability guaranties, they are typically much faster.
Additionally, there are ankerl::unordered_dense::segmented_map and ankerl::unordered_dense::segmented_set with lower peak memory usage. and stable iterator/references on insert.
The chosen design has a few advantages over std::unordered_map:
Perfect iteration speed – Data is stored in a std::vector, all data is contiguous!
Very fast insertion & lookup speed, in the same ballpark as absl::flat_hash_map
Low memory usage
Full support for std::allocators, and polymorphic allocators. There are ankerl::unordered_dense::pmr typedefs available
Customizeable storage type: with a template parameter you can e.g. switch from std::vector to boost::interprocess::vector or any other compatible random-access container.
Better debugging: the underlying data can be easily seen in any debugger that can show an std::vector.
There’s no free lunch, so there are a few disadvantages:
Deletion speed is relatively slow. This needs two lookups: one for the element to delete, and one for the element that is moved onto the newly empty spot.
no const Key in std::pair<Key, Value>
Iterators and references are not stable on insert or erase.
2. Installation
The default installation location is /usr/local.
2.1. Installing using cmake
Clone the repository and run these commands in the cloned folder:
To use the module with e.g. in module_test.cpp, use
import ankerl.unordered_dense;
and compile with e.g.
clang++ -std=c++20 -fprebuilt-module-path=. ankerl.unordered_dense.o module_test.cpp -o main
A simple demo script can be found in test/modules.
3.2. Hash
ankerl::unordered_dense::hash is a fast and high quality hash, based on wyhash. The ankerl::unordered_dense map/set differentiates between hashes of high quality (good avalanching effect) and bad quality. Hashes with good quality contain a special marker:
using is_avalanching = void;
This is the cases for the specializations bool, char, signed char, unsigned char, char8_t, char16_t, char32_t, wchar_t, short, unsigned short, int, unsigned int, long, long long, unsigned long, unsigned long long, T*, std::unique_ptr<T>, std::shared_ptr<T>, enum, std::basic_string<C>, and std::basic_string_view<C>.
Hashes that do not contain such a marker are assumed to be of bad quality and receive an additional mixing step inside the map/set implementation.
auto ids = ankerl::unordered_dense::set<id, custom_hash_simple>();
Since custom_hash_simple doesn’t have a using is_avalanching = void; marker it is considered to be of bad quality and additional mixing of x.value is automatically provided inside the set.
3.2.2. High Quality Hash
Back to the id example, we can easily implement a higher quality hash:
For heterogeneous overloads to take affect, both hasher and key_equal need to have the attribute is_transparent set.
Here is an example implementation that’s usable with any string types that is convertible to std::string_view (e.g. char const* and std::string):
structstring_hash {
using is_transparent = void; // enable heterogeneous overloadsusing is_avalanching = void; // mark class as high quality avalanching hash
[[nodiscard]] autooperator()(std::string_view str) constnoexcept -> uint64_t {
return ankerl::unordered_dense::hash<std::string_view>{}(str);
}
};
To make use of this hash you’ll need to specify it as a type, and also a key_equal with is_transparent like std::equal_to<>:
auto map = ankerl::unordered_dense::map<std::string, size_t, string_hash, std::equal_to<>>();
For more information see the examples in test/unit/transparent.cpp.
3.2.5. Automatic Fallback to std::hash
When an implementation for std::hash of a custom type is available, this is automatically used and assumed to be of bad quality (thus std::hash is used, but an additional mixing step is performed).
3.2.6. Hash the Whole Memory
When the type has a unique object representation (no padding, trivially copyable), one can just hash the object’s memory. Consider a simple class
structpoint {
int x{};
int y{};
autooperator==(point const& other) const -> bool {
return x == other.x && y == other.y;
}
};
A fast and high quality hash can be easily provided like so:
In addition to the standard std::unordered_map API (see https://en.cppreference.com/w/cpp/container/unordered_map) we have additional API that is somewhat similar to the node API, but leverages the fact that we’re using a random access container internally:
3.3.1. auto extract() && -> value_container_type
Extracts the internally used container. *this is emptied.
3.3.2. extract() single Elements
Similar to erase() I have an API call extract(). It behaves exactly the same as erase, except that the return value is the moved element that is removed from the container:
auto extract(const_iterator it) -> value_type
auto extract(Key const& key) -> std::optional<value_type>
template <class K> auto extract(K&& key) -> std::optional<value_type>
Note that the extract(key) API returns an std::optional<value_type> that is empty when the key is not found.
3.3.3. [[nodiscard]] auto values() const noexcept -> value_container_type const&
Exposes the underlying values container.
3.3.4. auto replace(value_container_type&& container)
Discards the internally held container and replaces it with the one passed. Non-unique elements are
removed, and the container will be partly reordered when non-unique elements are found.
3.4. Custom Container Types
unordered_dense accepts a custom allocator, but you can also specify a custom container for that template argument. That way it is possible to replace the internally used std::vector with e.g. std::deque or any other container like boost::interprocess::vector. This supports fancy pointers (e.g. offset_ptr), so the container can be used with e.g. shared memory provided by boost::interprocess.
3.5. Custom Bucket Types
The map/set supports two different bucket types. The default should be good for pretty much everyone.
ankerl::unordered_dense provides a custom container implementation that has lower memory requirements than the default std::vector. Memory is not contiguous, but it can allocate segments without having to reallocate and move all the elements. In summary, this leads to
Much smoother memory usage, memory usage increases continuously.
No high peak memory usage.
Faster insertion because elements never need to be moved to new allocated blocks
Slightly slower indexing compared to std::vector because an additional indirection is needed.
Here is a comparison against absl::flat_hash_map and the ankerl::unordered_dense::map when inserting 10 million entries
Abseil is fastest for this simple inserting test, taking a bit over 0.8 seconds. It’s peak memory usage is about 430 MB. Note how the memory usage goes down after the last peak; when it goes down to ~290MB it has finished rehashing and could free the previously used memory block.
ankerl::unordered_dense::segmented_map doesn’t have these peaks, and instead has a smooth increase of memory usage. Note there are still sudden drops & increases in memory because the indexing data structure needs still needs to increase by a fixed factor. But due to holding the data in a separate container we are able to first free the old data structure, and then allocate a new, bigger indexing structure; thus we do not have peaks.
5. Design
The map/set has two data structures:
std::vector<value_type> which holds all data. map/set iterators are just std::vector<value_type>::iterator!
An indexing structure (bucket array), which is a flat array with 8-byte buckets.
5.1. Inserts
Whenever an element is added it is emplace_back to the vector. The key is hashed, and an entry (bucket) is added at the
corresponding location in the bucket array. The bucket has this structure:
The distance of that value from the original hashed location (3 most significant bytes in dist_and_fingerprint)
A fingerprint; 1 byte of the hash (lowest significant byte in dist_and_fingerprint)
An index where in the vector the actual data is stored.
This structure is especially designed for the collision resolution strategy robin-hood hashing with backward shift
deletion.
5.2. Lookups
The key is hashed and the bucket array is searched if it has an entry at that location with that fingerprint. When found,
the key in the data vector is compared, and when equal the value is returned.
5.3. Removals
Since all data is stored in a vector, removals are a bit more complicated:
First, lookup the element to delete in the index array.
When found, replace that element in the vector with the last element in the vector.
Update two locations in the bucket array: First remove the bucket for the removed element
Then, update the value_idx of the moved element. This requires another lookup.
6. Real World Usage
On 2023-09-10 I did a quick search on github to see if this map is used in any popular open source projects. Here are some of the projects
I found. Please send me a note if you want on that list!
PruaSlicer – G-code generator for 3D printers (RepRap, Makerbot, Ultimaker etc.)
Kismet: Wi-Fi, Bluetooth, RF, and more. Kismet is a sniffer, WIDS, and wardriving tool for Wi-Fi, Bluetooth, Zigbee, RF, and more, which runs on Linux and macOS
Rspamd – Fast, free and open-source spam filtering system.
Slang – Slang is a shading language that makes it easier to build and maintain large shader codebases in a modular and extensible fashion.
CyberFSR2 – Drop-in DLSS replacement with FSR 2.0 for various games such as Cyberpunk 2077.
ossia score – A free, open-source, cross-platform intermedia sequencer for precise and flexible scripting of interactive scenarios.
HiveWE – A Warcraft III World Editor (WE) that focusses on speed and ease of use.
opentxs – The Open-Transactions project is a collaborative effort to develop a robust, commercial-grade, fully-featured, free-software toolkit implementing the OTX protocol as well as a full-strength financial cryptography library, API, GUI, command-line interface, and prototype notary server.
LuisaCompute – High-Performance Rendering Framework on Stream Architectures
Lethe – Lethe (pronounced /ˈliːθiː/) is open-source computational fluid dynamics (CFD) software which uses high-order continuous Galerkin formulations to solve the incompressible Navier–Stokes equations (among others).
PECOS – PECOS is a versatile and modular machine learning (ML) framework for fast learning and inference on problems with large output spaces, such as extreme multi-label ranking (XMR) and large-scale retrieval.
Operon – A modern C++ framework for symbolic regression that uses genetic programming to explore a hypothesis space of possible mathematical expressions in order to find the best-fitting model for a given regression target.
MashMap – A fast approximate aligner for long DNA sequences
minigpt4.cpp – Port of MiniGPT4 in C++ (4bit, 5bit, 6bit, 8bit, 16bit CPU inference with GGML)
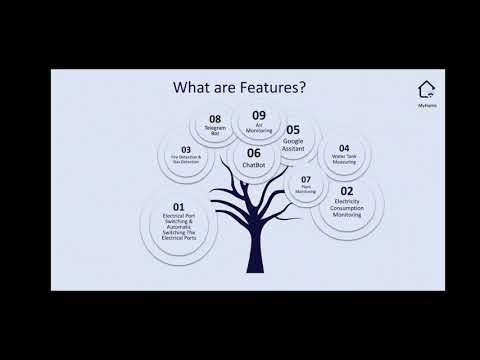
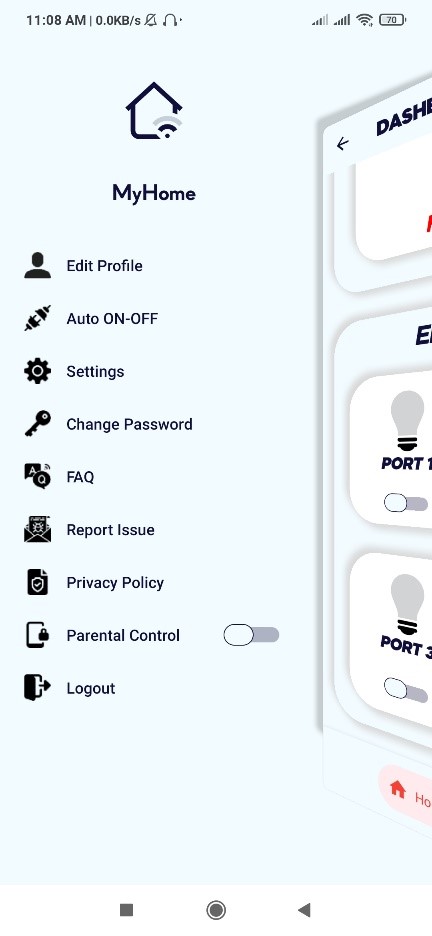
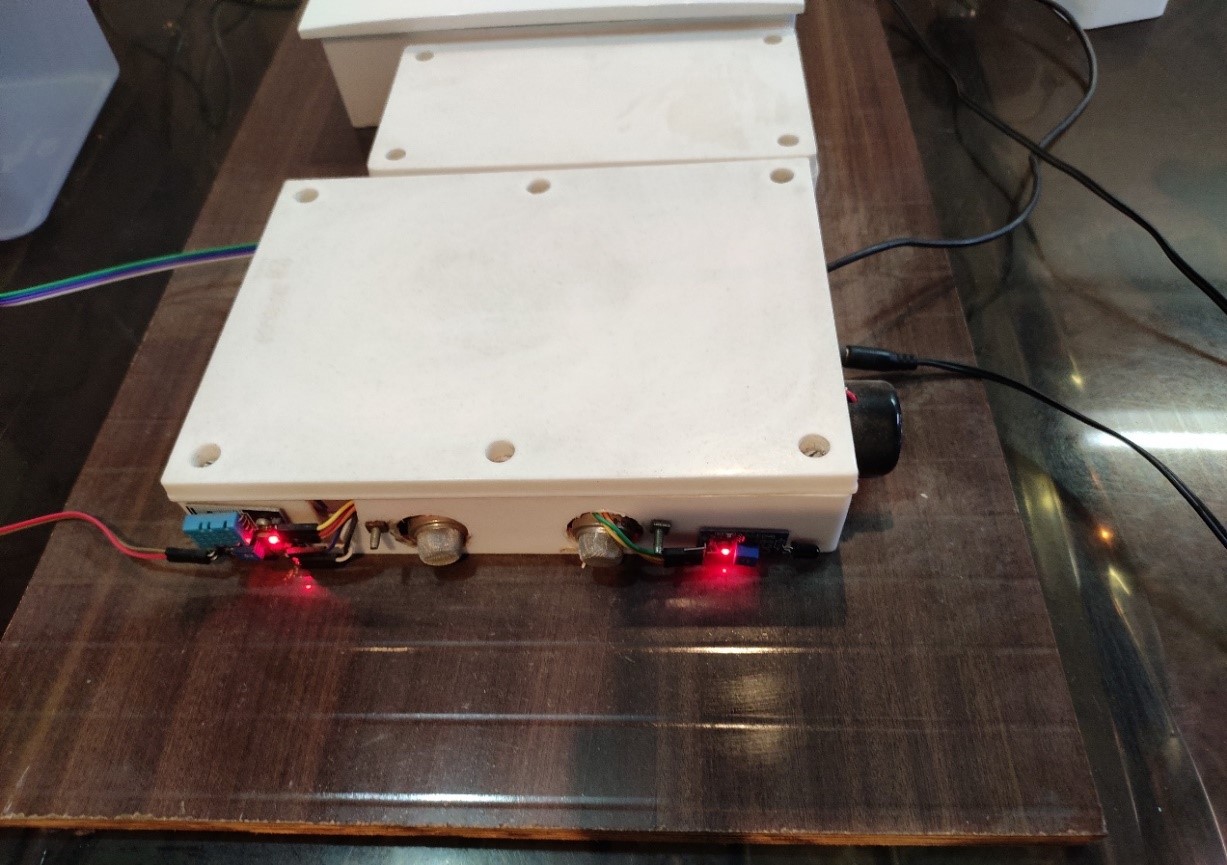
Iot based Smart Home Automation connected with firebase and Android
Also integrated with google assistant and the telegram using dialogflow
ESP32 is main controller in IoT
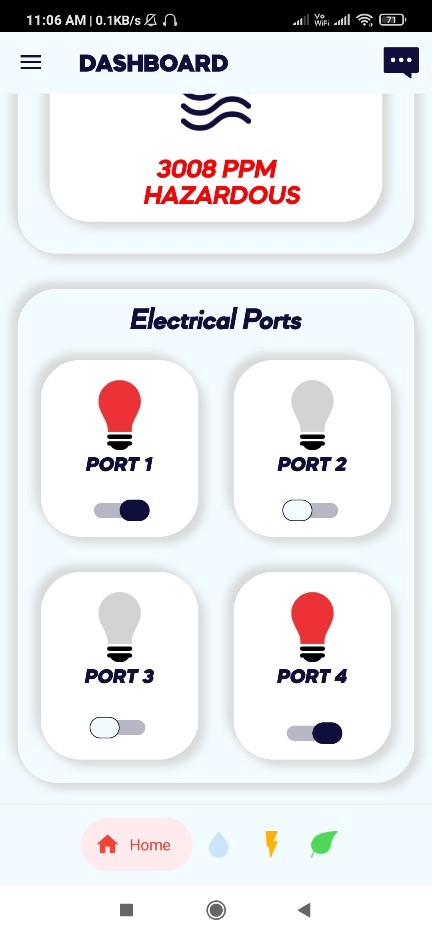
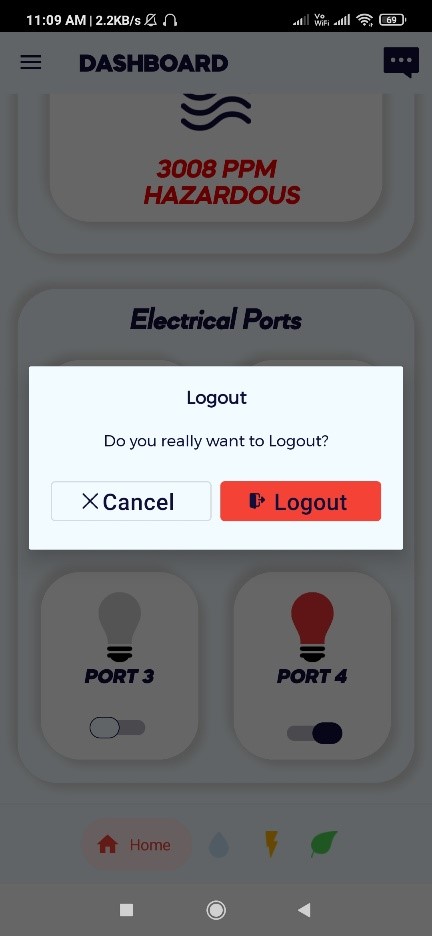
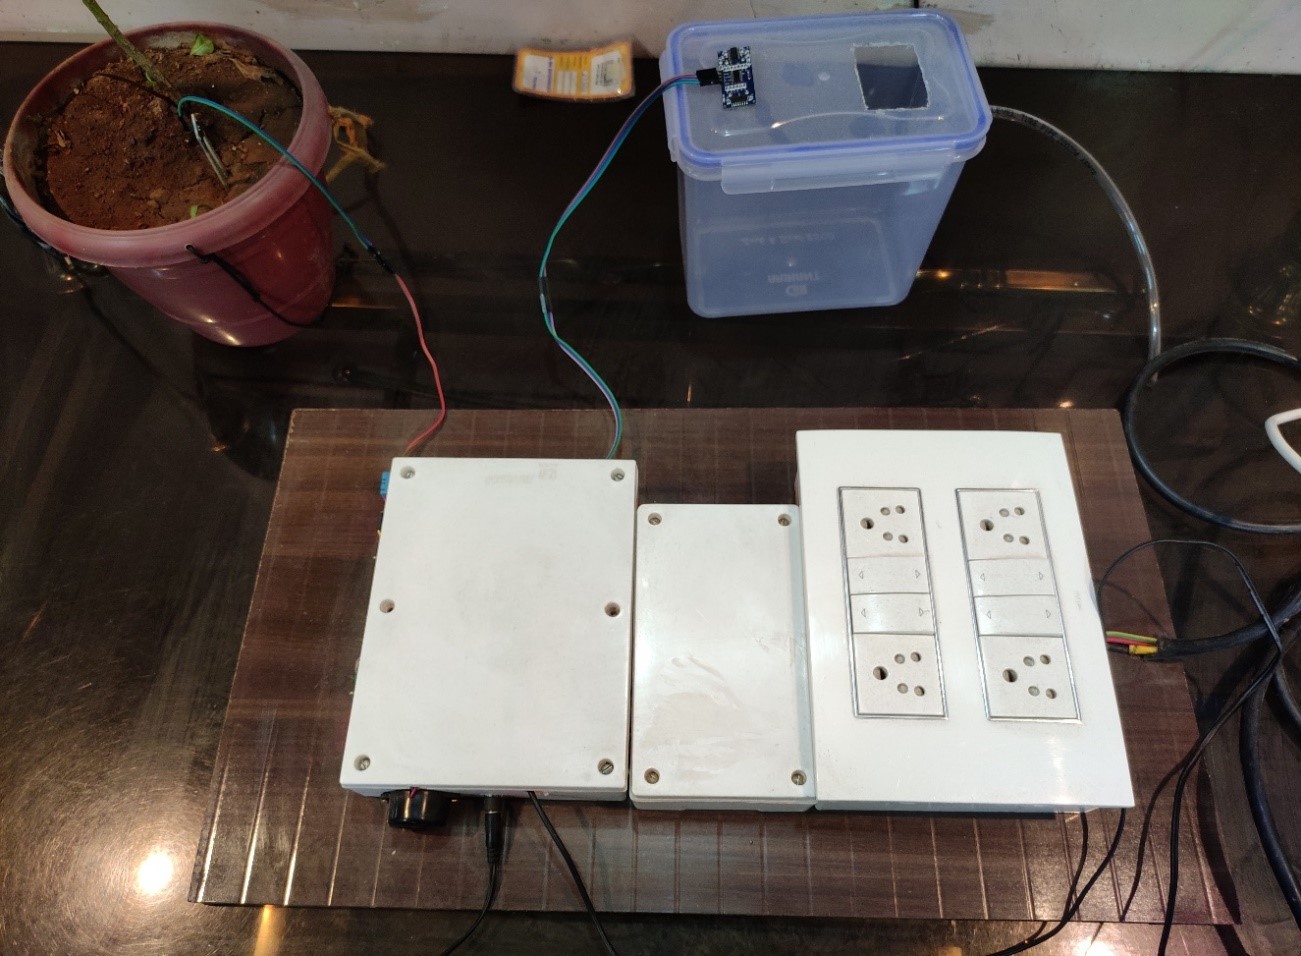
Electrical port switching (on/off): User can switch ON the electrical ports and
switch OFF the electrical ports. There will be total 4 ports.
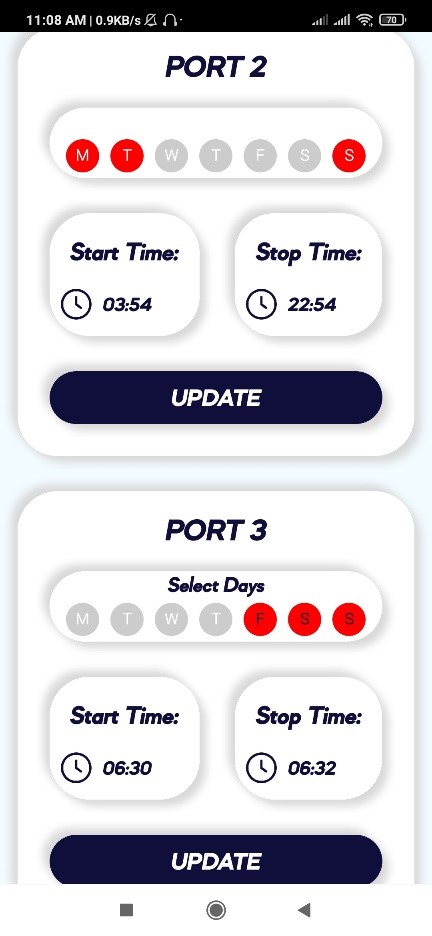
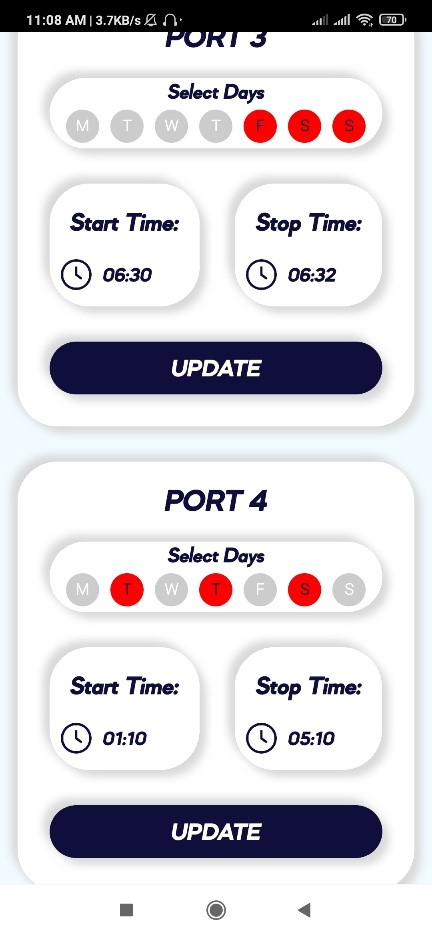
Automatic on/off the electrical ports: User will select Days, Start Time, Stop Time
for the particular electrical port. At selected days & time the electrical port will
automatically turned ON & turned OFF.
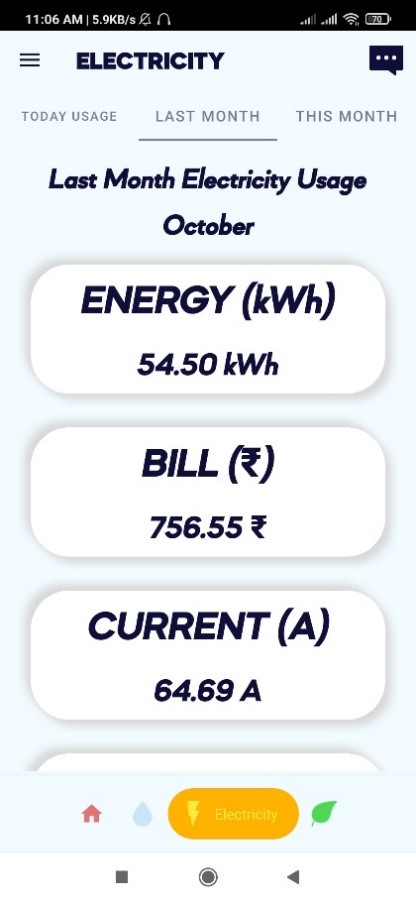
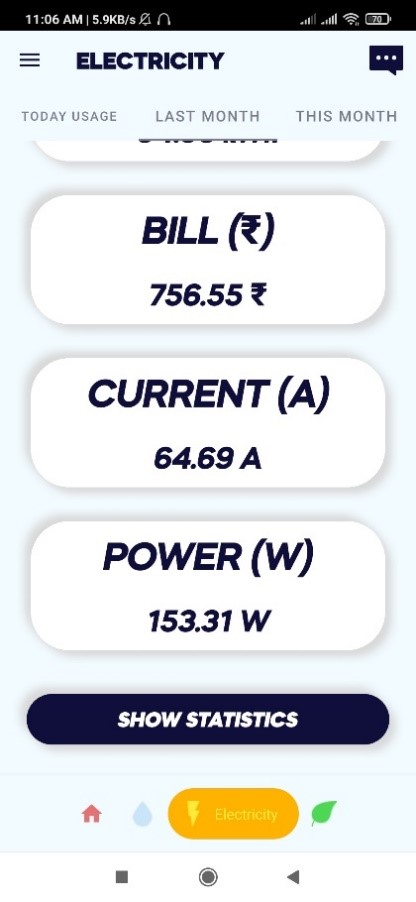
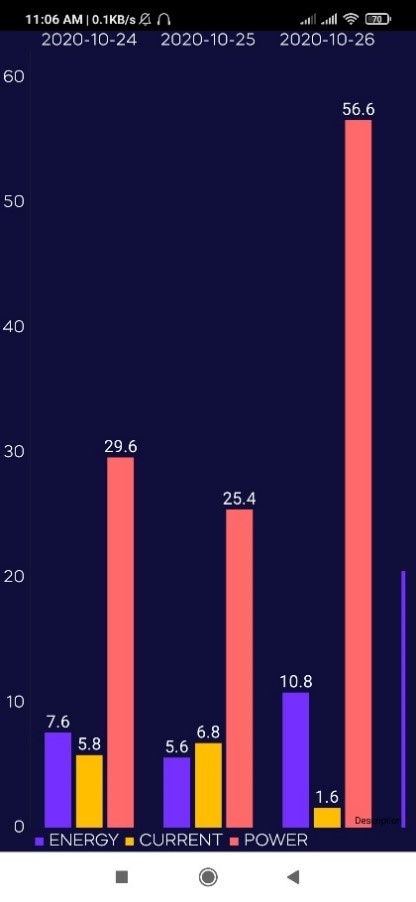
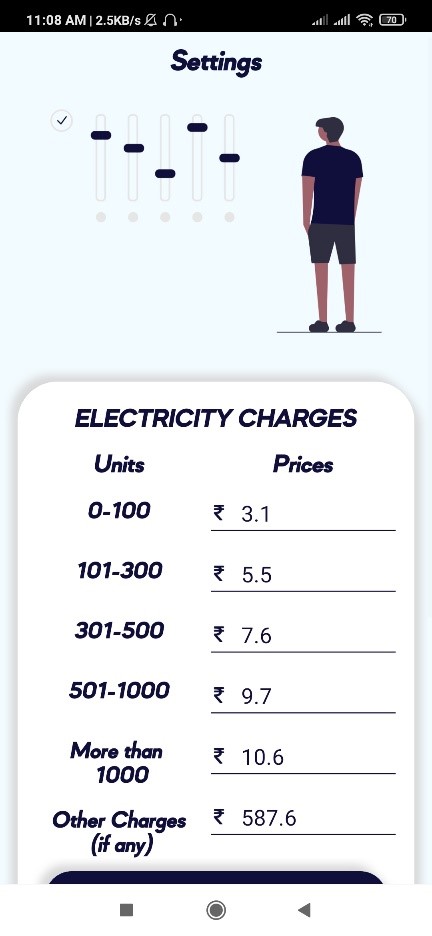
Electricity consumption monitoring: User will get the real time consumption
information in the mobile. User will get the information such as energy consumption,
power consumption, current consumption, bill (in rs). User can see the graph of the
consumption.
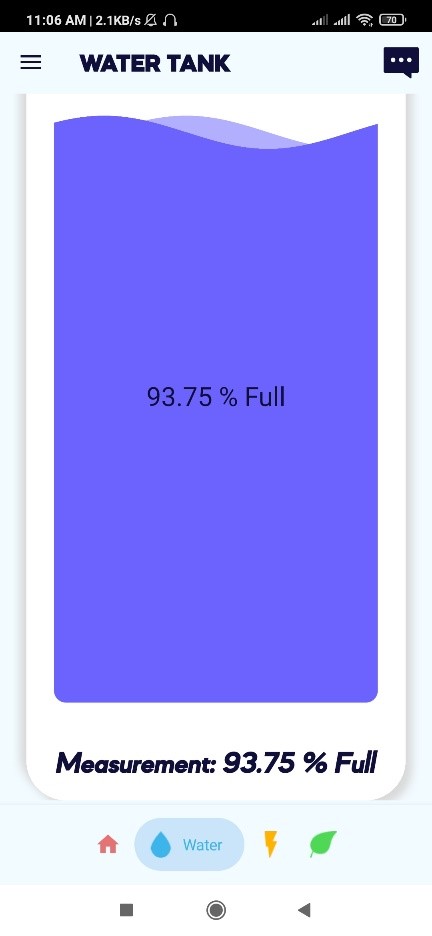
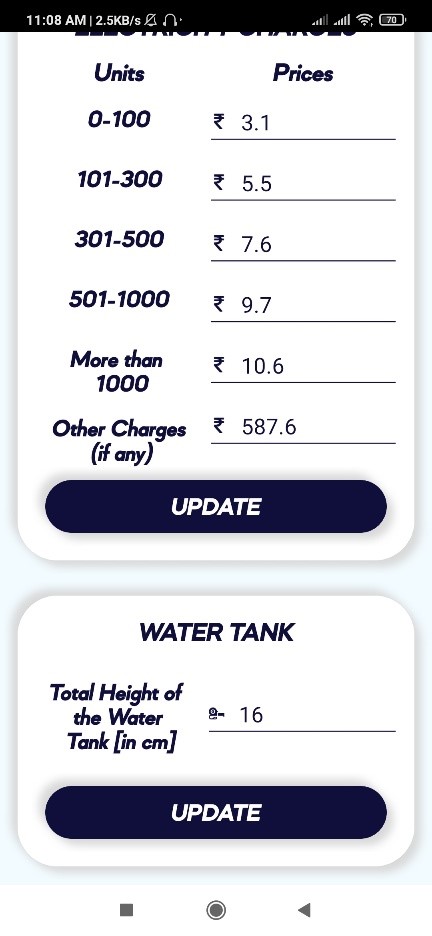
Water tank measuring: User can see the current water level of the tank on mobile.
User will be notified when the water tank will be full.
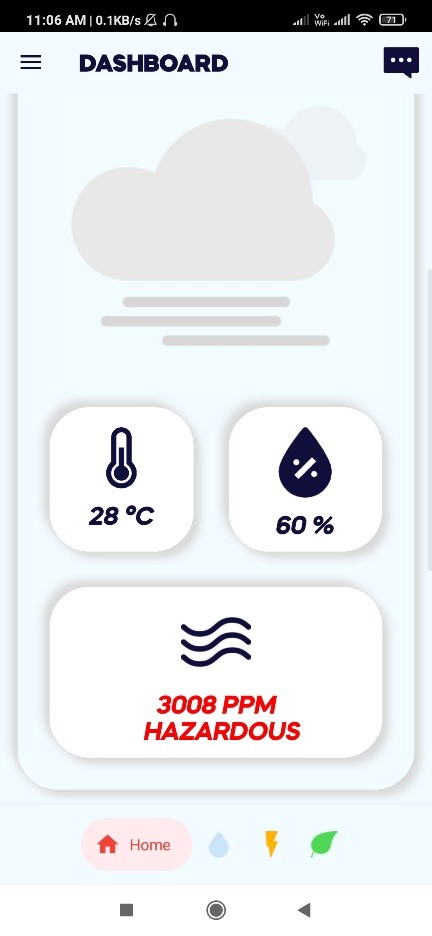
Air quality monitoring: User can see the current indoor Temperature, Humidity and
the AQI (Air Quality Index) on mobile.
Plant monitoring: User can see the current moisture level of the plant on mobile.
User will be notified when the plant needs water.
Gas detection: User will be notified when any gas leakage is detected.
Fire detection: User will be notified when any fire is detected.
Google assistant: User will voice command to the Google Assistant and particular
action will be performed.
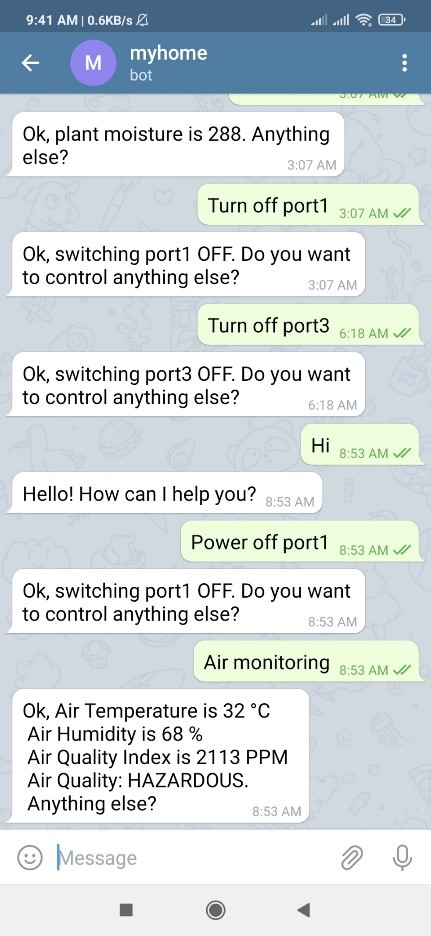
Technical assistant bot: User will ask command questions to the bot and bot will
process it.
Telegram Bot: User will ask command questions to the telegram bot and telegram
bot will process it.
Reusable popover component for Vue. This is purely functional, it’s a completely “naked” and blank canvas component. There are no styles for this component except a z-index, which you can override.
<template><div><popovername="example"><divslot="face"><button>popover face</button></div><divslot="content"><p>Some custom content for popover</p></div></popover></div></template>
closeOnContentClick ~ optional
Set to false if you don’t want the popover to close if you click its contents. Useful if the popover contains elements you interact with (e.g. buttons and textboxes). This defaults to true when not set.
Defaults to false, if enabled, it means the “face” slot is required and
the rendered component will be wrapper-less, there will be no further elements
around the “face” slot. To do this the onPopoverToggle method is passed to
the slot (with slim the slot becomes scoped).
Important: the content slot will render inside the root element of the face slot.
As the content slot still has a wrapper and will appear absolutely positioned, the
face slot will probably need to be positioned, relative will work well for most
use cases.
<template><div><popovername="example"slim><aslot="face"slot-scope="{ onPopoverToggle }"href="#"
@click.prevent="onPopoverToggle">
slim popover</a><divslot="content"><p>Some custom content for popover</p></div></popover></div></template>
Styling
Installation
Import the main SCSS file in to your application SCSS files
“`scss
@import “node_modules/vue-popover/src/component/scss/styles.scss”;
There are a few variables set to `!default` that can be overriden. If you need to change it more just override the actual styles.
**Any overriden variables needs to go above the `@import` statement to take effect**
```scss
//-- Global UI
$popover-z-index
If you don’t care to override variables and just want to override actual styles you may choose to import the minified compiled version of the css instead
A Clojure library for working with Delimiter-Separated Value
data. This includes a customizable defensive parser and a simple writer.
You might be interested in using this instead of the common
clojure.data.csv or a more mainstream
codec like Jackson
because CSV is a terrible format and you’ll often need to
deal with messy, malformed, and downright bizarre data files.
Usage
Releases are published on Clojars; to use the latest version with Leiningen,
add the following to your project dependencies:
The main namespace entrypoint is separator.io, which contains both the
reading and writing interfaces.
=> (require '[separator.io :as separator])
Reading
One of the significant features of this library is safety valves on parsing to
deal with bad input data. The parser does its best to recover from these errors
and present meaningful data about the problems to the consumer. This includes
limiting the maximum cell size and the maximum row width.
To parse data into a sequence of rows, use the read-rows function. This
accepts many kinds of inputs, including directly reading string data:
=> (vec (separator/read-rows"A,B,C\nD,E,F\nG,H,I\n"))
[["A""B""C"] ["D""E""F"] ["G""H""I"]]
;; quoted cells can embed newlines
=> (vec (separator/read-rows"A,B,C\nD,E,\"F\nG\",H,I\n"))
[["A""B""C"] ["D""E""F\nG""H""I"]]
;; parse errors are included in the sequence by default
=> (vec (separator/read-rows"A,B,C\nD,\"\"E,F\nG,H,I\n"))
[["A""B""C"] #<separator.io.ParseException@34b69fbe :malformed-quote2:4> ["G""H""I"]]
;; the error mode can also omit them
=> (vec (separator/read-rows"A,B,C\nD,\"\"E,F\nG,H,I\n":error-mode:ignore))
[["A""B""C"] ["G""H""I"]]
;; ...or throw them
=> (vec (separator/read-rows"A,B,C\nD,\"\"E,F\nG,H,I\n":error-mode:throw))
;; Execution error (ParseException) at separator.io.Parser/parseError (Parser.java:87).;; Unexpected character following quote: E;; the errors carry data:
=> (ex-data *e)
{:column4,
:line2,
:message"Unexpected character following quote: E",
:partial-cell"",
:partial-row ["D"],
:skipped-text"E...F",
:type:malformed-quote}
The parser also supports customizable quote, separator, and escape characters.
Escapes are not part of the CSV standard but show up often in practice, so we
need to deal with them.
The library also provides tools for writing delimiter-separated data from a
sequence of rows using the write-rows function. This takes a Writer to print the
data to and a similar set of options to control the output format:
=> (separator/write-rows *out* [["A""B""C"] ["D""E""F"] ["G""H""I"]])
;; A,B,C;; D,E,F;; G,H,I3;; cells containing the quote or separator character are automatically quoted
=> (separator/write-rows *out* [["A""B,B""C"] ["D""E""F\"F"]])
;; A,"B,B",C;; D,E,"F""F"2;; you can also force quoting for all cells
=> (separator/write-rows *out* [["A""B""C"] ["D""E""F"] ["G""H""I"]] :quote?true)
;; "A","B","C";; "D","E","F";; "G","H","I"3;; or provide a predicate to control quoting
=> (separator/write-rows *out* [["A""B""C"] ["D""E""F"] ["G""H""I"]] :quote? #{"E"})
;; A,B,C;; D,"E",F;; G,H,I3
Performance
Separator prioritizes defensiveness over speed, but aims to be as performant as
possible within those constraints. For comparison, it’s faster than data.csv
but significantly slower than Jackson:
=> (crit/quick-bench (consume! (separator/read-rows test-file)))
;; Evaluation count : 6 in 6 samples of 1 calls.;; Execution time mean : 5.544234 sec;; Execution time std-deviation : 78.630488 ms;; Execution time lower quantile : 5.481820 sec ( 2.5%);; Execution time upper quantile : 5.667485 sec (97.5%);; Overhead used : 6.824396 ns
=> (crit/quick-bench (consume! (data-csv-read test-file)))
;; Evaluation count : 6 in 6 samples of 1 calls.;; Execution time mean : 10.253641 sec;; Execution time std-deviation : 121.221011 ms;; Execution time lower quantile : 10.146078 sec ( 2.5%);; Execution time upper quantile : 10.436205 sec (97.5%);; Overhead used : 6.943926 ns
=> (crit/quick-bench (consume! (jackson-read test-file)))
;; Evaluation count : 6 in 6 samples of 1 calls.;; Execution time mean : 2.325301 sec;; Execution time std-deviation : 40.611328 ms;; Execution time lower quantile : 2.296693 sec ( 2.5%);; Execution time upper quantile : 2.390772 sec (97.5%);; Overhead used : 6.824396 ns
The test above was performed on a 2021 MacBook Pro with data.csv version
1.0.1 and jackson-dataformat-csv version 2.13.0 on a 330 MB CSV file with
12.4 million rows.
Of course, all the speed in the world won’t save you from a misplaced quote:
=> (spit"simple-err.csv""A,B,C\nD,\"\"E,F\nG,H,I\n")
=> (consume! (separator/read-rows (io/file"simple-err.csv")))
3
=> (consume! (data-csv-read (io/file"simple-err.csv")))
;; Execution error at clojure.data.csv/read-quoted-cell (csv.clj:37).;; CSV error (unexpected character: E)
=> (consume! (jackson-read (io/file"simple-err.csv")))
;; Execution error (JsonParseException) at com.fasterxml.jackson.core.JsonParser/_constructError (JsonParser.java:2337).;; Unexpected character ('E' (code 69)): Expected column separator character (',' (code 44)) or end-of-line;; at [Source: (com.fasterxml.jackson.dataformat.csv.impl.UTF8Reader); line: 2, column: 6]
Playing around with runbooks in the context of tasks that have to be done now in then in our infrastructure.
Runbooks idea is gradual automation, you start with no-op scripts that just define the necessary steps and then you start slowly filling the gaps and automate parts of the process.
This repository also comes with a script to generate the markdown rendering of the processes (runbooks).
Usage
run bundle to install the runbook and other dependencies (you need to have ruby version >= 2.3 installed for all that).
Creating new runbooks
To cover all steps, use ./new_operation.rb <NAME_OF_RUNBOOK>, where NAME_OF_RUNBOOK is e.g. it/do_the_task.
This will create the runbook it/do_the_task.rb, make it executable and add it to the list of runbooks for which markdown doc generation is done when ./runbooks_to_md.rb is executed.
See doc/index (or doc/ directory) for a list and details about runbooks.
Updating runbooks
After editing the code, update the documentation / markdown view with
./runbooks_to_md.rb
Creating doc/*md from runbooks
Execute runbooks_to_md.rb to populate doc/ folder (TODO: make this a rake task? Or a runbook itself? …).
To incorporate new runbooks, edit runbooks_to_md.rb and include the file. Note that this will be done for you if you add new runbooks via the new_operation.md <nameoftask> script given above.
Browsing documentation / runbooks
You can use madness (gem install madness) to fire up a webserver that displays the markdown files.
Tests
rake or rake test, done with MiniTest.
Contributing
Yay! Happy! Drop me a line.
License
Copyright 2019 Felix Wolfsteller, released under the GPLv3+ License (contained as file LICENSE in this repository).


 https://github.com/DisCardApp/DisCard