Created in February 1992, Log Alpha is one of those logic or IQ test programs. It displays a series of letters, and it’s up to you to find the missing one.
The program does not generate the series itself. It comes with a game editor.
I’m providing you with the source codes for the two programs in this project, in anticipation of a new online or Delphi version.
This game was developed in Turbo Pascal to run under MS-Dos in text mode.
It’s possible that this program is compilable with Free Pascal but I haven’t tried. Units not supplied can be found in the DeveloppeurPascal/librairies-TurboPascal repository. If any are missing, please let me know so that I can add them.
You’ll find the binaries (8 bits) and dependencies in the “release” folder. This is the September 19, 1993 version. You can only run it on an MS-Dos emulator, Windows 3.x or 95. There’s no point in trying it on Windows beyond these versions.
Follow my development streams of software, video games, mobile applications and websites on my Twitch channel or as replays on Serial Streameur mostly in French.
License to use this code repository and its contents
You are generally free to use the contents of this code repository anywhere, provided that:
you mention it in your projects
distribute the modifications made to the files supplied in this project under the AGPL license (leaving the original copyright notices (author, link to this repository, license) which must be supplemented by your own)
to distribute the source code of your creations under the AGPL license.
If this license doesn’t suit your needs, you can purchase the right to use this project under the Apache License 2.0 or a dedicated commercial license (contact the author to explain your needs).
These source codes are provided as is, without warranty of any kind.
Certain elements included in this repository may be subject to third-party usage rights (images, sounds, etc.). They are not reusable in your projects unless otherwise stated.
Support the project and its author
If you think this project is useful and want to support it, please make a donation to its author. It will help to maintain the code and binaries.
A collection of Javascript based tools for Wwise, using WAAPI from your browser.
Download, unzip anywhere and open index.html to use. Alternatively available on https://waapitools.org for direct use.
1. Event Soundbank finder
This tool is used to find out in which soundbank(s) a wwise event is included, upon selection of the event in the Wwise Authoring Tool, regardless of whether the event is directly included in a bank or through the inclusion of one of its parent folders or WWU. This is designed to work around the issue of Wwise’s Reference View ignoring indirect references (a soundbank appears in an event’s references only if the event is directly included in the bank).
Usage: select an event in Wwise.
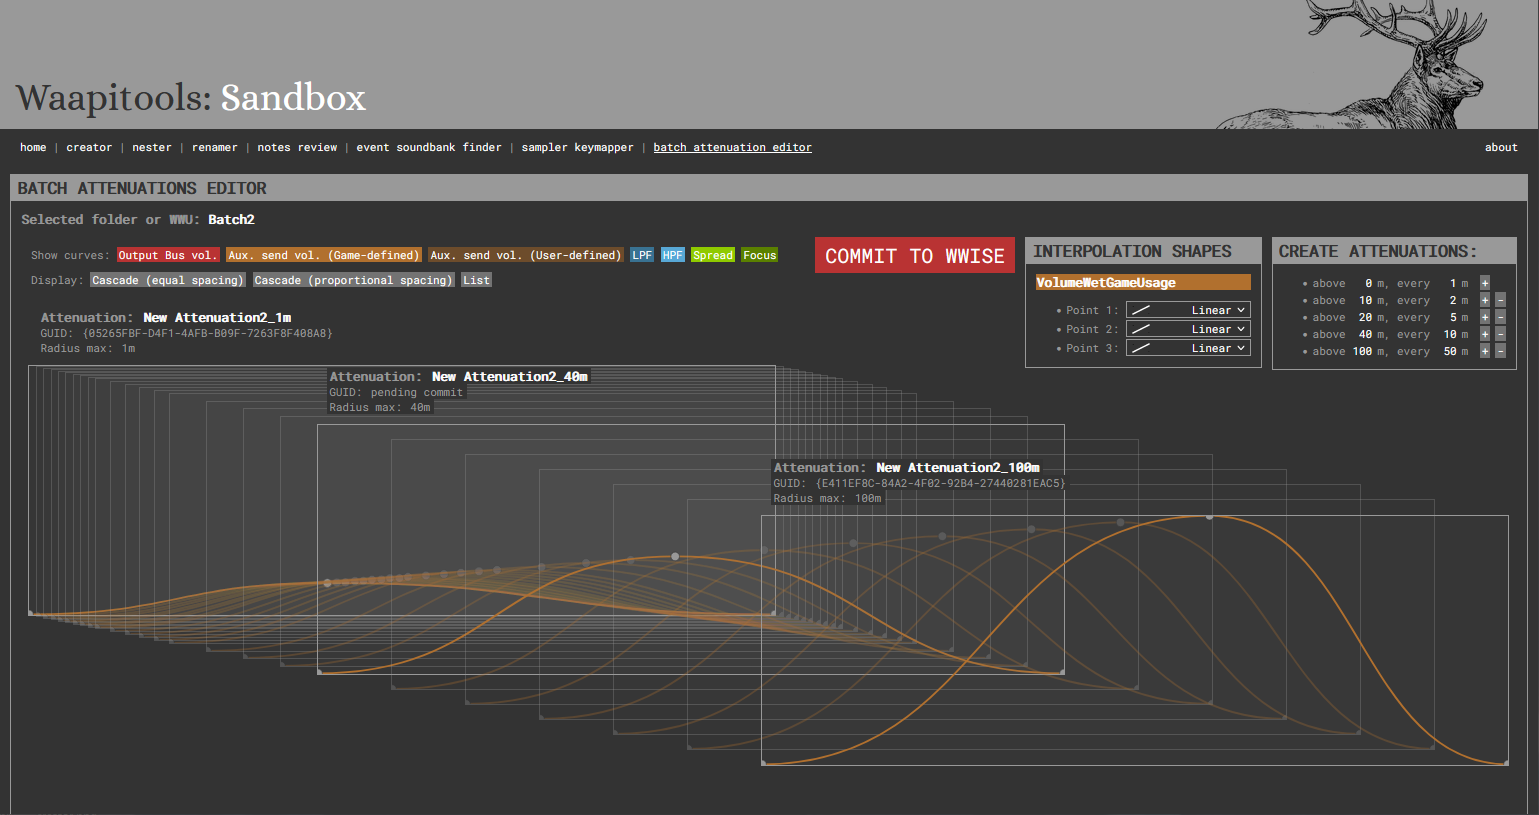
2. Batch Attenuations Editor
The Batch Attenuations Editor is designed to help with the creation and update of large attenuation sets, by interpolating attenuation curves between a short (eg 1m) and a long (eg 100m) attenuation.
Usage:
Create an attenuations folder or work unit
Inside, create 2 attenuations with names ending with their max radius (e.g. 1m, 100m)
Edit the attenuations curves, making sure each curve has a matching number of points between the short/long attenuation
Select the parent folder
In Waapitools, choose how many intermediate attenuations you want to create by setting distance intervals
For each curve (volume, aux sends…) and each point, choose how the point’s coordinates will be interpolated from the shortest to the longest attenuation (linear, quadratic, etc.)
Commit the new interpolated attenuations to Wwise
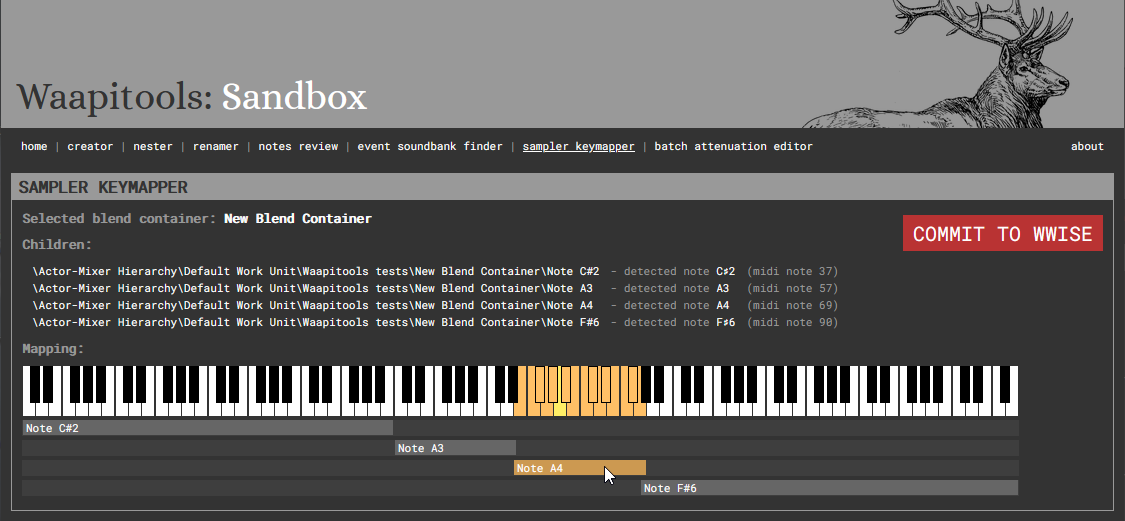
3. Sampler Keymapper
The Sampler Keymapper automatically sets MIDI root key and key range parameters on children of a blend container if their names contain a note name (eg MyPianoSample_C#3 is mapped to MIDI root key 49 and its range is set based on neighbouring samples root notes).
Usage:
Create a blend container
Inside, create the sound objects representing your sampler notes
Each sound object name must end with a note name (e.g. C#3, G7, Eb2…)
Select the blend container
From Waapitools, commit the note’s MIDI roots and key ranges to Wwise
4. Notes Review
Notes Review provides a comprehensive display of all notes in the Wwise project. It’s brutally stupid and will freeze on huge projects.
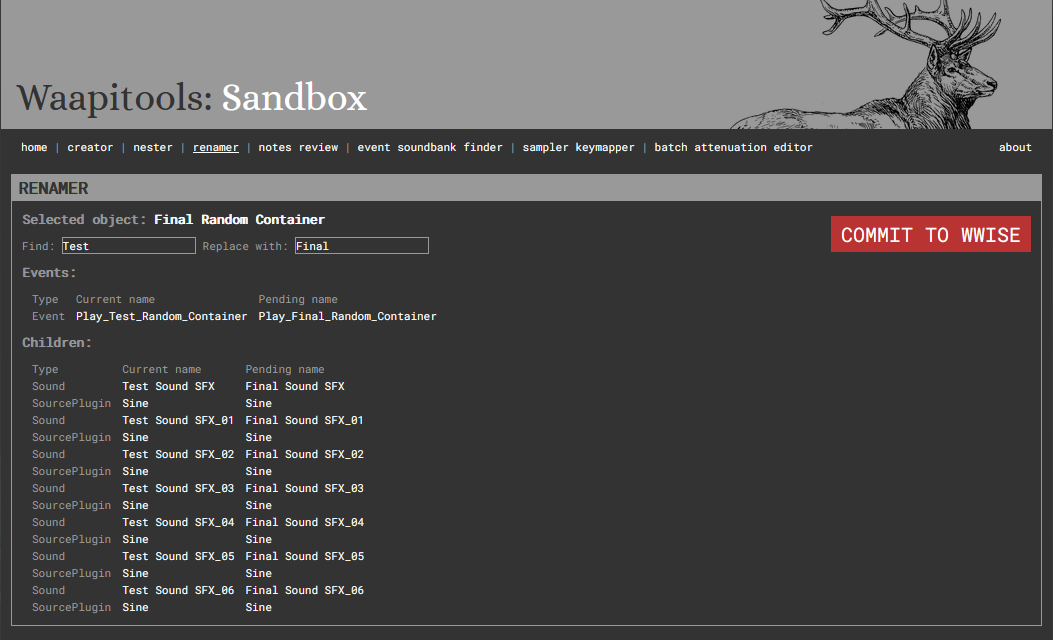
5. Renamer
The Renamer allows for easy search/replace in names of objects in the Actor-Mixer Hierarchy. In addition to the selected Actor-Mixer hierarchy object, it will apply the same renaming to:
all its children
all the events referencing it
Usage:
Select an object in the actor-mixer hierarchy
Edit the search and replace strings
Check the changes and commit them to Wwise
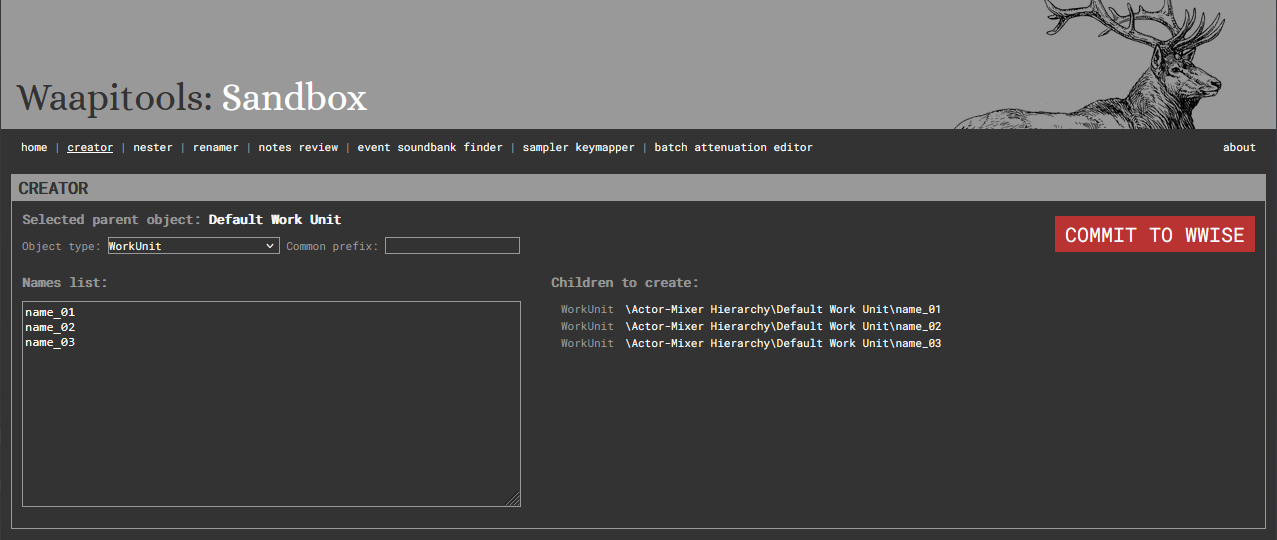
6. Creator
The Creator helps with the batch creation of children to the currently selected object, from an object type, a list of names and a common prefix.
Usage:
Select an parent object in your Wwise project
Choose an object type to create
Fill in the list of the names you want to give your new objects
Optionnally, choose a common prefix for all your new objects
Check the pending objects list
Commit the new objects to Wwise
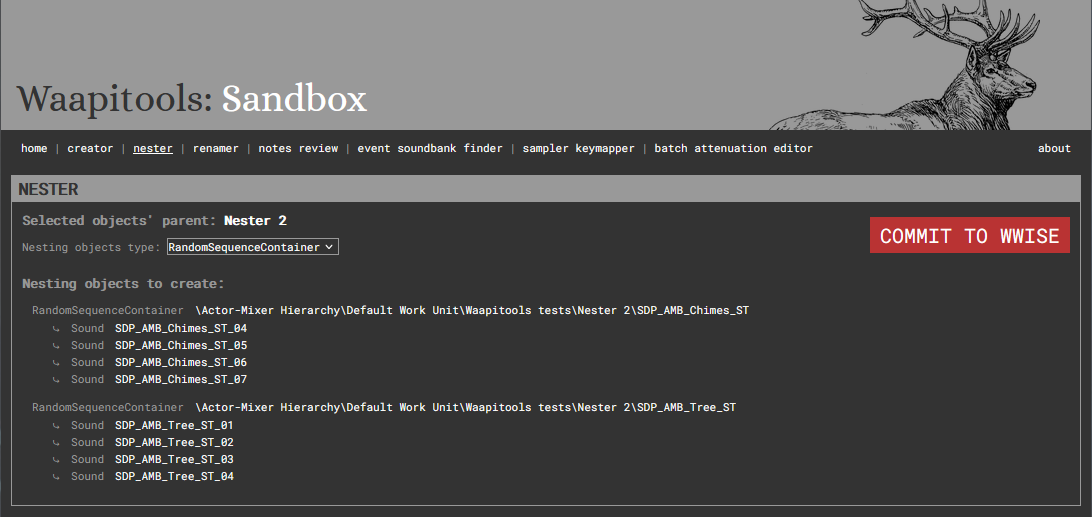
7. Nester
The Nester can ‘nest’ selected objects in new parents of your chosen type. The new parents will be nalmed after their children.
A typical use case would be to create random containers from a list of freshly imported sounds, each set of similarly named sounds getting their own parent.
Usage:
Select multiple objects in your Wwise project
Check the tool groups them as desired, based on their names
Choose the type of object you want to create as their new parents
statusCode(): int
isError(): bool // True if status code >= 300
headers(): Headers
raw() // Raw content of the response
json() // Array or false if not a json response
By default, FileRequestModifier and PlainTextRequestModifier are active.
If necessary, you can add an instance of ProxyRequestModifier
ProxyRequestModifier allows you to define curl options to use a proxy
FileRequestModifier is used to manage file paths starting with @
and passed as a parameter by transforming them into CurlFile
and then modifying the HTTP Content-Type header.
PlainTextRequestModifier changes the HTTP Content-Type header
to text/plain when a string is passed as a parameter.
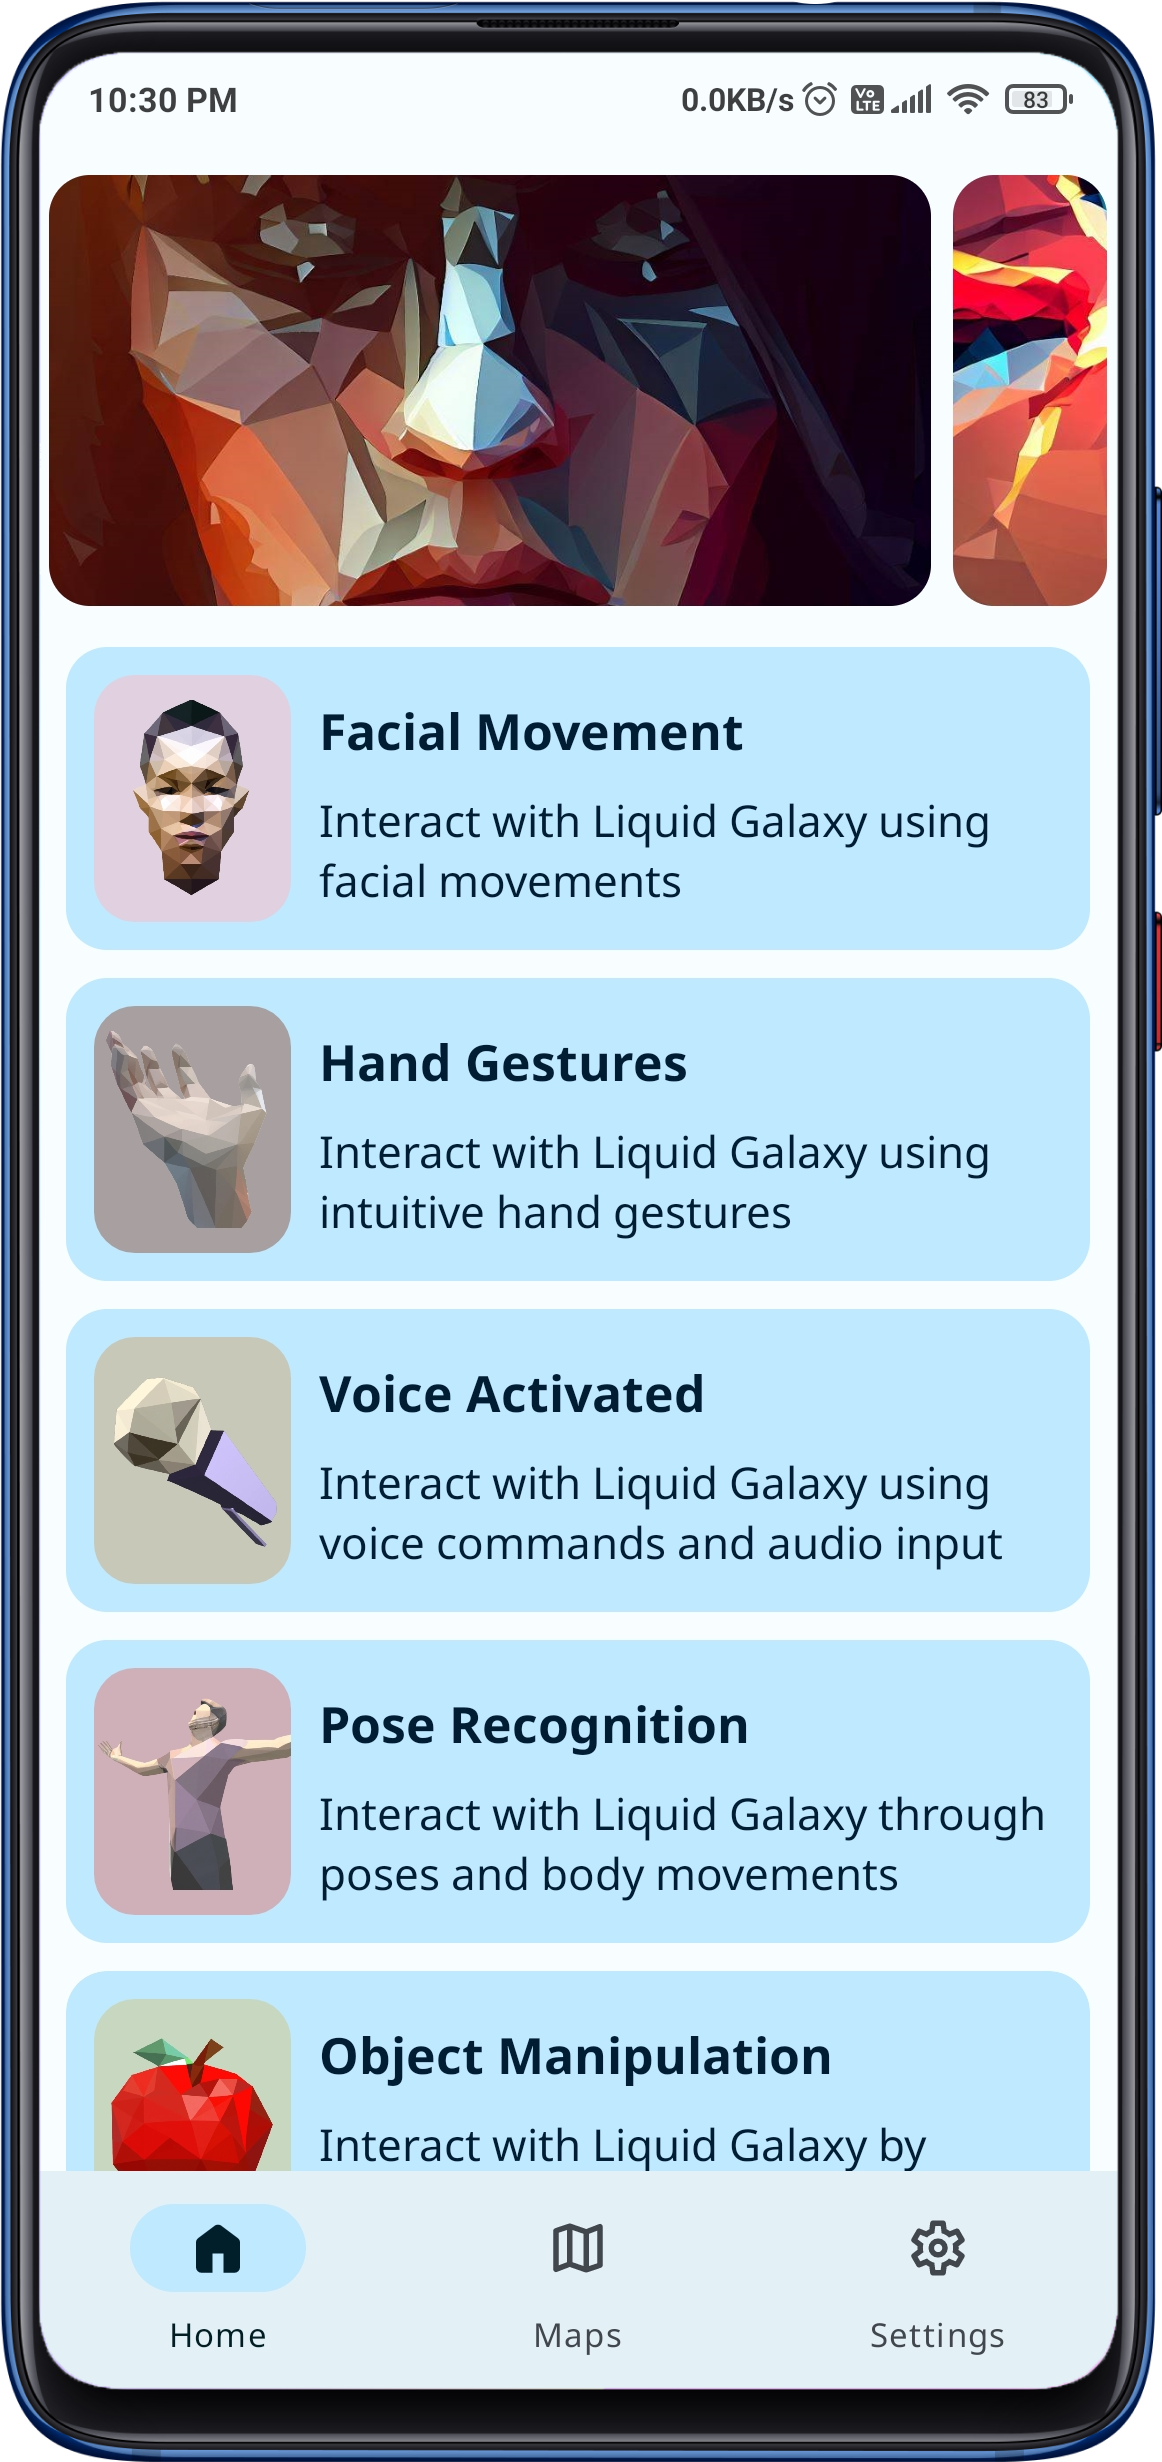
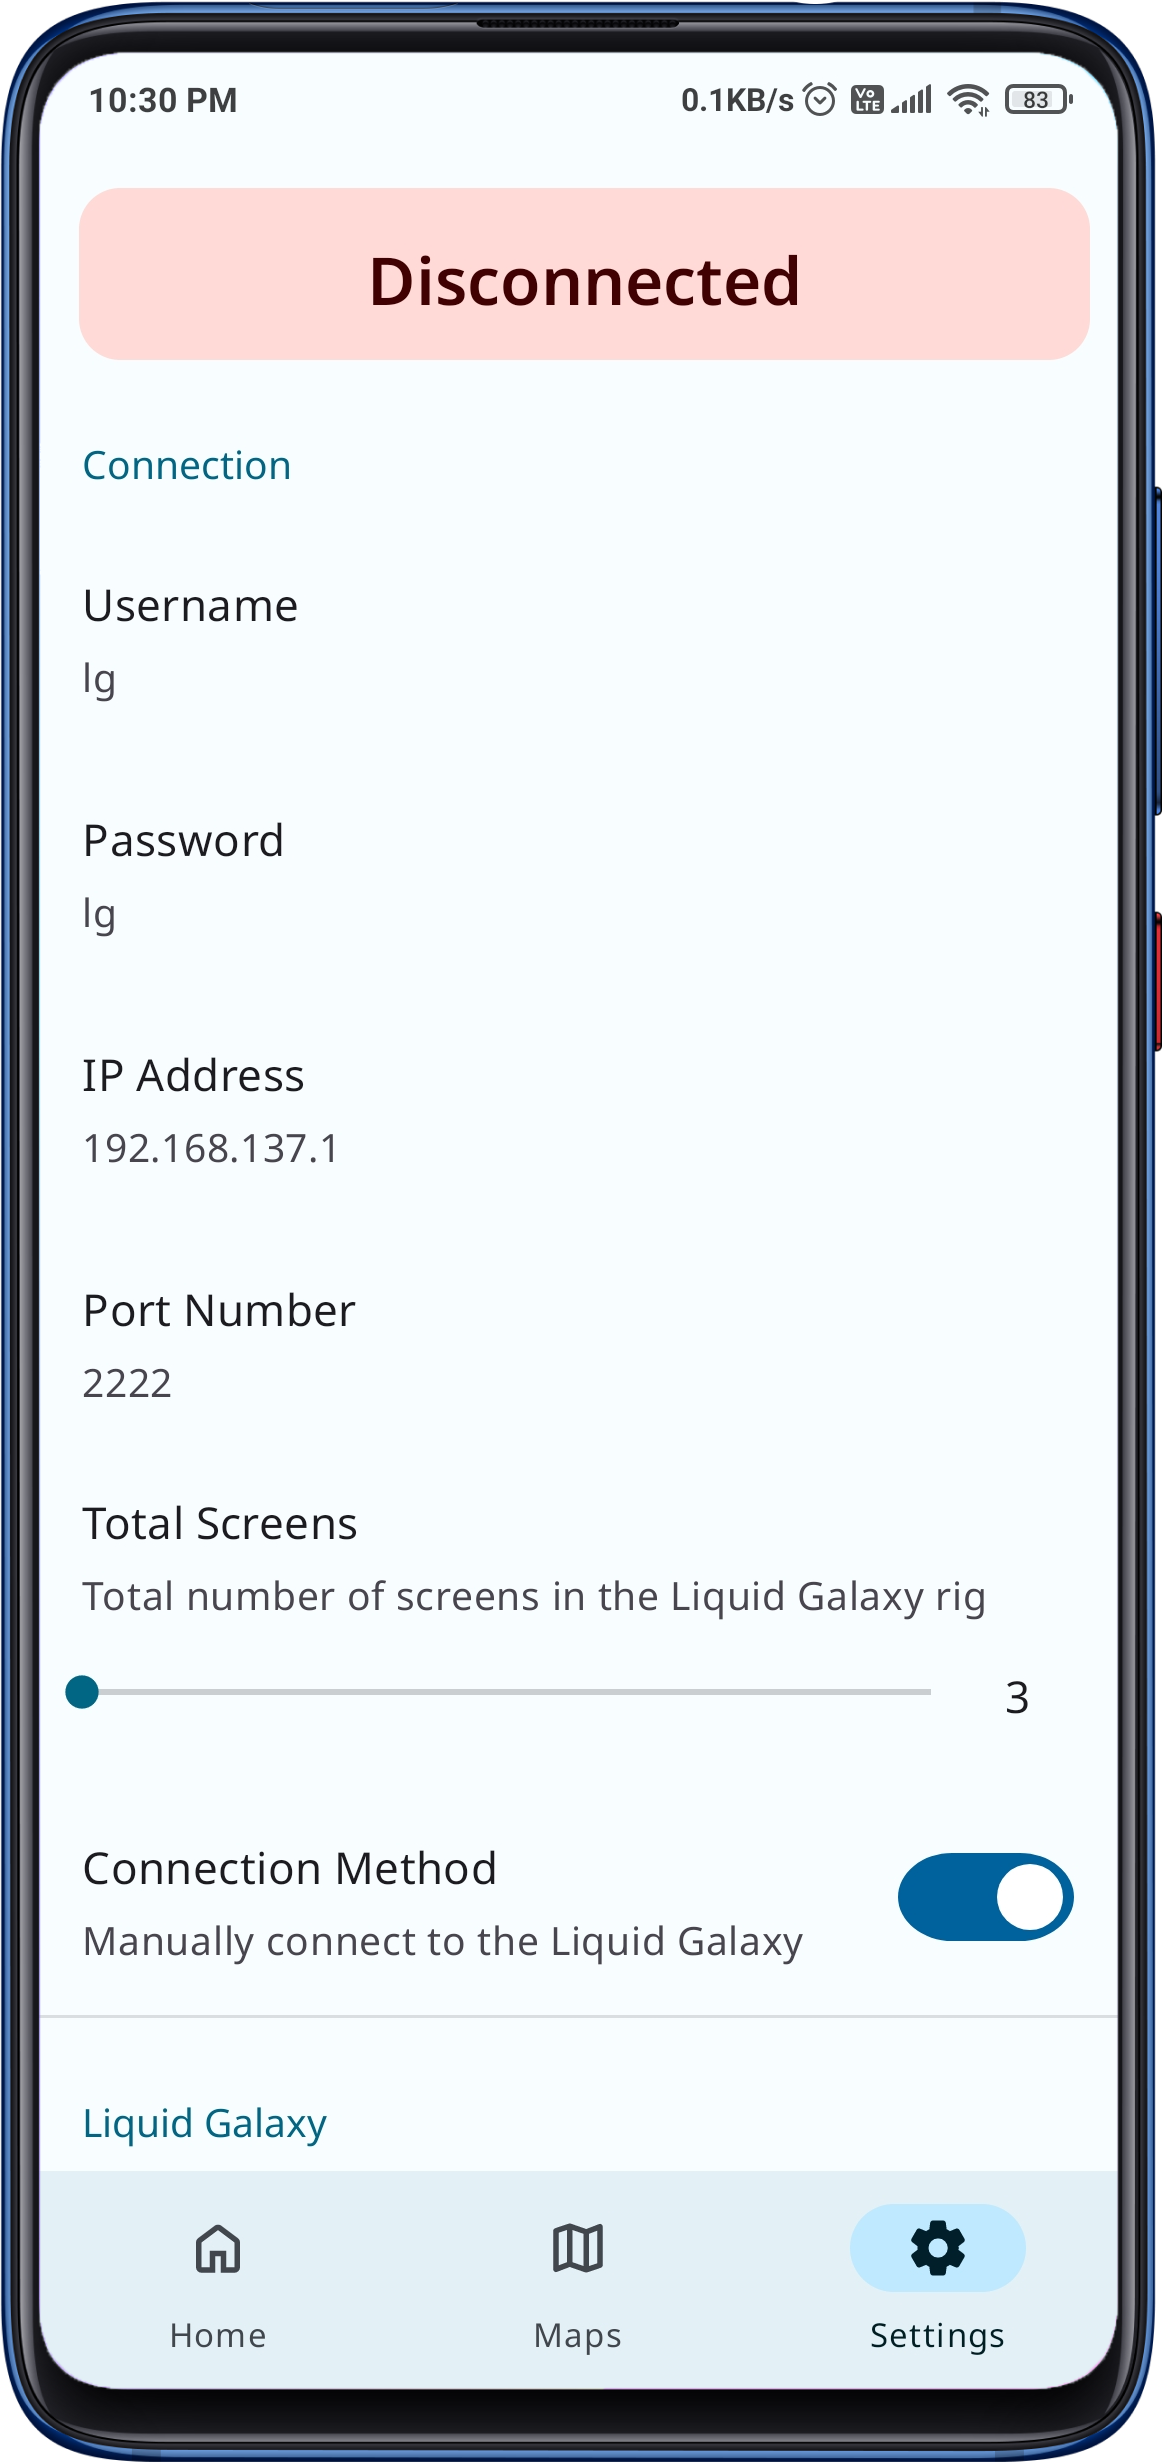
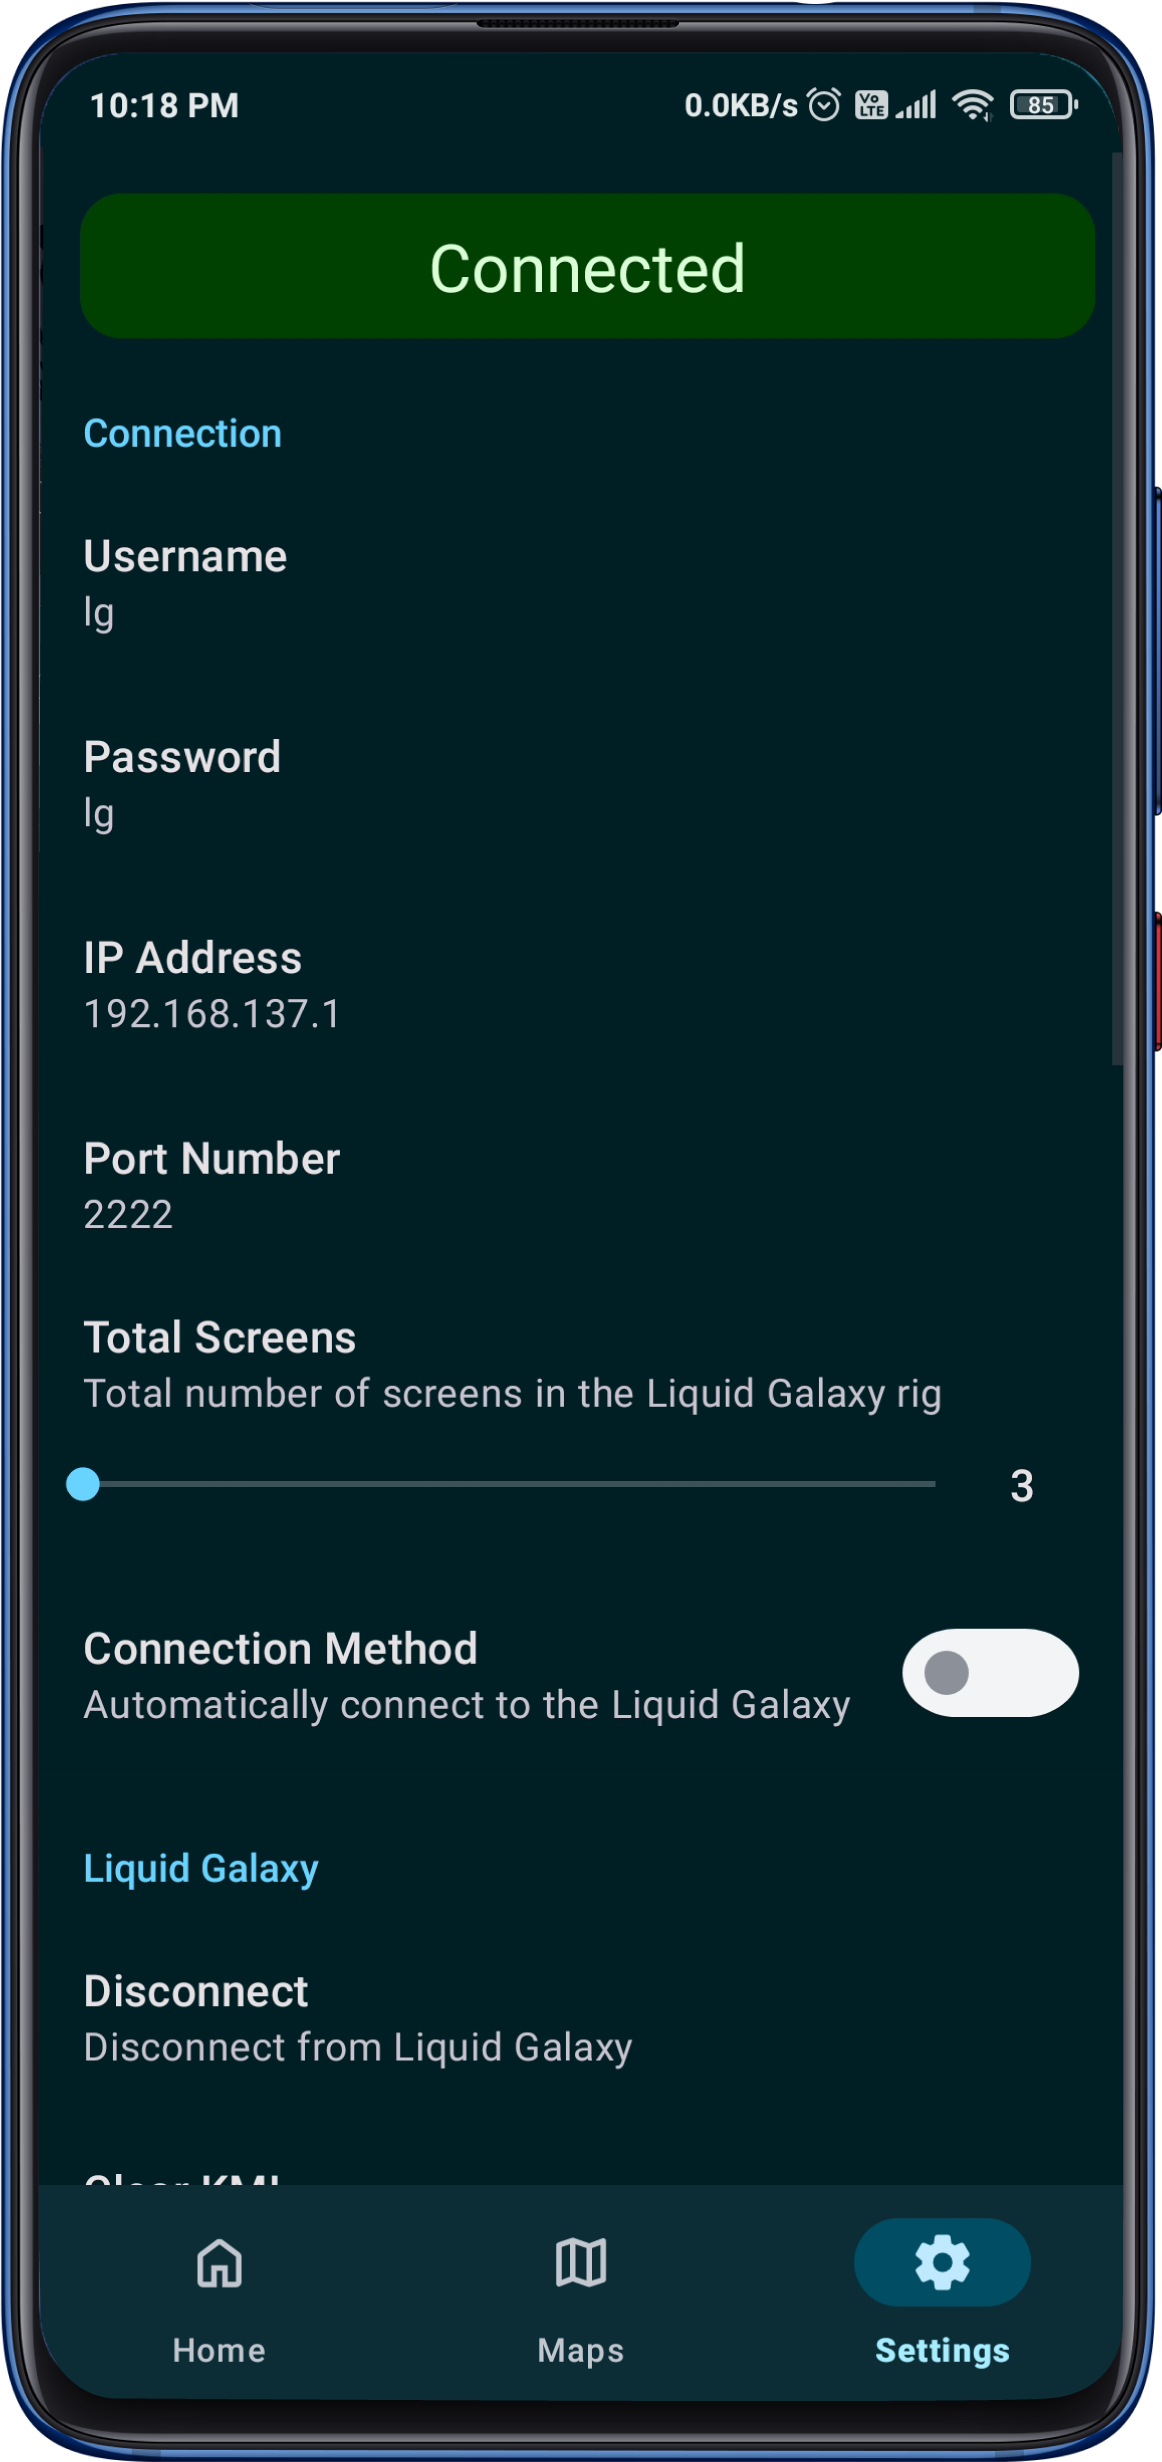
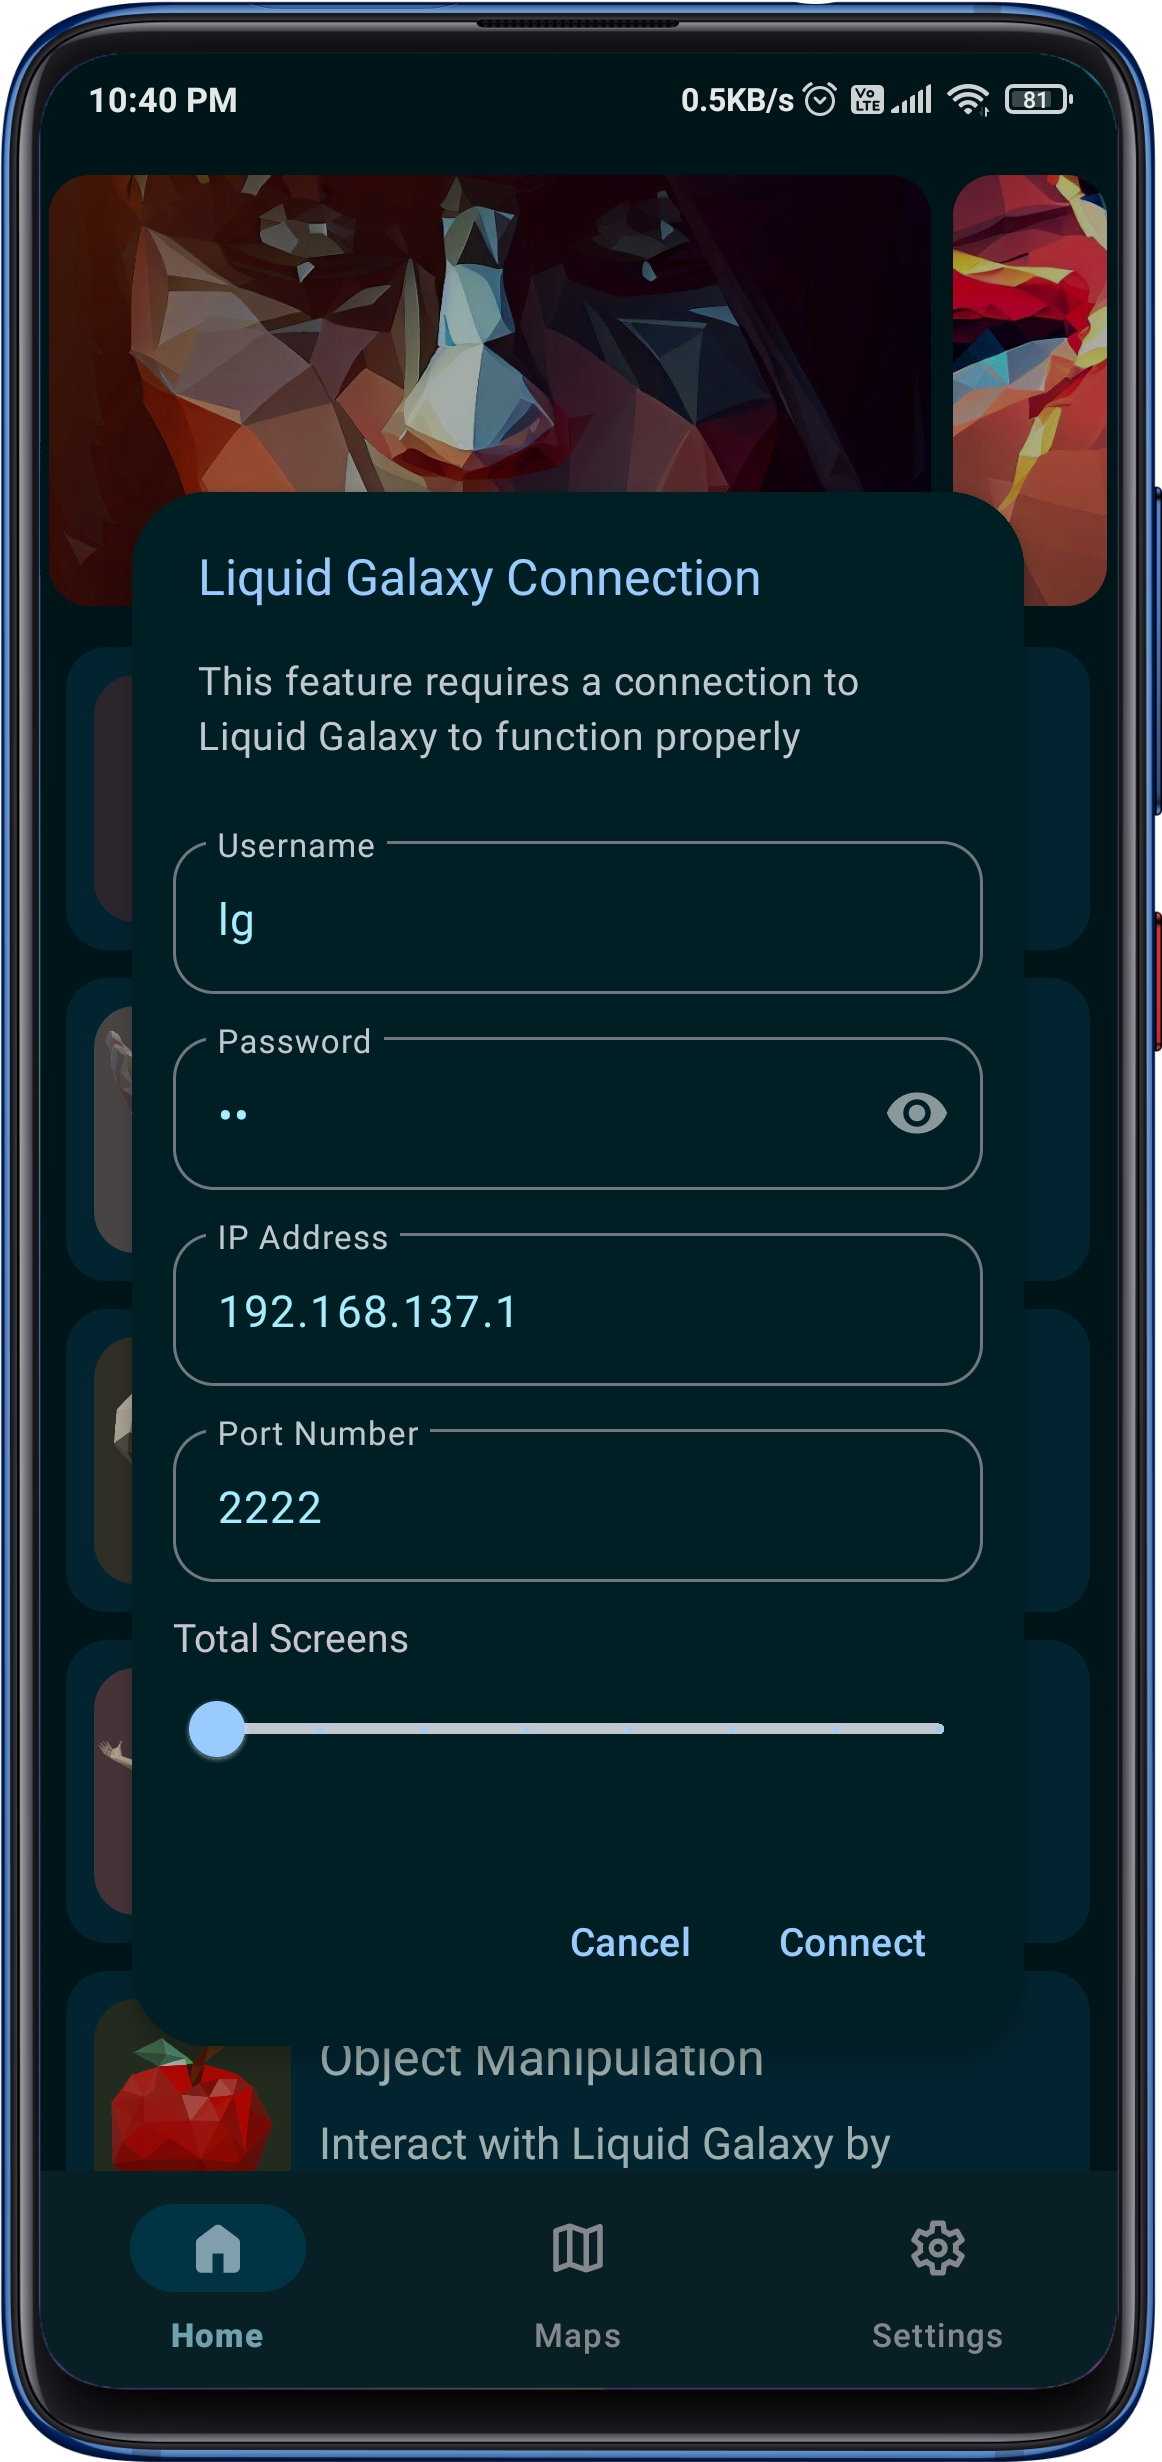
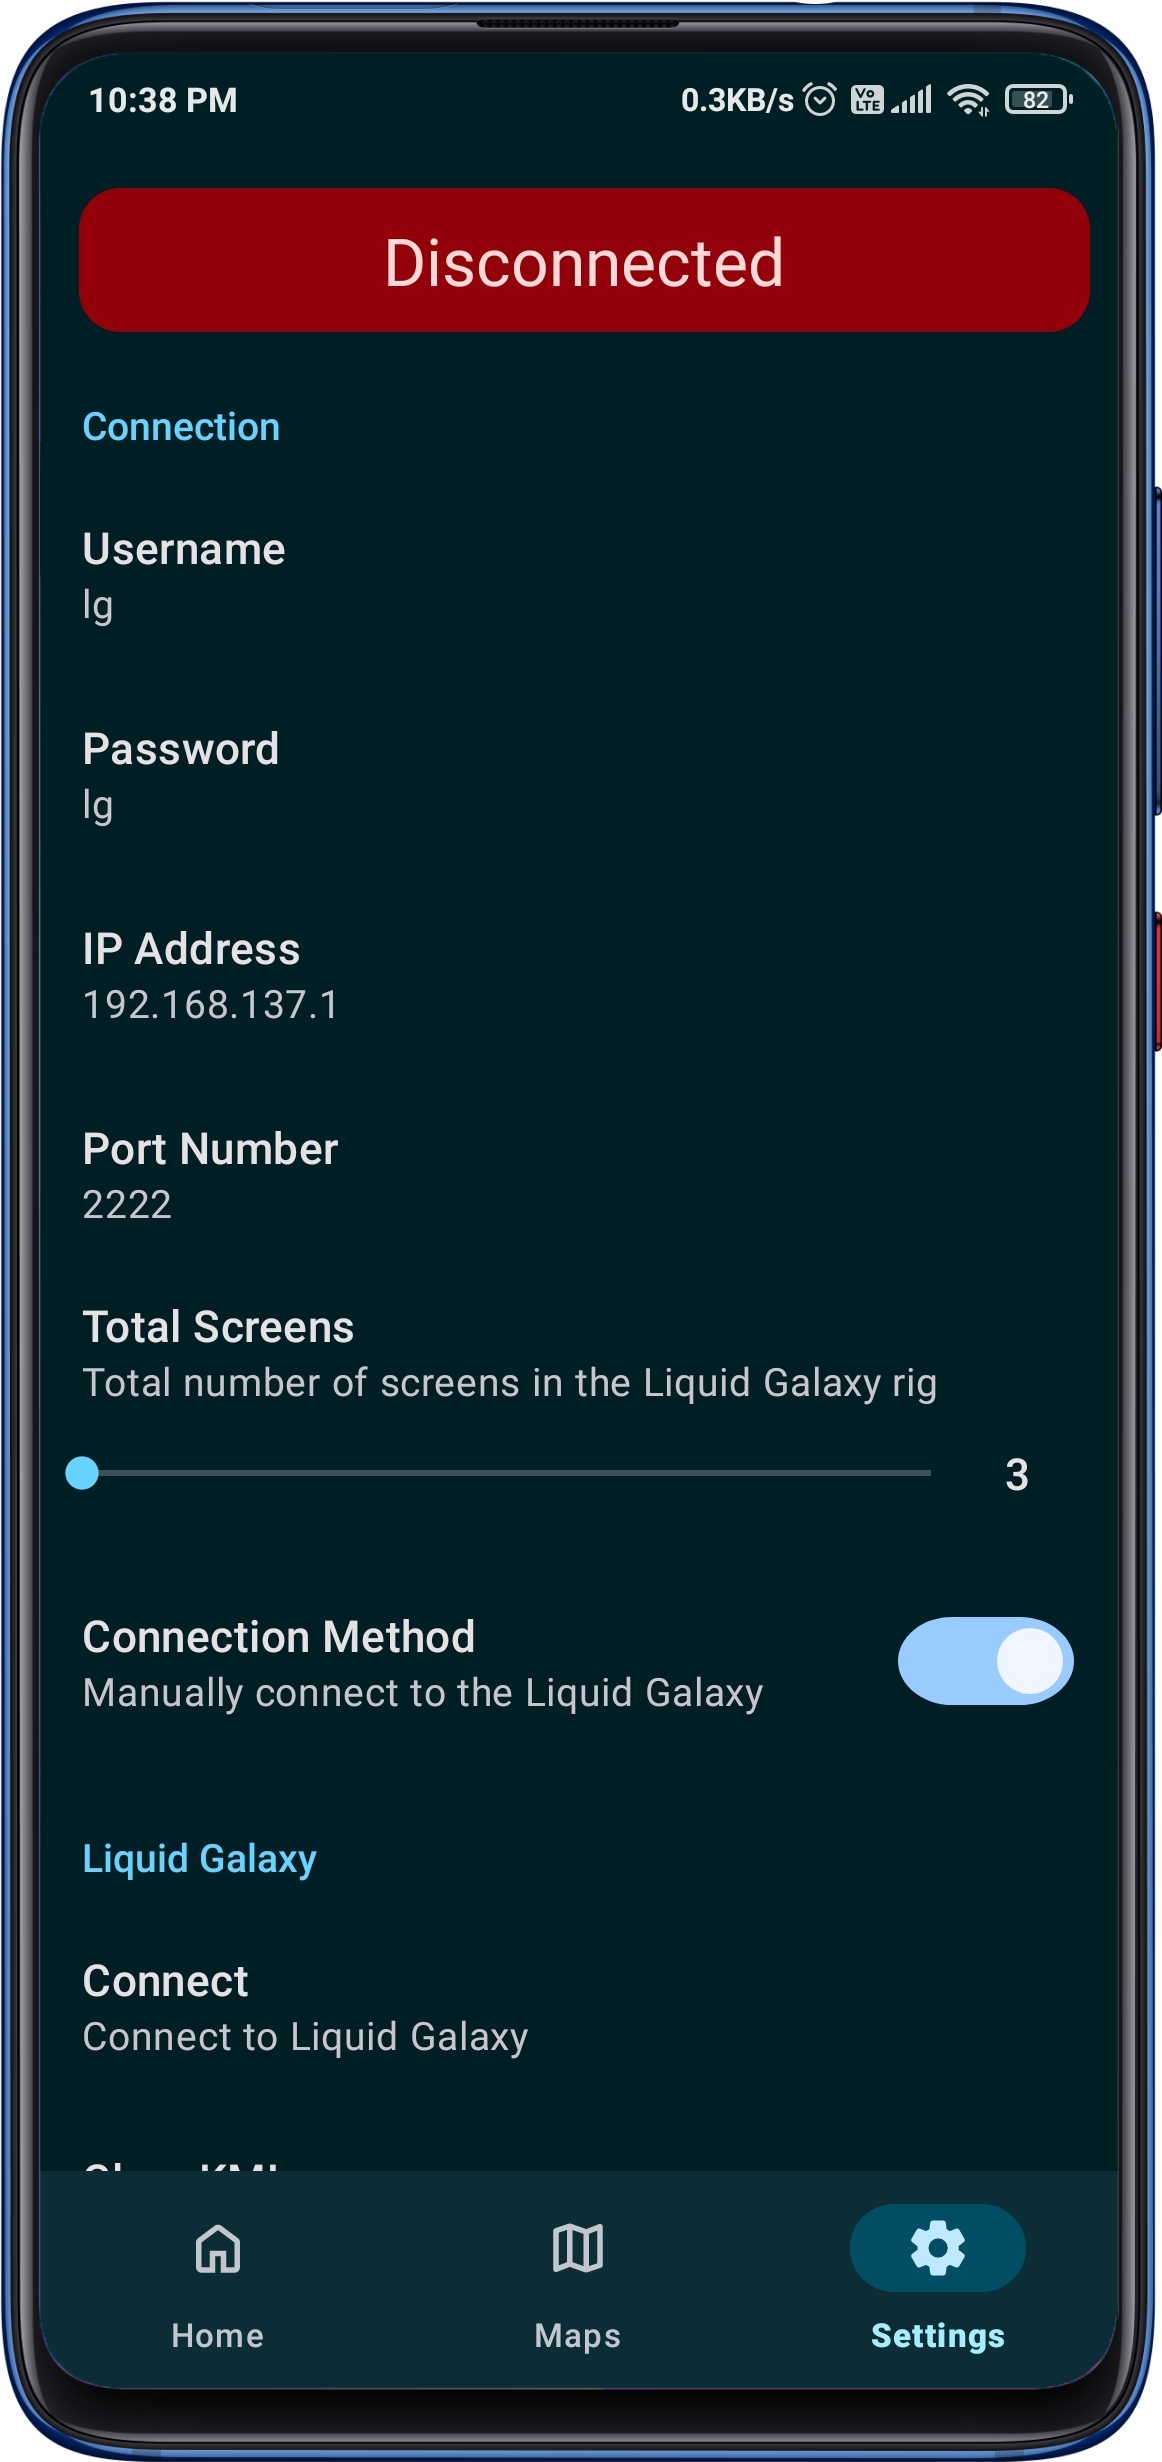
The incredible app designed to elevate your Liquid Galaxy experience like never before! With a seamless connection to your Liquid Galaxy rig, you can now control it remotely using facial expressions, voice commands, hand gestures, poses, and even object manipulation all at your fingertips!
The app utilizes the power of the Mediapipe API for recognizing and processing facial gestures, hand gestures, and body poses, making it easy for users to control their Liquid Galaxy experience through their Android device.
With Python 3 and LaTeX installed you can easily compile your project using the maketex script which simplifies the compilation progress, handles multiple source files and removes unnecessary files.
For most use-cases you only have to run ./maketex which compiles the main.tex file using pdflatex while looking for bibliography and glossary entries.
Latex
If (for some reason) you do not want to depend on the maketex script you can also use pdflatex, makeglossaries and bibtex from the shell.
pdflatex -shell-escape main	# Initial compilation
makeglossaries main 		# Compile glossaries
pdflatex -shell-escape main	# Progressive compilation for glossaries
bibtex main 			# Compile bibliography
pdflatex -shell-escape main	# Progressive compilation for bibtex
pdflatex -shell-escape main	# Progressive compilation for bibtex
TexStudio
In TexStudio a custom command can be added under Options → Configure TexStudio → Build → User Commands. The following line completely compiles a LaTeX file with glossaries, bibliography and minted.
Of course you can also add the maketex script as a user command but you might want to set -lm so TexStudio can find your log files and minted cache after cleanup.
Overleaf is a popular online latex editor and is also fully supported by this template. Just download the archived repository or latest release and upload as a new project.
Options
Options are added to the \documentclass command usually found in main.tex.
\documentclass[<option1>,<option2>,...]{protocol}
Option
Result
en
Set main document language to english
landscape
Change the page format to landscape orientation
minted
Add and configure minted package
natbib
Change bibtex backend to natbib
nobib
No bibliography
nofonts
No additional fonts
noglo
No acronyms and glossary
nologos
No logos on titlepage
notable
No table on titlepage
notitle
No titlepage
notoc
No table of contents
parskip
Skip a line instead of indenting after blank line
sans
Load sans-serif fonts
Variables
Variables are set as commands with their parameter being the variable value.
QuickCart is a full-fledged e-commerce web application built using Django and Tailwind CSS. It provides a user-friendly shopping experience with features like product management, cart functionality, order tracking, authentication, and more. The application is structured with rendered templates instead of an API-based implementation, ensuring a seamless user experience.
Features
User Management
User registration and login
Profile management with avatar upload
Password reset and change password functionality
Two-factor authentication (2FA) enablement
Product Management
Browse and search for products
View product details
Add, edit, and delete products (admin only)
Product reviews and ratings
Wishlist functionality
Shopping Cart & Checkout
Add and remove items from cart
Update cart item quantities
View cart details with total price
Checkout process with order summary
Address management for shipping and billing
Order Management
Place orders and track order status
View order history
Cancel orders if eligible
Order confirmation page
Payment processing simulation
Additional Features
Dark mode support
Responsive UI built with Tailwind CSS
Optimized database queries for performance
Admin dashboard for order and product management
Installation
Prerequisites
Ensure you have the following installed:
Python 3.8+
Django 4+
SQLite (default) or any supported database
Tailwind CSS (configured with Django reload)
Setup Instructions
Clone the repository:
git clone https://github.com/JunaidSumsaal/quickcart.git
cd quickcart
Create a virtual environment and activate it:
python -m venv venv
source venv/bin/activate  # On Windows use: venv\Scripts\activate
Install dependencies:
pip install -r requirements.txt
Apply database migrations:
python manage.py migrate
Create a superuser:
python manage.py createsuperuser
Run the development server:
python manage.py runserver
Open the application in your browser:
http://127.0.0.1:8000/
Project Structure
quickcart/
├── accounts/         # User authentication and profile management
├── cart/             # Shopping cart functionality
├── orders/           # Order management and tracking
├── products/         # Product catalog and reviews
├── templates/        # HTML templates organized by app
├── static/           # Static files including Tailwind CSS
├── core/             # Settings and configuration
├── manage.py         # Django management script
└── README.md         # Project documentation
Deployment
This project is configured for deployment on Render. To deploy:
Ensure environment variables are set for database and secret key.
Use a production-ready WSGI server like Gunicorn.
Set up Nginx as a reverse proxy.
Contributing
Contributions are welcome! Follow these steps:
Fork the repository.
Create a new branch: git checkout -b feature-branch
Commit your changes: git commit -m "Add new feature"
Push to the branch: git push origin feature-branch
Super-duper low cognitive overhead matching for Python developers reading or writing tests. Implemented fully in modern & typed Python, without any dependencies. Runs and passes its tests on most Pythons after 3.6. PyPy works fine too.
pychoir has mostly been developed for use with pytest, but nothing prevents from using it in any other test framework (like vanilla unittest) or even outside of testing, if you feel like it.
You can also check many things about the same value: for example IsInstance(int) & 5 will make sure that the value is not only equal to 5, but is also an int (goodbye to accidental 5.0).
You can place a matcher almost anywhere where a value can be. pychoir matchers work well inside lists, tuples, dicts, dataclasses, mock call assertions… You can also place normal values inside matchers, and they will match as with traditional == or !=.
A core principle is that pychoir Matchers are composable and can be used freely in various combinations. For example [LessThan(3) | 5] is “equal to” a list with one item, holding a value equal to 5 or any value less than 3.
Can I write custom Matchers of my own
Yes, you can! pychoir Matcher baseclass has been designed to be usable by code outside the library. It also takes care of most of the generic plumbing, so your custom matcher typically needs very little code.
Here is the implementation of IsInstance as an example:
All you need to take care of is defining the parameters (if any) in __init__(), the match itself in _matches(), and a description of the parameters in _description().
Here is an even simpler Anything matcher that does not take parameters and matches literally anything:
If your custom matcher is generic enough to be useful for everyone, please contribute (fork and make a pull request for now) and have it included in pychoir!
Nothing wrong with hamcrest as such, but pychoir aims to be better integrated with natural Python syntax, meaning for example that you do not need to use a custom assert function. pychoir matchers are drop-in replacements for your normal values alone or inside structures, even deeply nested ones. You can use hamcrest matchers through pychoir if you like, wrapping them in the Matches(my_hamcrest_matcher) matcher, although the idea is that pychoir would soon come with an equivalent set of matchers.
What a nice fluent API for matching, allowing matching multiple things at once. However, you can only match one value at a time. With pychoir you’ll be matching the whole result at once, be it a single value, list, tuple, dict, dataclass, you name it. Let’s see if pychoir gets some of that fluent stuff going forward as well.
???
I’d be happy to hear from you about other similar libraries.
What is it based on?
Python has a rather peculiar way of handling equivalence, which allows customizing it in wild and imaginative ways. This is a very powerful feature, which one should usually avoid overusing. pychoir is built around the idea of using this power to build a lean and mean matcher implementation that looks like a custom DSL but is actually completely standard Python 3.
What is the project status?
pychoir has quite a vast range of Matchers built in as well as basic API Reference documenting them. New ideas are still plenty and more can be discussed in Discussions. Documentation will receive updates as well. Most remarkably fancy examples are missing. Making pychoir easier to contribute to is also on the list.
Where does the name come from?
It comes from the French word pochoir which means a drawing technique using templates. For some reason this method of matching in tests reminds me of drawing with those. A French word was chosen because it happens to start with a p and a vowel 😉
MediCamp is a Medical Camp Management System (MCMS) built with the MERN stack. It is designed to help organizers and participants seamlessly manage medical camps. The platform provides tools for registration, payment, feedback collection, and detailed camp analytics, ensuring a smooth and efficient experience for all users.
User Authentication: Secure login and registration with support for email/password and social logins.
Home Page: A vibrant banner section showcasing impactful camp success stories, popular camps, and feedback from participants.
Popular Camps Section: Displays the top six camps based on participant counts, with detailed information and a “See All Camps” button.
Available Camps Page: Allows users to view all camps, search by keywords, and sort based on criteria such as participant count, fees, and alphabetical order.
Organizer Dashboard:
Add A Camp: Organizers can add camps with details like name, date, fees, location, and description.
Manage Camps: View, edit, or delete camps using intuitive controls.
Queries data via your existing REST API with adaptable query drivers
Stores state and data within Redux’ reducers automatically
Respects and manages caching
And, best of all, passes fetched data and loading state into your components
What does that mean?
Never define an action for loading data again. And also, never write a
reducer again. Which means no normalization of data! And no writing reselect
queries! It happens automatically for you.
Cool. How do I use it?
First you need to define some models to hold and query data:
import{Model}from'tectonic';classUserextendsModel{// modelName is important; it's used to differentiate modelsstaticmodelName='user';// fields are used to create an immutable.js record which holds data for an// instance of a model. All fields must be defined here with defaultsstaticfields={id: 0,email: '',name: '',}// idField defines which field is used as the model identifier. This defaults// to 'id' and should only be set if it's different.// Note that a model must always have an ID; this is how we look up data in// reducer.staticidField='id';}
Then you define your REST API as sources. It’s quick and easy, but let’s skip it
to get to the juicy part. Which is declaratively asking for data!
Check it out (I’ll tell you what’s going on after):
importReact,{Component,PropTypes}from'react';importload,{Status}from'tectonic';import{User,Post}from'./models.js';// your modelsconst{ instanceOf, arrayOf, shape, string }=PropTypes;
@load((props)=>({user: User.getItem({id: props.params.userId}),posts: Post.getList({email: props.user.email})}))classUserInfoextendsComponent{staticpropTypes={// btw, these are the same keys we passed to '@load'user: instanceOf(User),posts: arrayOf(instanceOf(User)),status: shape({user: instanceOf(Status),// Status is a predefined Tectonic class :)posts: instanceOf(Status),})}render(){const{ status }=this.props;if(status.user.isPending()){return<Loading/>;}// ...}}
Hella cool right?! Here’s what’s happening:
You say what props you want within the @load decorator. The @load decorator
gets the component’s props, so you can use props in the router or from parents
to load data.
Plus, it automatically handles what we call “dependent data loading”. Here, posts depends on the user’s email. We don’t get that until the user has
loaded. Don’t worry; this is handled automatically behind the scenes.
Tectonic also adds loading statuses for each of the props to your component!
You can see whether it’s pending, successful, or errored using built in
functions (the actual status is at .status, so this.props.status.user.status). Plus, if there’s errors, you get the error
message at .error, so this.props.status.user.error. Same goes for the HTTP
code.
And as a bonus all of the requests are automatically cached and stored according
to the server’s cache headers. So if your server tells us to store something for
an hour we’re not going to make a request for this data for, like, one hour and
one minute!
Super, super basic interface, and super, super powerful stuff behind the scenes.
I know, not as cool as GraphQL and relay. But still, if you gotta REST you gotta
deal, baby.
Bonus: Guess what? If three components asked for the same data we’ll
automatically dedupe requests for you. We’ll only ask the API once. So don’t
worry. Spam @load like you’re obsessed!
Mind blown. You mentioned defining API endpoints as sources?
That’s right. See, behind the scenes we need to figure out how to actually load
your data. This is done by a “resolver”.
In order for us to figure that out you need to tell us where your endpoints are;
what they return; and what required parameters they have.
Here’s an example:
import{Manager,BaseResolver}from'tectonic';importTectonicSuperagentfrom'tectonic-superagent';// Step 1: create your manager (which brings everything together)constmanager=newManager({resolver: newBaseResolver(),drivers: {// Drivers are modular functions that request data for us.// This one uses the awesome superagent ajax library.// See packages/tectonic-superagent for more info :)fromSuperagent: newTectonicSuperagent(),},
store,// Oh, the manager needs your redux store});// Step 2: Define some API endpoints as sources.// Note that each driver becomes a function on `manager` - this// is how we know which driver to use when requesting data.manager.drivers.fromSuperagent([// Each driver takes an array of API endpoints{// LMK what the endpoint returns. In this case it's a single// user item.returns: User.item(),// To get a single user the API endpoint needs a user's IDparams: ['id'],meta: {// meta is driver-specific. In this case the superagent driver// needs to know the URL of the API endpoint. It's going to// replace `:id` with the ID parameter when loading data.url: '/api/v1/users/:id',}},{// This returns a list of postsreturns: Post.list(),// Each param item is the name of the param you pass into @load. EG:// @load({// posts: Post.getList({ userId: 1 })// })params: ['userId'],meta: {url: '/api/v1/users/:userId/posts',},},]);
A lot of concepts.
The manager makes everything tick. It passes “queries” from @load into the
“resolver”, which then goes through your sources above to figure out which
requests to make.
Once we’ve got data, the manager takes that and puts it into the cache, which is
an abstraction over a Redux reducer in the store to manage caching.
What happens if I make a request without a source?
We’ll throw an error which you can see in your console. Also, we use the debug npm package which you can enable via:
tdebug.enable('*');
How do I add the manager to my app?
Wrap your app with a component which passes context. We call it a “loader”:
import{Provider}from'react-redux';import{Loader}from'tectonic';importstorefrom'./store.js';importmanagerfrom'./manager.js';// your manager with sources definedconstApp=()=>(<Providerstore={store}><Loadermanager={manager}>{/* Your app goes here */}</Loader></Provider>);exportdefaultApp;
Sweet potato. But can I CRUD?
Hell yeah baby!
The @load decorator also adds a query function to your components:
@load()// just gimme these functions please!classYourFormextendsComponent{staticpropTypes={query: PropTypes.func,}// imagine onSubmit is called with an object containing model// data...onSubmit(data){// Each function takes two arguments: an object of options and a// second callback for tracking the status of the request this.props.query({model: User,body: data,queryType: 'CREATE',// tells us to use a source definition to CREATE a model},this.afterSubmit);}afterSubmit=(err,result)=>{if(err!==null){// poo 💩return;}}}
💥💥💥! This is automatically gonna populate the cache, too.